

"What can you print on" has a much longer answer than most people expect. A UV printer will put full colour on metal, glass, acrylic, wood, leather, ceramic and a phone case. A sublimation printer needs either polyester fabric or a blank sold with a polymer coating, which is a much narrower list.
On those it produces the best fabric print there is — on polyester only.
The confusion comes from thinking of it as one decision. It is two. You choose a method, which commits you to a consumable set, and you choose a substrate to print onto. Whether those two are compatible is the whole question.
This guide works through the printable materials one surface at a time — what method each one takes, whether it needs a coating first, and what you will actually be buying.
Key Takeaways
- Rigid surfaces — metal, acrylic, wood, glass, ceramic, leather — are UV printing territory. UV ink cures as a physical layer, so it does not care whether the surface is porous.
- Glass and glazed ceramic usually need a primer before UV ink will hold. The requirement depends on the ink and the blank, so check the ink maker’s guidance and test adhesion.
- Sublimation needs polyester. On 100% cotton there is no polymer for the dye to bond into, so the print washes out — no setting fixes that.
- Curved and awkward objects are usually easier as a UV DTF transfer than as a direct print, because a sticker conforms where a print head cannot reach.
What Decides Whether a Material Is Printable

Printability is not about hardness or thickness. It comes down to one question: does the ink have something to hold on to?
Ink that cures on the surface
UV ink is liquid until a lamp cures it, at which point it becomes a solid layer sitting on the material. Because it never needs to soak in, it works on surfaces that absorb nothing at all — metal, acrylic, stone.
That layer has real thickness, which is why UV prints can be built up into texture and why a white underbase matters on dark or clear stock. Our UV printing explainer covers the mechanics.
Dye that bonds into the fibre
Sublimation is the opposite. Heat turns solid dye straight to gas, the polyester opens up, and the gas bonds inside the fibre. There is no layer and no hand feel — the colour is part of the fabric.
The catch is in the mechanism: it needs a polymer to bond into. That single fact explains why sublimation is unbeatable on polyester and useless on cotton. See how sublimation works for the full process.
Surfaces that need a coating first
Glass, glazed ceramic and bare metal are too smooth and too sealed for ink to key into. A primer or an adhesion promoter gives the ink something to bond to on a surface that would otherwise shed it. How it does that differs by product, so follow the primer’s own instructions rather than a general rule.
It takes very little time to apply, and it is often the difference between a print that stays put and one that lifts at a fingernail.
Every printable material at a glance
The quick reference before the detail. "Coated only" means the blank has to be bought with a polymer coating already on it.
| Material | UV printing | UV DTF | DTF | Sublimation | HTV / screen |
|---|---|---|---|---|---|
| Anodized or coated metal | Yes | Yes | No | Coated only | No |
| Bare metal | Usually with primer | Yes | No | No | No |
| Acrylic | Usually direct | Yes | No | No | No |
| Glass | Usually with primer | Yes | No | Coated only | No |
| Wood and plywood | Yes | Yes | No | Coated only | No |
| Glazed ceramic and tile | Usually with primer | Yes | No | Coated only | No |
| Leather and PU | Yes | Yes | No | No | HTV yes |
| Phone cases and other flat-backed items | Flat bed, no rotary | Yes | No | Coated only | No |
| Tumblers and bottles (clean cylinders) | Rotary, or a UV DTF transfer | Yes | No | Coated only | No |
| Cotton fabric | No | No | Yes | No | Yes |
| Polyester fabric | No | No | Yes | Yes | Yes |
| Cotton/poly blends | No | No | Yes | Partial | Yes |
| Canvas and denim | No | No | Yes | No | Yes |
| Paper and card | Yes | Yes | No | No | No |
| Silicone and PTFE | No | No | No | No | No |
Combinations That Will Not Bond
Everything after this is a question of matching method to surface. This section is about the pairings that fail at the bonding stage rather than at the settings stage.
They are failures of a substrate and a method together, with the equipment and inks covered in this guide. A different ink set or an industrial pre-treatment can change the answer.

Unprimed glass and glazed ceramic top the list, because the print looks perfect coming off the bed. The failure shows up later, when a fingernail or a dishwasher takes the whole graphic off in one piece.
Sublimating cotton is the other classic. The press cycle runs, the paper looks spent, and the shirt comes out pale — then washes to nothing. There is simply no polyester for the dye to enter.
Silicone and PTFE are engineered to shed everything, primer included. Open-weave and heavily textured fabric fails differently: the ink or film bridges across the gaps rather than bonding into them, and it cracks at the first stretch.
Test adhesion before you run a batch. Print one piece, cure it fully, wait an hour, then attack the edge with a fingernail and a strip of tape. Thirty seconds of that saves a tray of coasters. On glass and ceramic, run the same test with and without primer so you can see what it is doing.
Printing on Metal

Metal is the most-searched printable surface, and the alloy matters far less than what sits on top of it. Anodized aluminum and powder-coated steel already have a receptive layer, so UV ink bonds directly and cures hard.
Bare, polished metal is a different job. It is sealed and slick, so a primer or adhesion promoter goes down first. Business cards, tags, tool plates and signage are the common outputs.
Sublimation on metal only works on panels sold with a polymer coating — the print goes into the coating, not the metal. Buying uncoated aluminum for a sublimation job is a guaranteed blank.
Printing on Acrylic

Acrylic is the easiest rigid surface there is. UV ink normally keys into it without a primer, cures glossy, and the result is dimensionally stable. Preparation is not nothing, though: clean the sheet and pull the release film, because fingerprints and film residue are the usual cause of a patchy cure.
The one technique worth learning is the white underbase. Colour ink is semi-transparent, so on clear or dark sheet you lay white first and print colour on top of it, exactly as you would on a dark shirt.
Clear acrylic also allows reverse printing: print mirrored on the back face, and the viewer sees the graphic through polished acrylic. It gives a glass-like depth that is hard to get any other way.
Printing on Glass

Glass is where most first attempts go wrong. It is non-porous, chemically sealed and perfectly smooth — there is nothing for cured ink to mechanically grip.
A primer wipe is the usual answer: wipe, let it flash off, print, cure. It takes very little time, but treat it as a step to verify rather than a guarantee — adhesion still depends on the ink set and the blank, so test one piece. Glazed ceramic has the same problem for the same reason; whether the same primer is rated for both surfaces is a question for the product’s own instructions, not an assumption.
For drinkware, a UV DTF sticker is often the better route than a direct print: the transfer wraps a curved wall without needing a rotary. How it holds up to washing depends on the film and the ink, so test a piece before promising anything.
Printing on Wood

Wood normally takes UV ink directly without primer, which makes it a good place to start. What it does do is absorb — raw timber and plywood pull a little ink into the surface, so colours read softer.
If you want saturation, sand smooth and seal first. If you want the grain to show through as part of the design, print straight onto the bare surface and let it.
Knots, resin pockets and heavy grain all telegraph through a light print. On plywood, void-free sheet gives a flatter and more predictable face than construction stock, which matters because a warped panel changes the head height mid-pass.
Printing on Ceramic and Tile

Glaze is a glass layer. That means glazed tiles, plates and mugs behave much like glass under a UV printer — prime first, then print, and check that the primer you have is rated for glaze.
Unglazed terracotta is the opposite problem: so porous that it drinks ink and goes flat. Sealing it before printing evens the surface out.
For mugs specifically, sublimation on a poly-coated blank is still the standard route, though how it handles a dishwasher depends on the blank’s coating. That is a coating job rather than a ceramic job — you are printing into the polymer.
Printing on Leather

Leather prints better than people expect. Both vegetable-tanned hide and PU accept UV ink without primer, and the slightly textured surface hides minor imperfections.
The constraint is flex. Cured UV ink is rigid, so a graphic printed across a wallet fold or a watch strap will eventually crack along the crease. Print flat panels before assembly and keep the artwork off the fold line.
For apparel-weight leather patches, HTV is the alternative — it stays flexible through wash and wear. Our guide to how HTV works covers the trade-off.
Printing on Paper, Card and Packaging

Paper and card are porous, so they take UV ink without any preparation. On a rigid UV printer they behave like the easiest substrate in the guide.
What UV brings that a conventional press does not is finish. A spot varnish pass adds selective gloss, and layering ink builds genuine raised texture — useful on business cards, invitations and packaging where the tactile detail is the selling point.
The one limit is ink load on thin stock. Heavy coverage can cockle lightweight paper as it cures, so move up in weight or lighten the coverage rather than fighting it.
Printing on Curved and Uneven Objects

A print head needs a consistent distance to the surface. Curves, steps and lips break that, which is why a flat-bed UV printer struggles on anything that is not, well, flat.
Two ways round it. A rotary attachment turns cylindrical parts under the head, which handles tumblers, bottles and pens. Or you print a UV DTF transfer flat and apply it to the object afterwards — no jig and no head-height problem, and it reaches shapes a rotary cannot. How well it follows a surface depends on the curvature and the size of the graphic — a tight compound curve will still wrinkle.
UV DTF is the more flexible answer for mixed small-batch work. The difference between it and standard DTF is covered in DTF versus UV DTF.
Printing on Fabric: Cotton, Polyester and Blends

Fabric is the one area where the material dictates the method with no room to negotiate, and the dividing line is fibre content.
Polyester
Sublimation, and nothing else comes close. The dye becomes part of the fibre, so there is no layer to feel, nothing to crack, and no edge to peel. On white polyester it gives a very soft result, because there is no deposited layer at all.
The limits are colour and lightness: you cannot sublimate white ink, so a dark garment is out. Press temperatures and dwell times are in our heat sublimation guide.
Cotton
Sublimation is off the table. The working options are DTF, DTG, HTV and screen printing, and each sits at a different point on the run-length curve.
DTF has become the default for small batches because it works on any fibre content and needs no pretreatment. DTG gives a softer hand on cotton specifically but needs the garment pretreated first — compared side by side in DTG versus DTF.
Blends, canvas and denim
Blends are where DTF earns its place: it does not care about the ratio. Sublimation on a 50/50 blend technically works but gives a washed-out, vintage result — sometimes the effect you want, usually not.
Canvas and denim are heavy and textured, so press pressure matters more than usual. For a broader look at the apparel side, our overview of types of printing on shirts compares all six methods on feel and durability.
Choosing the machine rather than the material is a different question, answered in the beginner sublimation printer guide and the screen printing film printer guide.
The Supplies Each Method Needs
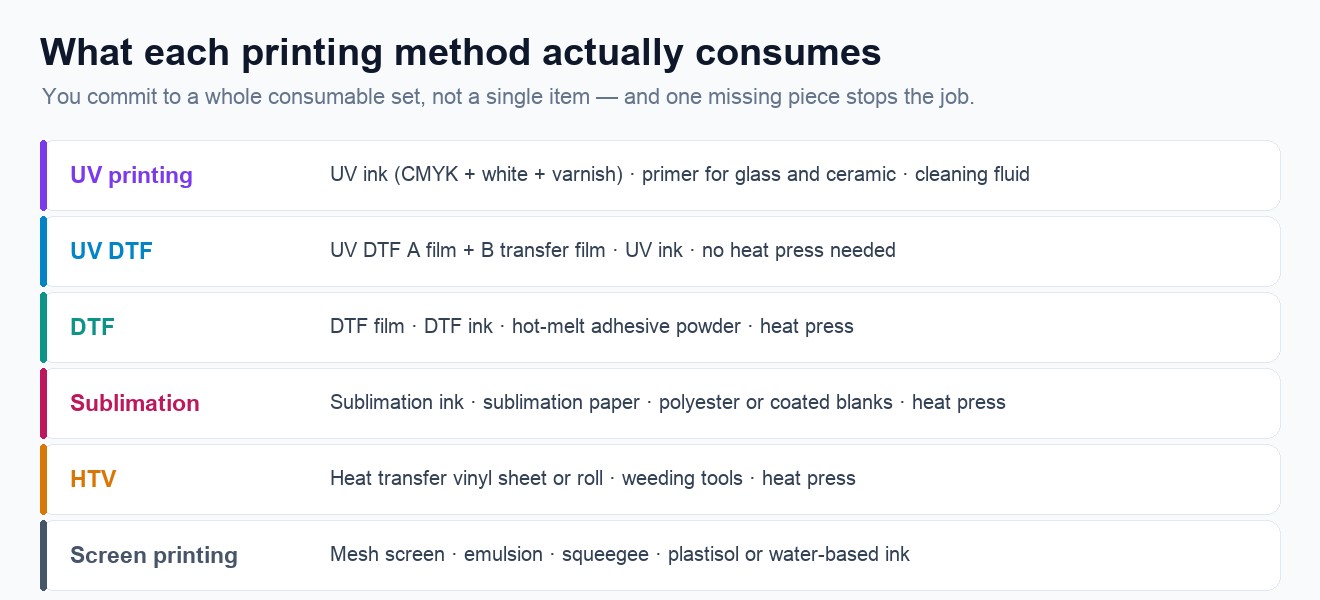
This is the part that catches people out when they buy their first printer. You are not buying a material, you are committing to a consumable set — and a single missing item in that set stops the job entirely.
In the Materials Lab these sit on the Accessories tab rather than the Official tab, because consumables have no tested power-and-speed values to record — you set the press temperature and dwell time instead.
UV printing
UV ink in CMYK plus white and a clear varnish, a primer for glass and glazed ceramic, and cleaning fluid for the head. The white and the varnish are what most beginners forget to budget for.
UV DTF
An A film that receives the print and a B film that transfers it, plus the same UV ink. No heat press — the transfer is applied by pressure, which is why it suits curved objects.
DTF
DTF film, DTF ink, hot-melt adhesive powder, and a heat press. The powder is the step people underestimate: it is what actually bonds the print to the fabric, and uneven application shows up as patchy adhesion after a wash.
Sublimation, HTV and screen printing
Sublimation needs sublimation ink, sublimation paper, a heat press, and polyester or coated blanks. HTV is the simplest set of all — a sheet or roll, a weeding tool and a press — and our HTV picks cover which to buy. The heat transfer vinyl page covers the finishes and how to read the press settings; time, temperature, pressure and peel type all come from the roll you buy rather than from a single table.
Screen printing is the most involved, and there are two routes. The traditional one needs mesh screens, photo emulsion, a squeegee, ink and a way to expose and cure. The other uses a polyester fast-engrave screen with the stencil lasered straight into the mesh, which removes the emulsion and UV exposure steps — so check which route you are buying for before ordering emulsion. High setup cost per design, lowest cost per unit at volume — the economics are in what screen printing is. The screen printing supplies page puts the mesh counts and ink families side by side.
How Long Does a Print Last?
Durability is the question buyers actually care about, and it is a property of the method-plus-substrate pair rather than of the printer. The same UV printer produces a permanent mark on acrylic and a peeling mess on unprimed glass.

Hard goods
A cured UV print on metal or acrylic lasts years indoors and takes a fingernail without marking. A clear varnish pass adds abrasion resistance where the piece gets handled.
On primed glass and glazed ceramic makers report good durability in use. We have not run dishwasher testing, so treat any specific claim as something to verify on your own combination. Without primer, failure on early contact with water is the common report — the same failure mode described earlier, arriving later than you would like.
Fabric
Sublimation on polyester has no layer to fail — the dye is inside the fibre rather than sitting on top of it.
DTF holds up through repeated washing when the adhesive powder is evenly applied and the press pressure is right; patchy powder is the usual cause when a print starts lifting. HTV lifts at the corners first when it does fail. We have not wash-tested any of these ourselves, so treat both a specific wash count and any ranking between the methods as something to verify on your own blank and press.
Outdoor use
UV ink is more UV-stable than most people assume, but sustained direct sunlight still fades it. How long it holds depends on the ink, the exposure and the substrate, so go by the manufacturer’s outdoor rating for the ink you use rather than a general figure. For outdoor signage, a laminate or varnish layer is the usual way to extend it.
Which Method for Which Material

Rigid and flat. Metal, acrylic, wood, tile, leather panels, paper. UV printing, direct. Add primer on glass and glaze, and remember the white underbase on anything clear or dark.
Rigid and awkward. Tumblers, bottles, phone cases, helmets. UV DTF as a transfer, or direct UV with a rotary if the part is a clean cylinder.
When the job is fabric, fibre content decides before anything else does: polyester goes to sublimation, cotton and blends go to DTF, and a big run of a two-colour design goes to screen printing because the per-unit cost collapses.
Mixed product line. If you are making both hard goods and apparel, UV plus DTF covers almost everything between them, and that pairing needs the fewest separate consumable sets.
Buy the whole set at once. Every method has one item that is easy to skip and impossible to work without — white ink on UV, adhesive powder on DTF, primer on glass, coated blanks on sublimation.
Ordering the printer and the ink but not that third item is the most common reason a new setup sits idle for a week.
Final Thoughts

Every awkward case in this guide comes back to one question: does the ink have something to hold on to? Once that is the question you ask first, the material list stops being a list of exceptions.
Glass is sealed and slick, so most UV ink sets need a primer on it. Cotton refuses sublimation because it has no polymer to bond into. A tumbler wants a transfer because a print head cannot follow a curve. None of those are quirks — they are the same rule showing up in three places.
And whatever a guide tells you a surface should do, prove it on one piece first. A cured test print and thirty seconds with a strip of tape costs almost nothing and settles the question for that exact substrate, ink and press. For finished-product inspiration, browse our UV printing project ideas.
Frequently Asked Questions about Printable Materials
What materials can a UV printer print on?
Metal, acrylic, wood, glass, ceramic, tile, leather, PU, stone, paper, card and most rigid plastics. UV ink cures as a layer on the surface rather than soaking in, so porosity does not matter. Glass and glazed ceramic usually need a primer first; the rest of that list normally takes ink directly, depending on the ink you run.
Can you sublimate on cotton?
No, not durably. Sublimation dye bonds into polyester, and cotton has no polymer for it to enter, so the print looks pale coming off the press and washes out. Poly-coated cotton blanks and polyester-coated transfers exist as workarounds, but on plain cotton use DTF, DTG, HTV or screen printing instead.
Do you need a primer to print on glass?
Usually. Most UV ink sets need one on glass, because the surface is non-porous and gives cured ink little to grip, though a few coated blanks do not. A primer wipe takes seconds, and without it peeling in whole sheets is the common report. The same applies to glazed ceramic and bare polished metal.
What is the best way to print on a curved object?
A UV DTF transfer, in most cases. You print flat onto film and apply it to the object, so no jig is needed and the transfer reaches shapes a rotary cannot. How well it follows the surface depends on the curvature and the size of the graphic — a tight compound curve will still wrinkle, so keep graphics small on those. For clean cylinders like tumblers and bottles, a rotary attachment under a UV printer also works and gives a slightly crisper result.
Can you print on metal without a special coating?
On anodized aluminum and powder-coated steel, yes — those surfaces already hold UV ink. Bare polished metal needs a primer or adhesion promoter. Sublimation is different again: it only works on panels sold with a polymer coating, because the image goes into the coating rather than the metal.
Which printing method works on the most materials?
UV printing for hard goods, and DTF for fabric. Between them they cover almost every substrate in this guide, which is why that pairing is the common setup for a shop selling both hard goods and apparel. Sublimation covers fewer materials but gives the best result on the ones it does.
Why does my print peel off after washing?
Work through the whole chain rather than assuming one cause: the substrate and its preparation, the ink or film, the cure, and the press. On glass, ceramic and bare metal a missing primer is the common report, but under-curing looks much the same. On fabric it is usually uneven adhesive powder, press pressure or temperature, or the wrong method for the fibre content. Change one variable at a time, and run a tape-and-fingernail test on one piece before committing a batch.
Get the whole consumable set, not half of it
Ink, film, powder, primer, screens and blanks — grouped by printing method so nothing is missing when the printer arrives.
