
Sublimation is a printing process where solid dye turns straight into gas under heat and bonds into the surface of a material, rather than sitting on top of it as a layer of ink. Nothing is added to the surface, so the print cannot be felt, peeled, or cracked.
This guide covers what sublimation is and how the process runs, what it works on and what it refuses to work on, real pieces made with it, and how it compares with the other ways of decorating a product.
Browse sublimation designsFree downloadable designs from the Atomm community, ready to print and press.See the designsKey Takeaways
- Sublimation turns solid dye directly into gas, which bonds into the material instead of coating it.
- It only works on polyester and polymer-coated surfaces — cotton and bare wood will not hold it.
- There is no white ink, so the material has to be white or very light to start with.
What Is Sublimation?
In chemistry, sublimation is a substance passing from solid to gas without becoming liquid first — dry ice is the everyday example. Sublimation printing borrows both the name and the physics.

Special dye is printed onto transfer paper, then heat and pressure convert that dye to gas. The gas passes into the surface of the material, which has itself expanded slightly under the heat, and is trapped there as the material cools.
That is the whole reason sublimation feels different from every other printing method. There is no ink layer, no adhesive, and no vinyl. The colour becomes part of the substrate.
It also explains the constraint that catches everyone out: the process needs something the gas can bond into. Polyester and polymer coatings accept it; natural fibres and bare surfaces do not.
How Sublimation Printing Works
Four stages, and the middle two happen in the same thirty to sixty seconds.
Step 1: Print the design onto sublimation paper
A sublimation printer loaded with sublimation dye prints the design mirrored onto coated transfer paper. The print looks dull and wrong-coloured at this stage — that is expected.
Step 2: Press the paper against the blank
Heat press at roughly 190–200°C with firm, even pressure. The exact settings depend on the substrate, and blanks are usually sold with a recommended time and temperature.

Step 3: Let the dye gas into the surface
Under heat the polymer opens and the gaseous dye moves into it. This is the part that cannot be rushed — a short press gives washed-out colour that no amount of re-pressing fixes.
Step 4: Peel and cool
Remove the paper while hot and let the item cool. The colour shifts noticeably as it cools, jumping from the dull printed tone to full saturation.
The print looking wrong is normal
Sublimation ink is muted and often visibly off-colour on the transfer paper. It only reaches its real colour after pressing. Judging the design by the printout is the most common beginner mistake.
How to Sublimate: A Practical Walkthrough
The process explanation above is what happens physically. This is what you actually do, start to finish, the first time.
Step 1: Match the blank to the design
Buy a blank sold specifically for sublimation, and check it is white or very pale. This decision is made before anything else, because the substrate is the one thing the process cannot work around.
Step 2: Size and mirror the artwork
Set the design to the finished dimensions and flip it horizontally. Forgetting to mirror is the single most common wasted blank, and it is not recoverable once pressed.
Step 3: Print onto the coated side of the paper
Sublimation paper has one printable side. Printing on the wrong face puts the dye where it cannot release, so the transfer comes out pale and the paper sticks.
Step 4: Tape the paper down and press
Heat-resistant tape stops the paper shifting mid-press, which would ghost the image. Use the time and temperature the blank supplier specifies rather than a generic setting.
Step 5: Peel hot, then let it cool
Lift the paper away immediately and leave the item untouched while it cools. The colour deepens noticeably during cooling — that shift is the process finishing, not a fault.
Test on the cheapest blank you own
Time and temperature vary by substrate, and every press runs slightly hot or cold. One test press on a spare coaster calibrates the whole batch and costs less than a single ruined tumbler.
What Sublimation Works On
The rule is simple and unforgiving: the surface must be polyester or polymer-coated, and it must be light.
| Material | Works? | Why |
|---|---|---|
| Polyester fabric | Yes | The fibres themselves accept the dye |
| Poly-cotton blends | Partly | Only the polyester takes colour, so it looks faded |
| 100% cotton | No | Natural fibres cannot bond the dye |
| Coated mugs and tumblers | Yes | The polymer coating is what holds it |
| Coated metal and slate | Yes | Same coating, applied by the blank maker |
| Bare wood, glass, or ceramic | No | Nothing for the gas to bond into |
| Dark or coloured surfaces | No | There is no white ink; the material supplies the white |
That last row is the constraint people underestimate. Sublimation dye is translucent, so a design on a black shirt simply will not show. If the item is not white or very pale, this is the wrong process.
“Sublimation blank” is a real category
Mugs, coasters, keychains, and plaques sold as sublimation blanks already carry the polymer coating. An uncoated version of the identical item will produce nothing at all, which is why buying the right blank matters more than the printer.
Good Sublimation Projects and Designs
Five community pieces that each use the process for something it is uniquely good at. All are downloadable designs.
1. Mom Fuel Sublimation Coffee Cup Sleeve

A coffee cup sleeve printed edge to edge in full colour. Sublimation earns its place on small items like this because the design wraps the whole surface with no border, no cut line, and no edge you can catch a fingernail on.
Get this design →2. Gaming Dice tray sublimated onto wooden base.

A gaming dice tray with a detailed illustration sublimated onto a wooden base. The wood had to be coated first — that coating, not the wood, is what holds the image, and it is the step people skip when they wonder why bare timber gives nothing.
Get this design →3. Sublimated Picture Cut out

A photograph sublimated onto board and cut to the outline of the subject as a standing display. Continuous tone is where sublimation beats vinyl outright — there are no colour layers to align, so a photo transfers as easily as a logo.
Get this design →4. Mom Sublimated Wooden Magnet/Coaster

A wooden magnet and coaster printed with dense text and a handwritten note. Fine lettering survives because nothing is physically deposited on the surface, so there is no minimum stroke width the way there is with vinyl.
Get this design →5. Sublimation Film Roll Keychain

A keychain shaped like a film strip, with a photograph in each frame. The pairing here is the point — the shape is laser cut and the image is sublimated, which is how most makers actually combine the two processes.
Get this design →Good Sublimation Machines
Four printers covering the realistic range, plus the press that every one of them needs. A sublimation printer on its own finishes nothing.
1. Sawgrass SG500
Best first sublimation printer
Sawgrass builds printers for sublimation rather than adapting office machines, and the SG500 is the model most people start on. It is designed around the failure mode that ends most sublimation setups: clogged heads.
Its No-Clog system pairs dual printheads with automatic maintenance cycles, which matters because sublimation ink dries in the nozzles when a printer sits unused between orders.
Pros
- Purpose-built for sublimation, not converted
- Automatic maintenance prevents clogs
- Three-year or 100,000-print warranty
- Compact enough for a desk
Cons
- Costs more than a converted inkjet
- Locked to Sawgrass ink systems
Sawgrass SG500: the safest first machine if you intend to print regularly rather than occasionally.
2. Epson SureColor F170
Cheapest real entry
At $399 this is the lowest-cost genuine dye-sublimation printer rather than a converted EcoTank, and it uses Epson dye-sub ink with PrecisionCore heads.
The 150-sheet auto-feed tray is unusual at this price and matters more than it sounds: sublimation runs are often dozens of small transfers rather than a handful of big ones.
Pros
- Lowest entry price for a real dye-sub printer
- 150-sheet auto-feed tray
- Genuine Epson ink and support
- Light enough to move easily
Cons
- 8.5″ width limits design size
- Third-party ink is not supported
Epson SureColor F170: the right buy for testing whether sublimation products sell before committing more.
3. Sawgrass SG1000
Best for larger designs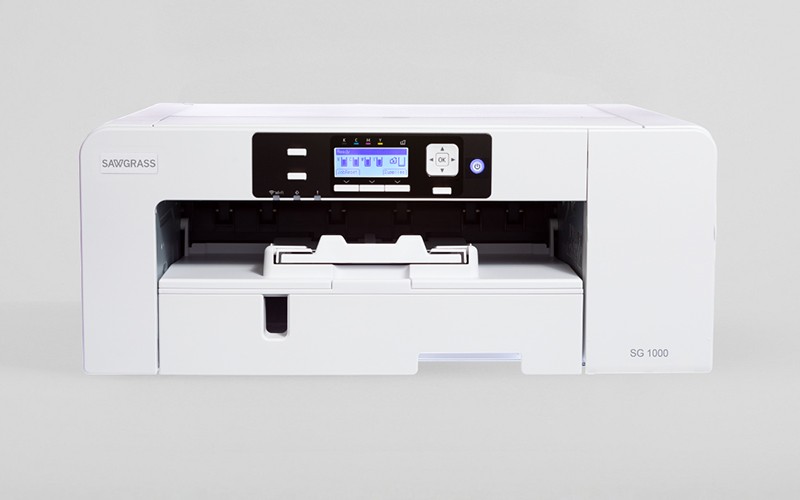
The SG1000 is the SG500 scaled to A3, which is the difference between a chest print and a full-front garment design, or between one tumbler wrap and several nested on a sheet.
Nesting is the underrated part. A larger sheet lets you print several small transfers in one pass, which cuts both paper cost and the number of press cycles per batch.
Pros
- A3 covers full-front prints and nested batches
- Same no-clog maintenance as the SG500
- Built for higher volume
Cons
- Considerably larger footprint
- Overkill for coasters and keychains
Sawgrass SG1000: the step up once design size or batch volume starts limiting what you can sell.
4. Epson SureColor F570
Best for roll production
A 24-inch machine that takes both roll and sheet media, which is what separates hobby output from production: continuous roll printing removes the per-sheet handling that caps throughput.
Nozzle Verification Technology checks and compensates for blocked nozzles automatically, addressing the same clogging problem Sawgrass solves differently.
Pros
- 24″ width handles apparel and soft signage
- Roll feed for continuous production
- Automatic nozzle verification
- Sheet tray retained for short runs
Cons
- Six times the price of a desktop unit
- Needs the space of a workshop, not a desk
Epson SureColor F570: the machine to move to when sublimation is the business rather than a product line.
5. xTool Heat Press
Best press to pair with any of them
A printer finishes nothing on its own, and this is the other half of the setup. It handles sublimation, HTV, and DTF transfers, with saveable presets so a sublimation profile and an iron-on profile sit side by side.
The kit pairs a 12 by 10 inch Smart Press with a mini press, which covers the two jobs one platen cannot do at once: a full shirt front, and small or awkward spots like shoes, patches, and pockets.
Pros
- Two presses in one kit, flat and mini
- Holds within ±5°F across the plate
- Saveable presets per material
- Timer runs to 600 s for thick blanks
Cons
- 205°C ceiling leaves little headroom above polyester
- Flat platen only — mugs still need a wrap press
xTool Heat Press: the sensible companion buy, and the piece beginners most often forget to budget for.
Note the pairing rule that catches people out: a flat press covers garments, coasters, and panels, but mugs and tapered tumblers need their own wrap press. No single platen does both.
Sublimation vs. DTF, HTV, and Screen Printing
Every method decorates a product; they differ in what they leave behind on it.
| Sublimation | DTF | HTV | Screen printing | |
|---|---|---|---|---|
| What is left on the surface | Nothing — dye is in the material | A thin flexible ink layer | A vinyl layer | A layer of ink |
| Feel | None | Slight | Noticeable | Noticeable |
| Works on cotton | No | Yes | Yes | Yes |
| Works on dark fabric | No | Yes | Yes | Yes |
| Full-colour photos | Excellent | Excellent | Poor | Difficult |
| Durability | Will not crack or peel | Very good | Can lift at edges | Very good |
| Best at | White polyester and coated blanks | Any garment, any colour | Simple shapes and text | Bulk runs of few colours |
The honest summary: sublimation wins on feel and on photographic detail, and loses the moment the item is cotton or dark. For those, see DTF and UV DTF or DTG printing.
Conclusion
Sublimation turns dye into gas so it can bond inside a material rather than sit on it. That single mechanism explains both what makes it good — no feel, no cracking, full photographic colour — and every limitation it has.
Those limits are hard rather than soft: polyester or a polymer coating, and a white or very light surface. No setting, press, or paper changes them.
Within that envelope it is the best-feeling decoration method available, which is why drinkware, coated blanks, and polyester apparel are where it dominates.
Frequently Asked Questions about Sublimation
What is sublimation printing?
A process where solid dye is turned directly into gas by heat and bonds into the surface of a polyester or polymer-coated material, becoming part of it rather than sitting on top as ink.
Can you sublimate on cotton?
Not effectively. Cotton fibres cannot bond the dye, so the colour washes out almost immediately. Poly-cotton blends take colour only in proportion to their polyester content.
Why does my sublimation print look faded?
Usually the press was too short, too cool, or too light. Colour is created during pressing, not printing, so under-pressing gives permanently washed-out results.
Can you sublimate on dark shirts?
No. Sublimation dye is translucent and there is no white ink, so the material has to supply the white. On a dark garment the design effectively disappears.
What is a sublimation blank?
An item sold with a polymer coating already applied — mugs, coasters, keychains, plaques. The identical item without that coating will not accept the dye at all.
Is sublimation more durable than vinyl?
On the right material, yes. Because there is no layer on the surface, there is nothing to crack, peel, or lift. Vinyl sits on top and can fail at the edges over time.
Find a sublimation design to make
Browse free community designs ready to print and press.
