
![[Laser cut and engrave] Easter Gift Box or Easter Egg Basket with Mechanical Sunflower](https://storage-us.atomm.com/resource/xtool/community/attachment/xtool-community/f442f706-9be9-4855-850f-e51d730bd274.gif)
![[Laser cut and engrave] Easter Gift Box or Easter Egg Basket with Mechanical Sunflower](data:image/png;base64,iVBORw0KGgoAAAANSUhEUgAAAAoAAAAKCAYAAACNMs+9AAAAAXNSR0IArs4c6QAAABdJREFUKFNjZCASMBKpjmFUId6QIjp4AAppAAuXjCs4AAAAAElFTkSuQmCC)
![[Laser cut and engrave] Easter Gift Box or Easter Egg Basket with Mechanical Sunflower](https://image-res.atomm.com/resource/xtool/community/attachment/xtool-community/90cc032b-9498-43ef-bdcd-05bee4f34f85.png?x-oss-process=image/resize,w_200,h_150,limit_0/interlace,1/format,webp/auto-orient,1)
![[Laser cut and engrave] Easter Gift Box or Easter Egg Basket with Mechanical Sunflower](https://image-res.atomm.com/resource/xtool/community/attachment/xtool-community/4801c759-bf9e-407c-a9c8-5524e435605a.JPG?x-oss-process=image/resize,w_200,h_150,limit_0/interlace,1/format,webp/auto-orient,1)
![[Laser cut and engrave] Easter Gift Box or Easter Egg Basket with Mechanical Sunflower](https://image-res.atomm.com/resource/xtool/community/attachment/xtool-community/cd75abfd-41cd-4eca-bb40-3741fd04f20c.JPG?x-oss-process=image/resize,w_200,h_150,limit_0/interlace,1/format,webp/auto-orient,1)
![[Laser cut and engrave] Easter Gift Box or Easter Egg Basket with Mechanical Sunflower](https://image-res.atomm.com/resource/xtool/community/attachment/xtool-community/c169ec67-2f6b-45ed-bb98-f7805006be08.JPG?x-oss-process=image/resize,w_200,h_150,limit_0/interlace,1/format,webp/auto-orient,1)
![[Laser cut and engrave] Easter Gift Box or Easter Egg Basket with Mechanical Sunflower](https://image-res.atomm.com/resource/xtool/community/attachment/xtool-community/f9bd5364-d3d7-4da6-b949-0582015eba0a.JPG?x-oss-process=image/resize,w_200,h_150,limit_0/interlace,1/format,webp/auto-orient,1)
![[Laser cut and engrave] Easter Gift Box or Easter Egg Basket with Mechanical Sunflower](https://image-res.atomm.com/resource/xtool/community/attachment/xtool-community/fcee6302-3262-4020-9354-5154b4b0c2c9.JPG?x-oss-process=image/resize,w_200,h_150,limit_0/interlace,1/format,webp/auto-orient,1)
![[Laser cut and engrave] Easter Gift Box or Easter Egg Basket with Mechanical Sunflower](https://image-res.atomm.com/resource/xtool/community/attachment/xtool-community/68805efb-ed5d-4265-b78a-422f9441019f.JPG?x-oss-process=image/resize,w_200,h_150,limit_0/interlace,1/format,webp/auto-orient,1)
![[Laser cut and engrave] Easter Gift Box or Easter Egg Basket with Mechanical Sunflower](https://image-res.atomm.com/resource/xtool/community/attachment/xtool-community/b19dbe10-4f83-44f6-b0ef-3b97bd860e5f.JPG?x-oss-process=image/resize,w_200,h_150,limit_0/interlace,1/format,webp/auto-orient,1)
![[Laser cut and engrave] Easter Gift Box or Easter Egg Basket with Mechanical Sunflower](https://image-res.atomm.com/resource/xtool/community/attachment/xtool-community/521af0c8-46ac-47c7-94e3-6b6d510200b0.JPG?x-oss-process=image/resize,w_200,h_150,limit_0/interlace,1/format,webp/auto-orient,1)
![[Laser cut and engrave] Easter Gift Box or Easter Egg Basket with Mechanical Sunflower](https://image-res.atomm.com/resource/xtool/community/attachment/xtool-community/205dbec6-0e0f-4051-aa66-fcd892b423cb.JPG?x-oss-process=image/resize,w_200,h_150,limit_0/interlace,1/format,webp/auto-orient,1)
![[Laser cut and engrave] Easter Gift Box or Easter Egg Basket with Mechanical Sunflower](https://image-res.atomm.com/resource/xtool/community/attachment/xtool-community/a1c8de06-f647-4e11-a615-ebc9e9113a46.JPG?x-oss-process=image/resize,w_200,h_150,limit_0/interlace,1/format,webp/auto-orient,1)
![[Laser cut and engrave] Easter Gift Box or Easter Egg Basket with Mechanical Sunflower](https://image-res.atomm.com/resource/xtool/community/attachment/xtool-community/a0914b49-6606-4f0d-9731-ccebb8e71967.JPG?x-oss-process=image/resize,w_200,h_150,limit_0/interlace,1/format,webp/auto-orient,1)
![[Laser cut and engrave] Easter Gift Box or Easter Egg Basket with Mechanical Sunflower](https://image-res.atomm.com/resource/xtool/community/attachment/xtool-community/c863090a-cc85-42a7-a752-ecadbf416299.JPG?x-oss-process=image/resize,w_200,h_150,limit_0/interlace,1/format,webp/auto-orient,1)
![[Laser cut and engrave] Easter Gift Box or Easter Egg Basket with Mechanical Sunflower](https://image-res.atomm.com/resource/xtool/community/attachment/xtool-community/ec33e42f-ccec-4ca0-8a71-8dcf881c7805.JPG?x-oss-process=image/resize,w_200,h_150,limit_0/interlace,1/format,webp/auto-orient,1)
![[Laser cut and engrave] Easter Gift Box or Easter Egg Basket with Mechanical Sunflower](https://image-res.atomm.com/resource/xtool/community/attachment/xtool-community/92f6eec4-0112-451e-9ce4-a07537105bd5.JPG?x-oss-process=image/resize,w_200,h_150,limit_0/interlace,1/format,webp/auto-orient,1)
![[Laser cut and engrave] Easter Gift Box or Easter Egg Basket with Mechanical Sunflower](https://image-res.atomm.com/resource/xtool/community/attachment/xtool-community/1520b83e-c73f-49d1-bf62-51076780e855.JPG?x-oss-process=image/resize,w_200,h_150,limit_0/interlace,1/format,webp/auto-orient,1)
![[Laser cut and engrave] Easter Gift Box or Easter Egg Basket with Mechanical Sunflower](https://image-res.atomm.com/resource/xtool/community/attachment/xtool-community/549a3f6b-4a12-444d-b0bf-056696ff7a2a.JPG?x-oss-process=image/resize,w_200,h_150,limit_0/interlace,1/format,webp/auto-orient,1)
![[Laser cut and engrave] Easter Gift Box or Easter Egg Basket with Mechanical Sunflower](https://image-res.atomm.com/resource/xtool/community/attachment/xtool-community/2b31ad66-5463-498d-aec0-9955f35027fd.JPG?x-oss-process=image/resize,w_200,h_150,limit_0/interlace,1/format,webp/auto-orient,1)
![[Laser cut and engrave] Easter Gift Box or Easter Egg Basket with Mechanical Sunflower](https://image-res.atomm.com/resource/xtool/community/attachment/xtool-community/f43c938a-6705-43fc-ba21-f65760e2c92f.JPG?x-oss-process=image/resize,w_200,h_150,limit_0/interlace,1/format,webp/auto-orient,1)
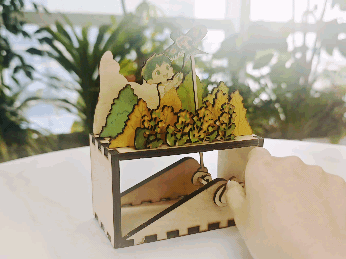
Easter Gift Box or Easter Egg Basket with Mechanical Sunflower
 Instruction


Information
This box can serve as an Easter Gift Box or a Unique Easter Egg Basket for Easter Egg Hunts! The functioning mechanical sunflower opening gives it a very exclusive signature touch, and allows gifts or eggs to be placed securely inside!
Instruction
Step1: SOCIAL MEDIA POSTS

SOCIAL MEDIA POSTS:
Facebook:
https://www.facebook.com/share/v/1Adr1a4joS/?mibextid=wwXIfr
Instagram:
https://www.instagram.com/p/DWX_U9Bjf3goqWc77vrSiqRkwu1pBPpq29h4Ss0/?igsh=MTQ0azk1b2J0cXBoYQ==
https://www.facebook.com/share/v/1b2sV4BMjP/?mibextid=wwXIfr
Facebook:
https://www.facebook.com/share/18geLEKFri/?mibextid=wwXIfr
https://www.instagram.com/p/DWX-uhjjhqG/?img_index=5&igsh=N282Y2Ewajcxa2d6
Step2: Engraving and Cutting Parts


•The project will require 3 Basswood Plywood Sheets at 12" x 12"
*** IMPORTANT NOTE! - In case the file doesn't import the size correctly, each square around each design should measure 11.818" x 11.818". ***
Step3: Prepping and Staining Parts (not mandatory but worth it)


After cutting all pieces, I took the time to sand the laser markings off of all edges and then clean each piece with a Magic Eraser and finally a Tack Cloth. After completing those steps I applied the chosen stains to all pieces. Since there are 16 tiles which will be the vertical pieces, I used 4 different stain colors to alternate them in an equal patten.
Once the stain has dried assembly is up next!
Step4: Assembly Steps


Assembly (Part 1)
This may seem overwhelming at first look, but is easy to follow along with the photos. it is also worth noting that it is vital to let super glued pieces dry completely before continuing, and also make sure that excessive superglue does not contact any parts not specifically mentioned.
- In the 1st photo I have started by arranging all of the mechanical sunflower parts.
- In the 2nd photo, you'll first center the two outer sunflower rings and then super glue them together (with the flower petal ring being on top). Once that is complete, flip the flower part over and you'll then super glue the five 7/16" dowel pieces into the holes on the bottom side. The other five - ¼" dowel rods can be glue to the center of five of the ½" circles. Once these steps are completed, I found it a good time to apply a very small coat of the wood wax to the dowel rods.
- In the 3rd photo, I have flipped the top of the box over and superglued the five ½" circle cutouts to the box top with the dowel rods going through the five ¼" holes that have been lasered out.
- In the 4th photo, you'll see that I have flipped the top of the box back over and aligned the center five pieces of the sunflower (which will become the opening and closing mechanism) and mounted them on the ¼" dowel rods that were superglued to the back side. *** IMPORTANT! - THESE PIECES DO NOT GET SUPER GLUED! *** They should be able to move freely which will allow for the box to open and close. Once the center pieces are in place, you can then place the sunflower ring on top of the center pieces. You want to ensure that the pieces fit into the arched cutouts of both the center pieces and top of the box, pertruding through to the back side of the top of the box. This can be seen in the 5th photo by turning the top of the box back over with the face down.
- In the 5th photo, you can see the remaining five ½" circle cutouts which will now be superglued to the 7/16" dowel pieces that protrude through the arches mentioned in step 4. *** IMPORTANT! - WHEN SUPER GLUING THESE PIECES, ENSURE THAT SUPER GLUE ONLY CONTACTS THE CIRCLE PIECES AND THE ENDS OF THE DOWEL RODS! ***
- Once step 5 is completed and the super glue has dried, you can flip the top of the box over and test to ensure the sunflower mechanism opens and closes accurately as depicted in the 6th photo. It may be a bit sticky or rough the first few attempts. This is where the wax application mentioned in step 2 becomes extremely helpful. It allows all of the moving parts to do so freely with minimal friction.
- The last and most tedious step to complete the box is superglueing the tiles to the top and bottom pieces. Photos 7-10 show what this looks like when completing. The delicate and time sensitive nature of completing this process did not allow me to take photos of this process. However, there are some very helpful tips I learned along the way.
- Focus on superglueing the bottom of the tiles to the bottom of the box first. (meaning the bottom of the eggs are facing down, please don't ask how I know).
- I found it helpful to lay out the tiles face down in the order I wanted them to be in. I then applied masking tape to the back of 4 tiles at a time, allowing me to therefore superglue 4 tiles at a time. This not only sped up the process, but also provided support for the neighboring tiles which tend to lean in if they are inserted in an individual fashion.
- Once all tiles have been superglued to the bottom of the box, place the top of the box on the top tabs of the tiles. This likely will take minor adjustments of some of the tiles to align with the slots appropriately. It is important to apply very little force during this process to ensure the tiles to not break away from the bottom.
- When all of the top tabs fit securely into the top panel of the box, you can then gently turn the box upside down, firmly holding the bottom and top panels together so the tiles dont move out of place. Once upside down, you can apply super glue to the top edges of each tile where it meets the top panel of the box.
- This should complete the assembly process and your project should now be complete!
- If you want to add a personal touch, you can engrave your business logo or a personal message on the bottom side of the box as seen in photo 11.
Step5: Project Complete!


You did it! Your very own Easter Gift Box or Easter Egg Basket is finished and ready! Just in time for the Easter Bunny to come!
Remixes


You may also like

'/%3e%3cdefs%3e%3clinearGradient%20id='paint0_linear_1433_15726'%20x1='12'%20y1='5.25'%20x2='12'%20y2='18.75'%20gradientUnits='userSpaceOnUse'%3e%3cstop%20stop-color='%23FFC654'/%3e%3cstop%20offset='1'%20stop-color='%23FF8D12'/%3e%3c/linearGradient%3e%3c/defs%3e%3c/svg%3e)
Dancing and Jumping Easter Bunny


🌸 Spring Awakening Automaton: Multi-Axle Easter Scene with Dancing Eggs, Jumping Bunny & Fluttering Butterflies


Wooden automata mechanical box with Easter bunny rabbit and carrot decoration


Easter Marble Run – Hand-Crank Lift System


Gear Toys & Stress Relief Toys & Dynamic mechanism


Galileo''s wooden escapement mechanism


Sunflower Windspinner


'/%3e%3cdefs%3e%3clinearGradient%20id='paint0_linear_1433_15675'%20x1='12'%20y1='3.25'%20x2='16.6891'%20y2='20.75'%20gradientUnits='userSpaceOnUse'%3e%3cstop%20stop-color='%23FF5D80'/%3e%3cstop%20offset='1'%20stop-color='%23FF0035'/%3e%3c/linearGradient%3e%3c/defs%3e%3c/svg%3e)
Mechanical Diorama Featuring a Boy Flying a Kite in a Field


"Easter Defying Gravity" Floating Bunny Balloon using kinetic energy


Laser Cut Gear Fidget Spinner


Gears, Rack and Pinion


Butterfly Switch (Flapping Wing Mechanism)

Laser Cut Metal Mechanical Iris


Wooden Hand Crank Turning Mini Panda Toy


Kinetic Sculpture Double Rotation Electric Mechanism Laser Cut Cnc files Wall Art Illusion Decoration Art | SVG, DXF, AI , eps, pdf |#175|


Tension Balancing Table


Kaleidoscope


Laser-cut movable St. Patrick's Day doll