
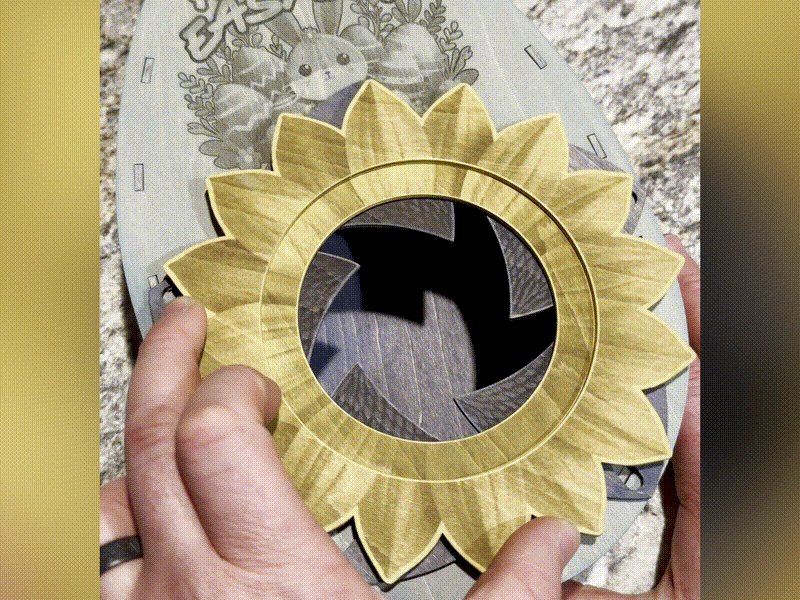
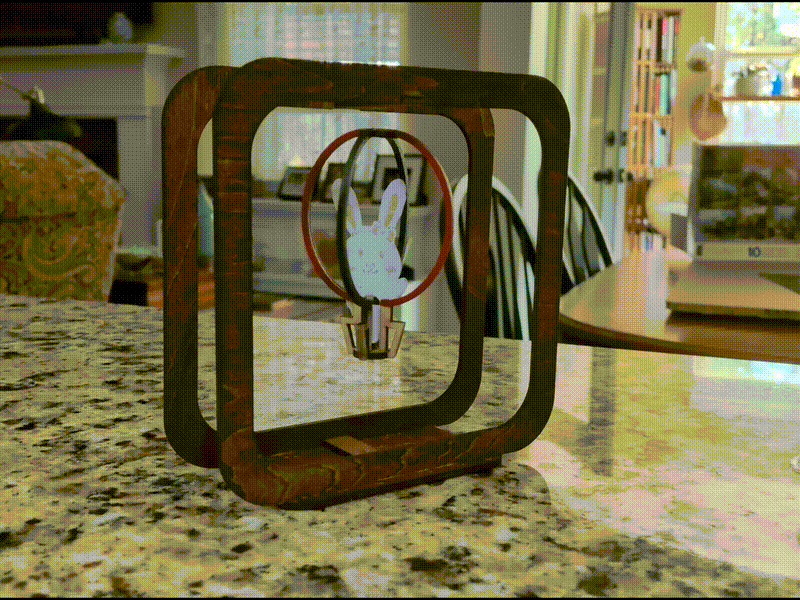
![[Laser cut and engrave,Blade cut,Inkjet printing] 🌸 Spring Awakening Automaton: Multi-Axle Easter Scene with Dancing Eggs, Jumping Bunny & Fluttering Butterflies](https://image-res.atomm.com/resource/xtool/community/attachment/xtool-community/eb025fa8-581f-4163-bd99-846a7ad9c669.png?x-oss-process=image/resize,w_1200,h_900,limit_0/interlace,1/format,webp/auto-orient,1)
![[Laser cut and engrave,Blade cut,Inkjet printing] 🌸 Spring Awakening Automaton: Multi-Axle Easter Scene with Dancing Eggs, Jumping Bunny & Fluttering Butterflies](data:image/png;base64,iVBORw0KGgoAAAANSUhEUgAAAAoAAAAKCAYAAACNMs+9AAAAAXNSR0IArs4c6QAAABdJREFUKFNjZCASMBKpjmFUId6QIjp4AAppAAuXjCs4AAAAAElFTkSuQmCC)
![[Laser cut and engrave,Blade cut,Inkjet printing] 🌸 Spring Awakening Automaton: Multi-Axle Easter Scene with Dancing Eggs, Jumping Bunny & Fluttering Butterflies](https://image-res.atomm.com/resource/xtool/community/attachment/xtool-community/eb025fa8-581f-4163-bd99-846a7ad9c669.png?x-oss-process=image/resize,w_200,h_150,limit_0/interlace,1/format,webp/auto-orient,1)
![[Laser cut and engrave,Blade cut,Inkjet printing] 🌸 Spring Awakening Automaton: Multi-Axle Easter Scene with Dancing Eggs, Jumping Bunny & Fluttering Butterflies](https://storage-us.atomm.com/resource/xtool/community/attachment/xtool-community/34973211-f95d-4b93-95c4-28cb5420a25a.png)
![[Laser cut and engrave,Blade cut,Inkjet printing] 🌸 Spring Awakening Automaton: Multi-Axle Easter Scene with Dancing Eggs, Jumping Bunny & Fluttering Butterflies](https://image-res.atomm.com/resource/xtool/community/attachment/xtool-community/8888f47f-1f61-4baf-90fa-98c56bde3ced.gif?x-oss-process=image/resize,w_200,h_150,limit_0/interlace,1/format,webp/auto-orient,1)
![[Laser cut and engrave,Blade cut,Inkjet printing] 🌸 Spring Awakening Automaton: Multi-Axle Easter Scene with Dancing Eggs, Jumping Bunny & Fluttering Butterflies](https://image-res.atomm.com/resource/xtool/community/attachment/xtool-community/7d42a3c8-6b72-4db3-9819-86979790579e.jpg?x-oss-process=image/resize,w_200,h_150,limit_0/interlace,1/format,webp/auto-orient,1)
![[Laser cut and engrave,Blade cut,Inkjet printing] 🌸 Spring Awakening Automaton: Multi-Axle Easter Scene with Dancing Eggs, Jumping Bunny & Fluttering Butterflies](https://image-res.atomm.com/resource/xtool/community/attachment/xtool-community/1fda3446-5467-460c-b3b4-b443be566990.jpg?x-oss-process=image/resize,w_200,h_150,limit_0/interlace,1/format,webp/auto-orient,1)
![[Laser cut and engrave,Blade cut,Inkjet printing] 🌸 Spring Awakening Automaton: Multi-Axle Easter Scene with Dancing Eggs, Jumping Bunny & Fluttering Butterflies](https://image-res.atomm.com/resource/xtool/community/attachment/xtool-community/c9d074ec-8d0b-4651-be6e-db3758d33388.jpg?x-oss-process=image/resize,w_200,h_150,limit_0/interlace,1/format,webp/auto-orient,1)
![[Laser cut and engrave,Blade cut,Inkjet printing] 🌸 Spring Awakening Automaton: Multi-Axle Easter Scene with Dancing Eggs, Jumping Bunny & Fluttering Butterflies](https://image-res.atomm.com/resource/xtool/community/attachment/xtool-community/a891cf59-665f-45e3-a0d3-030ab38d806c.jpg?x-oss-process=image/resize,w_200,h_150,limit_0/interlace,1/format,webp/auto-orient,1)
![[Laser cut and engrave,Blade cut,Inkjet printing] 🌸 Spring Awakening Automaton: Multi-Axle Easter Scene with Dancing Eggs, Jumping Bunny & Fluttering Butterflies](https://image-res.atomm.com/resource/xtool/community/attachment/xtool-community/82c857dc-6aba-46ca-8888-65f0e9c237a4.jpg?x-oss-process=image/resize,w_200,h_150,limit_0/interlace,1/format,webp/auto-orient,1)
🌸 Spring Awakening Automaton : Scène de Pâques à plusieurs axes avec œufs dansants, lapin sautissant et papillons qui volent
 Instruction


Information
      🌸 Automate de l’Éveil du Printemps

À mesure que l’hiver s’estompent et que les premiers signes du printemps apparaissent, le jardin commence lentement à s’animer...

Ce projet capture ce moment magique — où l’immobilité se transforme en mouvement.

Dans cet automate sur le thème de Pâques, chaque élément raconte une partie de l’histoire :

- 🥚 Les œufs montent et descendent en une vague rythmée, comme le pouls d’une nouvelle vie
- 🐰 Un lapin joueur saute à travers la scène, plein d’énergie et de curiosité
- 🦋 Les papillons voltigent au-dessus, apportant légèreté et mouvement à l’air

Tous ces mouvements sont soigneusement synchronisés pour créer un affichage mécanique dynamique et axé sur l’histoire.

🎯 L’idée derrière ce projet

Au lieu de créer une décoration statique, l’objectif était de concevoir quelque chose qui ressemble à :

- Vivant
- Joueur
- Axé sur l’histoire

Ce n’est pas seulement une décoration de Pâques — c’est un monde miniature animé entièrement alimenté par le mouvement mécanique.

⚙️ Aperçu de la conception mécanique

Cet automate est alimenté par un système à cames multi-essieux, conçu pour un mouvement fluide et synchronisé.

Le système de base comprend :
- 🔩 4 arbres rotatifs indépendants (essieux)
- ⚙️ Système de synchronisation entraîné par engrenages
- 🌀 Profils de cames personnalisés pour chaque type de mouvement
- 📏 Tiges suiveuses verticales contrôlant le mouvement des personnages
- 🔧 Décomposition des mouvements

🔩 Chaque essieu est responsable d’un type de mouvement différent :

🦋 Axe 1 – Battant des papillons
      - Cames à double lobe
      - Crée deux volets par rotation
      - Ajoute un mouvement léger et rapide dans la couche supérieure
🥚 Axe 2 – Mouvement de l’Onde d’Œuf
      - Disposition de came sinusoïdale
      - Crée un effet d’onde de gauche à droite
      - Représente le rythme et la continuité
🐰 Axe 4 – Saut de lapin
      - Profil de came à haute levée
      - Produit une montée lente + un mouvement de chute rapide
      - Imite une action de saut naturelle
Essieu 3 - Transmission de puissance

⚙️ Système de synchronisation

- Les 4 essieux sont connectés à l’aide de :

⚙️ Engrenages découpés au laser
- 🔁 Entrée de rotation continue (manivelle manuelle ou prêt pour le moteur)

La phase de chaque came est intentionnellement décalée pour créer :

- Flux au lieu de chaos

Cela garantit que le mouvement ressent :

- naturel
- lisse
- agréable visuellement

🎨 Design & Esthétique

Ce projet combine :

- 🌈 Éléments colorés des personnages (œufs, lapin, papillon)
- 🪵 Panneau avant gravé au laser
- 🌿 Composition de scène superposée (effet de profondeur)

Le résultat est un équilibre entre :

Précision mécanique + narration ludique

💡 Ce qui rend ce film unique
- Système multi-mouvements (rare dans les participations au concours)
- Conception de came à haute levée (visuellement spectaculaire)
- Structure mécanique entièrement découpée au laser
- Combine ingénierie + art + narration

🐣 Parfait pour
- Décoration de Pâques
- Démonstrations mécaniques
- Cadeaux pour enfants et familles
- Projets d’apprentissage STEM

🎬 Regarde-la prendre vie

👉 Regardez le mouvement complet dans la vidéo ci-dessous pour voir comment tous les éléments bougent ensemble.
Instruction
Étape1: Liens vers les réseaux sociaux
- https://www.facebook.com/groups/xtoolofficial/permalink/1432050291989740/?mibextid=Nif5oz
- https://m.facebook.com/story.php?story_fbid=pfbid02T1AbytQp3PkAJAd57nVVif1okYmZ4JpARuZWDns4dgdtFxeRay5NTqbD7HFKgjULl&id=1628374474&mibextid=Nif5oz
- https://www.facebook.com/groups/atommcommunity/permalink/3839840232990096/?mibextid=Nif5oz
- https://www.facebook.com/groups/laserengravergroupforbeginner/permalink/1267017445616738/?mibextid=Nif5oz
Étape2: 🧩 🪵 Conception et planification des matériaux
Avant de couper quoi que ce soit, nous devons soigneusement planifier les matériaux et la structure de l’automate.
Ce projet combine
🧠 Aperçu de la conception
L’automate est divisé en 3 systèmes majeurs :
2. Système de mouvement (engrenages + arbres + arbres à cames)
3. Couche visuelle (œufs, lapins, papillons)
Chaque partie utilise un matériau différent selon sa fonction.
🪵 Matériaux utilisés
1. Tilleul (3 mm) — Structure + Caractères
Utilisé pour :
- Panneaux de boîte (haut, bas, côtés)
- Éléments de caractères (œufs, lapin, papillon, herbe)
- Suiveurs (tiges verticales)
👉 Why tillwood :
- facile à découper au laser
- léger (important pour le mouvement)
- finition de gravure propre
2. MDF (12 mm) — Cams
Utilisé pour :
- Tous les profils de cames
👉 Pourquoi MDF :
- fort et stable
- gère la portance élevée (20–25 mm) sans flex
- surface lisse pour un mouvement constant
3. Tiges en bois (essieux)
- Diamètre :
10,9 mm - Utilisé pour les 4 arbres rotatifs
4. Entretoises (tilleul ou rondelles de 3 mm)
Utilisé pour :
- cames séparées
- évite les frictions entre les composants
- maintient l’alignement
⚙️ Considérations de conception
Tandis que Conception, gardez à l’esprit ceci :
🔹 Dégagement (TRÈS IMPORTANT)
En raison de la forte portance :
portance maximale ≈ 25 mm
+
Hauteur des caractères ≈ 35–45 mm
👉 Assurez-vous d’un espace vertical suffisant à l’intérieur de la boîte
🔹 Dimensionnement
- du trou
- Trou d’arbre (cames/engrenages) :
ajustement serré (≈10,9 mm) - Trous de support (murs latéraux) :
11,1–11,2 mm
👉 Cela permet :
- cams de pivoter avec l’arbre
- arbre pour tourner en douceur dans le cadre
🔹 Espacement entre cams
Maintenez :
👉 Empêche :
- collision de suiveurs
- interférence mécanique
Étape3: 🔧 Découpe laser de toutes les parties
Maintenant que la conception est prête, nous passons à la coupe de tous les composants.
🪵 Cutting Tillwood (3 mm)
Utilisé pour :
- panneaux de boîtes
- caractères
- espaceurs
Paramètres (xTool M1 / F2 typique OU Suivez-en un dans le fichier)
- Puissance : 90–100 %
- Vitesse : 5–8 mm/s
- Passe : 1
👉 Toujours tester sur la casse d’abord
🧱 Découpe MDF (12 mm) — Cams
Utilisé pour :
- all cam Profils (œuf, lapin, papillon)
⚠️ Notes
importantes
- MDF produit plus de fumée → assure la ventilation
- utilisez le masque si nécessaire pour réduire les
marques de brûlure
Paramètres suggérés (approximatif)
- Puissance : 100 %
- Vitesse : 2–4 mm/s
- Passes : multiple (selon la puissance du laser)
👉 Vous pourriez avoir besoin de :
⚙️ Cutting Gears
Matériau :
- 3 mm ou tilleul stratifié (double couche recommandée)
👉 Astuce :
- colle 2 couches → plus solide dents de dénouement
🔩 Entretoises de découpe
Utiliser plusieurs entretoises entre les cames
🧠 Pro Tips
1. Étiquetez vos pièces
Gravez de petites étiquettes : C1, C2, C3...
👉 Facilite l’assemblage et rend professionnel<p data-section-id="t4p2w5 » data-start="3288 » data-end="3315">2. Sable avant l’assemblage
- légèrement poncer les bords
- enlever les marques de brûlure
👉 améliore :
- fluidité
du mouvement- look final
3. Ajustement sec First
Avant de coller : assemblez tout une fois
👉 vérifiez :
- alignement
- rotation
- espacement
Étape4: ⚙️ 🔩 Système d’engrenages et ensemble d’essieu


Cette étape construit le système de transmission d’énergie
🧠 Objectif de cette étape
Nous voulons :
Une rotation d’entrée → entraîne les 4 essieux en douceur
- synchronisé du mouvement
- vitesse constante
- flux d’animation propre
⚙️ Aperçu du système d’engrenages
Votre système utilise :
- ⚙️
4 essieux ( 10,9 mm de baguettes en bois) - ⚙️
- 🔁 Manivelle manuelle (ou entrée prête au moteur)
🔗 Disposition des engrenages (Simple Chain)
Vitesse 1 ← (Manivelle + Vitesse 2) → Vitesse 3 → Vitesse 4
Chaque engrenage entraîne l’essieu suivant.
🎯 Choix de conception important
👉 Utiliser
Cela donne :
Tous les essieux tournent à Même vitesse
Ce qui est important car :
- votre mouvement est déjà contrôlé par des cams
- vitesses différentes briseraient l’harmonie visuelle
🪵 Step 3.1 : Préparer les essieux
Coupe 4 arbres :
Longueur : selon la largeur de la boîte (~ +10 mm de marge)
Poncez légèrement
- assurez une rotation fluide
- enlever les
arêtes rugueuses
Optionnel (Pro Upgrade)
👉 Ajouter un
Cela empêche :
glisse
⚙️ Étape 3.2 : Monter les engrenages
Chaque essieu reçoit :
- 1 engrenage (monté sur le côté)
🔧 Type
- d’ajustement
- Trou d’engrenage :
- Presse ou colle<
Assurez-vous :
Tous les engrenages sont alignés dans un même plan
Si mal alignés :
- les engrenages se lieront
- mouvement devient saccadé
🧠 ⚠️ Alignment Tip
Assurez-vous :
Si le désalignement :
- les engrenages se liendront
- mouvement devient saccadé
🧠 Pro Tip
Utilisez les espaceurs :
[mur] — entretoise — engrenage — entretoise — empilement à cames
👉 Empêche les engrenages de frotter contre les murs
🔁 Étape 3.3 : Monter la chaîne d’engrenages
Installer les essieux dans la boîte :
- insérer les 4 arbres dans les parois latérales
- assurer une rotation libre
Ajouter des engrenages :
- mesh chaque engrenage avec le suivant
- rotation manuelle pour tester
✅ Que vérifier
✔ pas de
✔ glissement, pas de zones serrées,
✔ rotation douce sur les 4 arbres
🌀 Étape 3.4 : Ajouter l’entrée (manivelle)
Fixer le vilebrequin au premier essieu :
Option 1 :
Poignée
- simple
- petit bras en bois
- collé ou press-fit
Option 2 (meilleure)
- rond bouton pour une rotation douce
🎯 Test de rotation
Tournez lentement la manivelle :
👉 Les 4 essieux doivent tourner ensemble
Sinon :
- vérifiez l’alignement des engrenages
- vérifiez les points de friction
Étape5: 🎨 Impression et découpage des éléments de caractères


À cette étape, vous créerez tous les éléments visuels de l’automate, y compris les œufs, le lapin, le caneton, les papillons et l’herbe. Ces éléments donnent vie à la scène et rendent le projet ludique et complet.
Tous les caractères sont d’abord imprimés avec le module Ink puis coupés précisément avec le module Cutting sur le xTool M1 Ultra.
🧠 Objectif de cette étape
- Rendez l’automate visuellement attrayant et coloré
- Gardez toutes les pièces mobiles légères
- Assurez-vous de bords propres et des formes précises
- Ajoutez de la personnalité et de la narration à la scène. Dans cette étape, vous créerez tous les éléments visuels de l’automate, y compris les œufs, le lapin, le caneton, les papillons et l’herbe. Ces éléments donnent vie à la scène et rendent le projet ludique et complet.
🖼️ Préparez l’œuvre d’art
Créez ou importez des designs pour tous les caractères.
Incluez les éléments suivants :
- Œufs de Pâques avec des motifs différents
- Un lapin dans le profil latéral
- Un petit caneton
- Papillons avec des ailes simples et symétriques
- Herbe aux formes naturelles et fluides
Conseils de conception :
- Utilisez des formes en gras et simples
- Évitez les détails très fins (ils ne gravent pas bien)
- Gardez les motifs légèrement plus grands pour qu’ils soient visibles lors du déplacement
Tailles recommandées :
- Œufs : 25–30 mm
- Bunny : 35–45 mm
- Duckling : 25–35 mm
- Papillon : 30–40 mm
- Herbe : 20–30 mm
🖨️ Imprimer avec le module d’encre
Placez votre feuille de tilleul dans la machine et imprimez les designs.
Points clés :
- Utilisez la haute résolution pour une sortie propre
- Assurez-vous que tous les designs sont correctement positionnés dans la zone de travail
- Vérifiez deux fois l’orientation avant d’imprimer
Suggestions de couleurs :
- Utilisez des couleurs pastel douces pour les œufs
- Gardez des tons de lapin clairs et naturels
- Utilisez du jaune/orange pour le caneton
- Ajoutez des accents de couleur clair pour les papillons
- Utilisez des tons verts pour l’herbe
Évitez les couleurs très foncées pour garder le design doux et adapté aux enfants.
✂️ Coupe avec le module de découpe
Après l’impression, passez en mode découpe et découpez le long des contours.
Points importants à vérifier :
- Assurez-vous que le chemin de coupe correspond exactement au design imprimé
- Utilisez l’alignement ou le positionnement de référence de la caméra
Réglages typiques pour le tilleul 3 mm :
- Puissance : 90–100 %
- Vitesse : 5–8 mm/s
- Passes : 1
Conseils pour des résultats propres :
- Utilisez du ruban de masquage pour réduire les marques de brûlure
- Poncez légèrement les bords après coupe si besoin
🔧 Ajoutez des emplacements de montage
Chaque caractère a besoin d’une fente en bas pour s’attacher à la tige suivante.
Directives :
- Largeur de fente : environ 3 mm
- Hauteur de fente : 5–7 mm
- Gardez la fente centrée pour l’équilibre
Cela garantit :
- attache facile
- mouvement
vertical stable
🧪 Dry Fit Test
Avant l’assemblage final, testez tout.
Que faire :
- Insérer chaque caractère dans son emplacement
- Le déplacer manuellement vers le haut et le bas
Vérifier :
- déplacement vertical fluide
- pas d’inclinaison
- aucune collision avec les parties proches
🧠 Pro Tips
- Gardez tous les caractères légers pour éviter de solliciter les cams
- Équilibrez les formes pour qu’elles ne penchent pas d’un côté
- Des bords nets et une bonne finition améliorent considérablement l’apparence finale
Étape6: 🔧 Assemblage final et intégration de la caméra


À cette étape, nous rassemblons tous les composants — cames, essieux, suiveurs et personnages — et ajustons le mouvement pour créer une animation fluide et synchronisée.
🧠 Objectif de cette étape
- Convertir le mouvement de rotation en mouvement vertical propre
- Synchroniser tous les caractères de la scène
- Obtenir une animation fluide et naturelle
- Éliminer les frottements et les vacillements
- N’oubliez pas : Coupez la cheville en fonction de la taille requise et sur le tronçon
⚙️ Installez les ensembles de cames
Commencez par monter toutes les cames sur leurs essieux respectifs. Regardez l’image pour voir comment le jeu de cames est fixé
Décomposition de l’essieu :
- Essieu 1 → Cames Eggwave
- Axe 2 → Bunny jump cam
- Essieu 3 → Cames papillons
Conseils d’assemblage :
- Assurez-vous que chaque came est bien ajusté sur l’arbre (sans patinage)
- Maintenir l’espacement entre les cames à l’aide des espaceurs
- Aligner toutes les cames dans le même plan vertical que leurs suiveurs
🎯 Définir l’orientation de la came (CRITIQUE)
C’est la partie la plus importante pour un mouvement fluide.
Chaque came doit être tournée à la bonne position de départ avant de la fixer.
Directives :
- Egg cams → décalés (motif d’onde de gauche à droite)
- Bunny cam → pic légèrement aligné après la montée de l’œuf
- Les cams papillon → déphasées régulièrement
- Les cames herbe → légèrement décalées pour le balancement
Astuce :
- Faites pivoter l’arbre manuellement et observez le mouvement avant de fixer définitivement
🔩 Insérer les tiges suiveuses
Maintenant connectez les bielles verticales à chaque came.
Steps :
- Insérer les tiges par les fentes supérieures
- Positionner les tiges directement au-dessus des points hauts de la came< li data-start="1656 » data-end="1775">Assurez-vous que les tiges ne bougent que verticalement
Important :
- Les tiges ne doivent pas pencher ni se bloquer
- Garder la fente dégagement serré (environ 3–3,2 mm)
🐰 Attacher les caractères
Attacher tous les caractères imprimés et découpés aux tiges suiveuses.
Ordre :
- Œufs → première ligne
- Lapin et caneton → milieu
- Papillons → derrière/haut
- Herbe → avant/couche basse
Astuces d’attachement :
- Utilise de la colle légère ou de la friction< li data-start="2104 » data-end="2205">Gardez les caractères centrés sur les tiges
- Assurez-vous que le poids est équilibré
🧪 Essai à sec (TRÈS IMPORTANT)
Avant la correction finale, testez tout.
Faites tourner la manivelle lentement et observez :
- Tous les éléments bougent-ils en douceur ?
- Y a-t-il une collision entre les pièces ?
- Les mouvements sont-ils synchronisés ?
Corrigez les problèmes dès maintenant avant de finaliser.
⚠️ Réglage fin
Cette étape fait la différence entre le bon et l’excellent.
Si le mouvement semble saccadé :
- sable bordes de la came légèrement
- appliquez de la cire (ou frotte à la bougie) sur les surfaces de la came
Si les tiges bougent :
- serrez la largeur de la fente
- assurez que les tiges sont droites
Si les engrenages peinent :
- vérifier l’alignement
- ajouter des entretoises si besoin
🎯 Fixation finale
Une fois que tout fonctionne parfaitement :
- colle les cames de façon permanente aux arbres (si needed)
- secure gears
- assurez que les spacers restent en place
🏁 Final Motion Test
Faites pivoter la manivelle en continu et observez la scène complète.
Vous devriez maintenant voir :
- œufs se déplaçant dans une vague douce
- bunny sautant clairement et de façon évidente
- papillons rebondissant/battant
- herbe se balançant doucement
Le mouvement doit se sentir :
- continuou
- synchronisé
- alive
🧠 Pro Tips
- Ajoute une petite quantité de lubrifiant (cire) pour une fluidité durable
- Nettoyez toutes les surfaces visibles
- assurez-vous qu’aucune trace de colle ne soit visible
- alignez les caractères proprement pour un équilibre visuel
Étape7: Gravure décorative


Gravez l’image ci-dessus sur le devant de la boîte de scène. Une fois terminé, appliquez le vernis puis peignez-le.


'/%3e%3cdefs%3e%3clinearGradient%20id='paint0_linear_1433_15726'%20x1='12'%20y1='5.25'%20x2='12'%20y2='18.75'%20gradientUnits='userSpaceOnUse'%3e%3cstop%20stop-color='%23FFC654'/%3e%3cstop%20offset='1'%20stop-color='%23FF8D12'/%3e%3c/linearGradient%3e%3c/defs%3e%3c/svg%3e)


'/%3e%3cdefs%3e%3clinearGradient%20id='paint0_linear_1433_15675'%20x1='12'%20y1='3.25'%20x2='16.6891'%20y2='20.75'%20gradientUnits='userSpaceOnUse'%3e%3cstop%20stop-color='%23FF5D80'/%3e%3cstop%20offset='1'%20stop-color='%23FF0035'/%3e%3c/linearGradient%3e%3c/defs%3e%3c/svg%3e)


