
![[Laser cut and engrave] Christmas magic stained glass light box laser-cut](https://image-res.atomm.com/resource/xtool/community/attachment/xtool-community/4b6b983d-3895-45a0-ab17-c0a4441c70ec.png?x-oss-process=image/resize,w_1200,h_900,limit_0/interlace,1/format,webp/auto-orient,1)

![[Laser cut and engrave] Christmas magic stained glass light box laser-cut](data:image/png;base64,iVBORw0KGgoAAAANSUhEUgAAAAoAAAAKCAYAAACNMs+9AAAAAXNSR0IArs4c6QAAABdJREFUKFNjZCASMBKpjmFUId6QIjp4AAppAAuXjCs4AAAAAElFTkSuQmCC)
![[Laser cut and engrave] Christmas magic stained glass light box laser-cut](https://image-res.atomm.com/resource/xtool/community/attachment/xtool-community/4b6b983d-3895-45a0-ab17-c0a4441c70ec.png?x-oss-process=image/resize,w_200,h_150,limit_0/interlace,1/format,webp/auto-orient,1)
![[Laser cut and engrave] Christmas magic stained glass light box laser-cut](https://storage-us.atomm.com/resource/xtool/community/attachment/xtool-community/8b2c4707-a084-41b7-b417-125c224a57ec.png)
![[Laser cut and engrave] Christmas magic stained glass light box laser-cut](https://image-res.atomm.com/resource/xtool/community/attachment/xtool-community/f18fc3a7-0347-4496-ad4e-64265b805f63.png?x-oss-process=image/resize,w_200,h_150,limit_0/interlace,1/format,webp/auto-orient,1)
![[Laser cut and engrave] Christmas magic stained glass light box laser-cut](https://image-res.atomm.com/resource/xtool/community/attachment/xtool-community/f68ee361-425a-4cfc-847e-02f799abb816.jpg?x-oss-process=image/resize,w_200,h_150,limit_0/interlace,1/format,webp/auto-orient,1)
![[Laser cut and engrave] Christmas magic stained glass light box laser-cut](https://image-res.atomm.com/resource/xtool/community/attachment/xtool-community/e5a190da-f8f6-47ba-b67e-2026891bc5dd.jpg?x-oss-process=image/resize,w_200,h_150,limit_0/interlace,1/format,webp/auto-orient,1)
![[Laser cut and engrave] Christmas magic stained glass light box laser-cut](https://image-res.atomm.com/resource/xtool/community/attachment/xtool-community/b0875bf2-c327-4c6c-b0f4-44fb415469ac.jpg?x-oss-process=image/resize,w_200,h_150,limit_0/interlace,1/format,webp/auto-orient,1)
![[Laser cut and engrave] Christmas magic stained glass light box laser-cut](https://image-res.atomm.com/resource/xtool/community/attachment/xtool-community/89f1e390-ca05-40c3-a27e-bb16e640469b.png?x-oss-process=image/resize,w_200,h_150,limit_0/interlace,1/format,webp/auto-orient,1)
![[Laser cut and engrave] Christmas magic stained glass light box laser-cut](https://image-res.atomm.com/resource/xtool/community/attachment/xtool-community/06869ad7-73ee-40bc-9888-2f0a00abdd57.png?x-oss-process=image/resize,w_200,h_150,limit_0/interlace,1/format,webp/auto-orient,1)
![[Laser cut and engrave] Christmas magic stained glass light box laser-cut](https://image-res.atomm.com/resource/xtool/community/attachment/xtool-community/4c8d1e6b-199e-406d-9ad1-333281ac127c.png?x-oss-process=image/resize,w_200,h_150,limit_0/interlace,1/format,webp/auto-orient,1)
Christmas magic stained glass light box laser-cut
 Instruction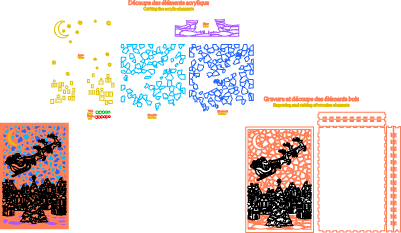


Information
      A magical laser-cut Christmas project ✨

This stained glass–style design, complete with its back box, turns into a beautiful light box once you place a light inside — like a window opening onto the magic of Christmas 🕯️

Originally made with my xTool P2S laser, this project combines detail, depth, and warmth to brighten up your holiday décor.
The file can be adapted for any machine, even if you don't cut acrylic (see instructions) 💡

If you like this project, feel free to leave a little "thump-up" to support my work!

---

A magical creation to cut with a laser ✨

This Christmas stained glass window, along with its back box, transforms into a light box once the light is placed inside — like an open window to the magic of Christmas 🕯️

Designed with my xTool P2S laser, this project combines detail, depth and warmth to illuminate your holiday décor.
The file can be adapted to all machines, even if you are not cutting acrylic (see instructions)
💡

If you like this project, feel free to leave a little "like" to support my work!
Instruction
Step1


Now is the time to adjust the file size to your desired dimensions if the suggested size isn't suitable.
You can then begin the various wood cutting operations.
The front section will involve engraving and cutting, while the back section will be for the light box.
This is the time to adjust your file size to the size you want if the one offered doesn't suit you.
You can then start the different cuts of the wood.
The front part will include engraving and cutting, the rear part concerns the light box.
Step2


You can paint or stain your wood before assembling it.Here
, I used "smoky oak" wood stain and white paint on the inside of the box to make it brighter.
Assemble the box with wood glue, and don't forget to thread the cable for your LED strip through before gluing the bottom piece of the box.
You can paint or stain your wood before assembling it.
Here I used "smoked oak" wood stain and white paint on the inside of the box to make it brighter.
Assemble the box with wood glue and don't forget to slide the cable from your LED headband before gluing the bottom piece of the box.
Step3
You can stick your LED strip inside your box.
I used a 3-meter strip, but you can use a longer one if you want something even brighter.
You can stick your led strip inside your box.
I took a 3m long headband but you can go for a longer headband if you want something even brighter.
Step4: Acrylic version


Start cutting out your different colors of acrylic.
Start cutting your different colors of acrylic.
Step5: Acrylic-free version
If you don't have a CO2 cutter for acrylic, you can easily buy a sheet of clear acrylic the same size as the stained glass window and paint on the back with stained glass paint.
Alternatively, you could use a simple sheet of clear plastic if you can't get custom-cut acrylic.
If you don't have a CO2 machine that allows you to cut acrylic, it is quite possible to buy a transparent acrylic plate to the full size of the stained glass window and paint the back with special stained glass paint.
We can also imagine going for a simple transparent plastic sheet if you can't get custom acrylic.
Step6


Now is the time to be patient...
Glue your acrylic pieces to the back of your front panel using a special acrylic glue.
The same applies if you're using the full transparent panel version, which you'll then paint.
Once your panel is glued in place, it's time to paint it.
It's time to be patient...
Glue your acrylic pieces to the back of your front side with a special acrylic glue.
The same goes for the complete transparent plate version to be painted later.
Once your plate is glued, it's time to paint
it
Step7

You can now assemble your stained glass window with the box. Glue or nail it, according to your preference.
Vous pouvez maintenant venir assembler votre vitrail avec la boite.
Collez ou clouez en fonction de votre préférence.
Step8

Turn it on and admire!
Allumez et admirez !
Remixes
License



You may also like

'/%3e%3cdefs%3e%3clinearGradient%20id='paint0_linear_1433_15675'%20x1='12'%20y1='3.25'%20x2='16.6891'%20y2='20.75'%20gradientUnits='userSpaceOnUse'%3e%3cstop%20stop-color='%23FF5D80'/%3e%3cstop%20offset='1'%20stop-color='%23FF0035'/%3e%3c/linearGradient%3e%3c/defs%3e%3c/svg%3e)
Laser Cut Wooden Christmas Light House Decoration with LED


Laser Cut Wooden Christmas House Light Decoration with Doorbell Activated Lights


christmas lamp box decoration


'/%3e%3cdefs%3e%3clinearGradient%20id='paint0_linear_1433_15726'%20x1='12'%20y1='5.25'%20x2='12'%20y2='18.75'%20gradientUnits='userSpaceOnUse'%3e%3cstop%20stop-color='%23FFC654'/%3e%3cstop%20offset='1'%20stop-color='%23FF8D12'/%3e%3c/linearGradient%3e%3c/defs%3e%3c/svg%3e)
Christmas Lantern – Laser Cut Wooden Holiday Light Box

Laser Cut Christmas Light Box with Snowman and Tree Scene


christmas lantern


Laser-etched Santa Claus on illuminated acrylic glass


Laser Cut Wooden Christmas Tree Lantern with Santa and Reindeers Decoration


3D Christmas lamps bundle. Xmas light box laser cut. Christmas scene svg. Wooden lantern. Winter home decor. Santa Claus. Reindeer. Snowman


Acrylic christmas Light


Wooden Star - Christmas Light Decoration with Holiday Icons - Candle Holder


Laser Engraved Wooden Merry Christmas Nativity Scene Light Box

Laser Engraved Hanukkah Menorah Acrylic Light Display


LED Acrylic Laser Cut Christmas Tree Night Light Decoration


swappable light box christmas front


Laser Engraved Merry Christmas Acrylic Ornament Decoration

Wooden Christmas Lamp Holiday Lighting


Laser Cut Wooden Christmas Lantern with Snowflake and Reindeer Design