
![[Laser cut and engrave] Laser Cut Merry Christmas Santa Lighted Wall Art Decoration](https://image-res.atomm.com/resource/xtool/community/attachment/xtool-community/4b2a3660-26ae-46aa-bd31-cb5e279a0d58.png?x-oss-process=image/resize,w_1200,h_900,limit_0/interlace,1/format,webp/auto-orient,1)
![[Laser cut and engrave] Laser Cut Merry Christmas Santa Lighted Wall Art Decoration](data:image/png;base64,iVBORw0KGgoAAAANSUhEUgAAAAoAAAAKCAYAAACNMs+9AAAAAXNSR0IArs4c6QAAABdJREFUKFNjZCASMBKpjmFUId6QIjp4AAppAAuXjCs4AAAAAElFTkSuQmCC)
![[Laser cut and engrave] Laser Cut Merry Christmas Santa Lighted Wall Art Decoration](https://image-res.atomm.com/resource/xtool/community/attachment/xtool-community/4b2a3660-26ae-46aa-bd31-cb5e279a0d58.png?x-oss-process=image/resize,w_200,h_150,limit_0/interlace,1/format,webp/auto-orient,1)
![[Laser cut and engrave] Laser Cut Merry Christmas Santa Lighted Wall Art Decoration](https://image-res.atomm.com/resource/xtool/community/attachment/xtool-community/154193a9-6150-4bf9-a56a-38e72c0f2211.png?x-oss-process=image/resize,w_200,h_150,limit_0/interlace,1/format,webp/auto-orient,1)
![[Laser cut and engrave] Laser Cut Merry Christmas Santa Lighted Wall Art Decoration](https://image-res.atomm.com/resource/xtool/community/attachment/xtool-community/f2a194d0-b83d-4e0e-9145-ae6feefb7dd3.png?x-oss-process=image/resize,w_200,h_150,limit_0/interlace,1/format,webp/auto-orient,1)
![[Laser cut and engrave] Laser Cut Merry Christmas Santa Lighted Wall Art Decoration](https://image-res.atomm.com/resource/xtool/community/attachment/xtool-community/ce759ab9-46f3-4ed3-899d-b3dd650592d7.png?x-oss-process=image/resize,w_200,h_150,limit_0/interlace,1/format,webp/auto-orient,1)
🎄La lueur du Père Noël — Boîte🎅🏼 à ombres de Noël illuminée
 Instruction
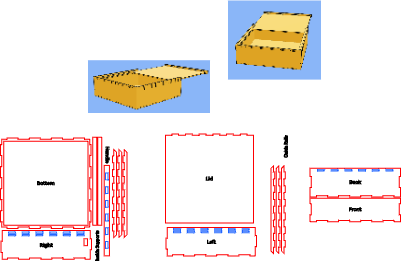


Information
      Apportez la chaleur de Noël dans n’importe quelle pièce avec cette boîte à ombres illuminée artisanale.
Ce panneau miroir carré de 8 pouces est gravé au laser d’un motif festif du Père Noël entouré de houx, de flocons de neige et de la vœu « Joyeux Noël ». Une fois allumée, la gravure prend vie avec une lumière intérieure douce et lumineuse qui crée une ambiance chaleureuse de fête.

Le panneau miroir est placé dans une boîte à ombres entièrement sur mesure, réalisée en contreplaqué riche en palissandre, donnant à la pièce une ambiance intemporelle et élégante. Une bande LED intégrée offre un éclairage vif et uniforme tout en maintenant un profil épuré et épuré.

La pièce finale mesure 8,25 » x 8,25 » x 2 » de profondeur, ce qui la rend parfaite pour les cheminées, étagères, tables d’appoint ou vitrines. Qu’il soit utilisé comme décoration saisonnière ou offert comme cadeau unique pour les fêtes, ce miroir illuminé du Père Noël ajoute instantanément une joie de Noël à n’importe quel espace.
Instruction
Étape1: Rassembler des documents et préparer des dossiers


Rassemblez tous les matériaux nécessaires avant de commencer le projet. Vous aurez besoin de :
- miroir carré de 8 » (utilisé comme panneau avant gravé)
- Trois (3) feuilles de 12 » × 12 » xTool Pale en contreplaqué
- Bois
- de colle en spray polyuréthane (transparent, satin ou brillant — à votre préférence)
- Kit de bandes LED (USB ou batterie fonctionnent tous deux bien)
- Les deux fichiers projet (téléchargés avant découpe)
Pour la gravure et la découpe, ce projet utilise à la fois le laser à diode xTool F1 Ultra 20W (pour la gravure en miroir) et le laser CO₂ xTool P2 (pour les composants en contreplaqué). Le projet peut être réalisé avec n’importe quel laser xTool — avec des réglages appropriés de puissance et de vitesse.
Étape2: Gravez le miroir et découpez les composants de la boîte d’ombre


Commencez par graver le miroir carré de 8" à l’aide du laser diode xTool F1 Ultra 20W.
Si vous gravez à l’intérieur ou à l’arrière du miroir, assurez-vous que l’image est en miroir (inversée) avant de lancer le travail afin qu’elle paraisse correcte vue de face. Une fois la gravure terminée, lavez doucement le miroir avec du savon et de l’eau pour éliminer tout résidu.
Ensuite, passez au laser CO₂ xTool P2 et découpez tous les composants en contreplaqué pour la boîte d’ombre en utilisant les fichiers téléchargés. Une fois la découpe terminée, nettoyez soigneusement chaque pièce pour éliminer la suie ou les résidus avant l’assemblage.
Étape3: Assemblez la boîte d’ombre et installez le miroir


Commencez par ajuster à sec tous les composants en contreplaqué pour assurer un alignement correct avant d’appliquer toute colle. L’assemblage est simple, mais référez-vous aux photos de référence jointes si nécessaire.
Selon les dimensions exactes de votre miroir, il se peut que vous deviez insérer le miroir dans le cadre avant de fixer les dernières pièces latérales. Une fois le miroir bien en place, collez les supports de support pour le fixer dans la boîte.
Ne fixez pas ni ne collez encore le panneau arrière — il doit rester ouvert pour l’étape suivante où l’éclairage LED sera installé.
Étape4: Installer la bande LED

Faites passer la bande LED par le trou prédécoupé sur le côté droit de la boîte d’ombre. Une fois la bande à l’intérieur, fixez-la sur les murs intérieurs selon votre méthode préférée — la plupart des kits LED ont un support adhésif, mais du ruban adhésif ou de la colle chaude supplémentaire peut être utilisé pour plus de sécurité.
Si votre bande LED comprend un capteur à distance, assurez-vous de placer le capteur en dehors de la boîte ou dans un endroit où le signal de la télécommande peut facilement l’atteindre. Un bon placement garantit un contrôle fluide de la luminosité, des couleurs et des effets d’éclairage.
Étape5: Terminez le panneau arrière et fermez la boîte


Pour un meilleur effet d’éclairage, terminez la surface intérieure du panneau arrière avant de fermer la boîte. Le peindre d’une couleur claire ou l’appliquer du ruban réfléchissant aidera à amplifier la luminosité LED, car le bois brut a tendance à absorber la lumière plutôt qu’à la réfléchir.
Une fois terminé, glissez le panneau arrière en place. Selon l’épaisseur exacte de votre matériau, il peut être nécessaire de poncer légèrement les bords des panneaux pour assurer un ajustement lisse et serré. Une fois la boîte complètement assemblée, appliquez votre scellant transparent préféré pour protéger le bois et rehausser le grain du palissandre.
Exposez fièrement votre création de Père Noël illuminé — cette pièce est garantie d’apporter un peu de magie de Noël dans n’importe quelle pièce !
Remixes
Licence


Vous pourriez aussi aimer

Décoration de boîte de lampes de Noël


Boîte de boîtes lumineuses de Noël 3D en bundle. Découpe laser par boîte d’ombre. Scène de Noël SVG. Boîte à ombres en bois à couches. Maison de Noël. Pin. Tasse de cacao. Bauble_copy


'/%3e%3cdefs%3e%3clinearGradient%20id='paint0_linear_1433_15726'%20x1='12'%20y1='5.25'%20x2='12'%20y2='18.75'%20gradientUnits='userSpaceOnUse'%3e%3cstop%20stop-color='%23FFC654'/%3e%3cstop%20offset='1'%20stop-color='%23FF8D12'/%3e%3c/linearGradient%3e%3c/defs%3e%3c/svg%3e)
Lanterne de Noël – Boîte à lumières de Noël en bois découpée au laser

Père Noël gravé au laser sur verre acrylique illuminé


Décoration de lumière de maison en bois découpé au laser avec lumières activées par sonnette


Décoration en acrylique gravée au laser pour Joyeux Noël

Boîte d’ombre de scène boisée découpée au laser


Lampe suspendue du sapin de Noël


Décoration de lumière de nuit en sapin de Noël en acrylique LED découpée au laser


Lanterne girafe

Lanterne en forme de boîte à ombres éclairée pour cerfs et scènes forestières pour matériau 3mm


Décoration de Noël LED avec le Père Noël et les rennes


Stand de crèches 3D. Scène de Noël coupée au laser. Poseur en bois sur étagère. SVG stable de Nativity. Décoration intérieure. Lanterne à LED chrétienne

Boîte lumineuse échangeable devant


Lanterne de Noël


Poinsettia


Boîte lumineuse magique en vitrail de Noël découpée au laser

Boite cadeau lumineuse