


![[Laser cut and engrave] Laser Cut Wooden Christmas House Light Decoration with Doorbell Activated Lights](https://storage-us.atomm.com/resource/xart/result/111407/3e70fa37-8a07-4df0-b269-da25f34d6c1b.png?x-oss-process=image/resize,w_1200,h_900,limit_0/interlace,1/format,webp/auto-orient,1)
Laser Cut Wooden Christmas House Light Decoration with Doorbell Activated Lights
 Remix
Remix Instruction
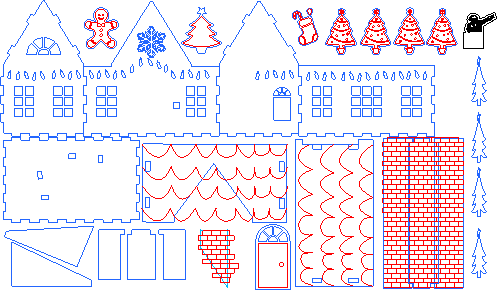

Information
Took this great project and modified to plywood (about 4.5 mm) with mods for the holidays. I loved the project, but wanted to use some fairy lights so I had fun ! Thanks and enjoy. I ended up making 3 versions of this to almost perfect it. This is wood!, so I removed the support piece and some tabs to simplify assembly. Paint makes wood swell more than stain so modify any connection point slightly wider if you need to. Do a mock version, then adjust and perfect your own project!
This remix is based on

 ytxtool
Instruction
Step1: Cut the 4.5 mm sanded plywood and glue these 2 items


This is the support bracket for the fairy lights and the chimney. Best to get these two items built and solid before constructing the main house.
Step2: Glue/Build/Install internal lights and tree


I used some clear silicon glue and installed the lights and the support box and while the glue dried, I installed the trees. I played with the file of the baseplate to help with angles. Feel free to modify. One big tree might be easier. Up to the eye of the beholder….Now install the back of the house and start on the roof.
Step3: Install rear roof

Note the top is shorter than the bottom. The notch is to the right for the chimney. Once this is in place, the chimney can be added. Do not glue this back roof piece if you want to be able to open and replace batteries.
Step4: Install front roof panel

Glue this piece in and then the angled triangle pieces to form a roofline. One piece is longer than the other to help with overlap/ glueing . The gingerbread man will be added to hide any gap. Now glue the remainder of the decorations.
Step5: The glue is probably dry and you have finished decorating


Ready to hit the doorbell?
Step6: Add Santa and the last chimney piece if you want to


Thanks for the project and I had fun modifying it ! Used sanded plywood from HD. Remember the thickness varies 4.3 to 4.6 most of the time.


