
![[Laser cut and engrave] Dad's Coffee Capsule Holder](https://image-res.atomm.com/resource/xtool/community/attachment/xtool-community/b4df0181-0038-42c8-bc3b-469fcdbedf71?x-oss-process=image/resize,w_1200,h_900,limit_0/interlace,1/format,webp/auto-orient,1)
![[Laser cut and engrave] Dad's Coffee Capsule Holder](data:image/png;base64,iVBORw0KGgoAAAANSUhEUgAAAAoAAAAKCAYAAACNMs+9AAAAAXNSR0IArs4c6QAAABdJREFUKFNjZCASMBKpjmFUId6QIjp4AAppAAuXjCs4AAAAAElFTkSuQmCC)
![[Laser cut and engrave] Dad's Coffee Capsule Holder](https://image-res.atomm.com/resource/xtool/community/attachment/xtool-community/b4df0181-0038-42c8-bc3b-469fcdbedf71?x-oss-process=image/resize,w_200,h_150,limit_0/interlace,1/format,webp/auto-orient,1)
![[Laser cut and engrave] Dad's Coffee Capsule Holder](https://image-res.atomm.com/resource/xtool/community/attachment/xtool-community/171405e4-f456-4b7c-be22-70af420d5ec5.png?x-oss-process=image/resize,w_200,h_150,limit_0/interlace,1/format,webp/auto-orient,1)
![[Laser cut and engrave] Dad's Coffee Capsule Holder](https://image-res.atomm.com/resource/xtool/community/attachment/xtool-community/74f55d3a-5d8a-41a4-bcae-456e80a87940.jpg?x-oss-process=image/resize,w_200,h_150,limit_0/interlace,1/format,webp/auto-orient,1)
Dad's Coffee Capsule Holder
 Instruction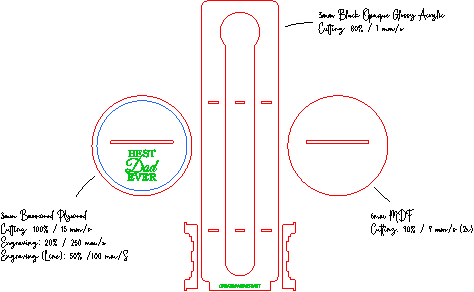


Information
      Even the best coffee mug is useless without coffee. With this capsule holder (for 7 capsules), it's now within easy reach for Dad!

You have to open the pickture file to see the full size!

(Attention! The individual parameters can be found in the XCS file)
Instruction
Step1

At first - Thank you for the download and have fun building! We will start with cutting the acrylic parts.
Step2


Please take the brackets and place each one into the recesses in the base plate. Starting with one side, bend the bracket and the base plate simultaneously to push the other side through the opening. A little bit of feeling is required—please do not bend too forcefully.
Once both brackets are in place, please place the middle section using the existing recesses. We'll permanently secure the middle section with a little superglue.
Step3


Now we turn our attention to the base. Once both parts are engraved and cut, we glue everything together.
Step4

Insert the capsule holder and the stand into each other and fill the stand with coffee capsules. A ribbon completes this gift for Dad.
Done!
Remixes
License



You may also like

Wooden coffee capsule stand (nespresso)


'/%3e%3cdefs%3e%3clinearGradient%20id='paint0_linear_1433_15726'%20x1='12'%20y1='5.25'%20x2='12'%20y2='18.75'%20gradientUnits='userSpaceOnUse'%3e%3cstop%20stop-color='%23FFC654'/%3e%3cstop%20offset='1'%20stop-color='%23FF8D12'/%3e%3c/linearGradient%3e%3c/defs%3e%3c/svg%3e)
Our Coffee Moment — Coffee Capsule & Cup Holder (SVG + XCS)


Coffee Pod Stand


Simple Coffee Bean Stand


☕ It’s Coffee Time – Kawaii Nespresso Pod Holder ☕


☕️ Coffee Time


Father's Day Football Plaque Stand in the Shape of a Hand Drawn Football Laser Cut Wood - XCS Settings + PDF Tutorial Included


Bamboo Cellular Holder


Coffee Bean Capsule Holder – “Espresso Yourself”


Coffee Mug, Coaster and Pod Organizer


3D Coffee pod stands bundle. Dolce gusto and nespresso pod holder lasercut. Wooden coffee capsule storage box. Coffee pod hanger display svg


Pendant/Keychain Holder


Novelty glasses holder


Wooden Tea Time table display stand for Father’s Day


Pop up tent sign holder


Bamboo Hand Towel Holder

Laser Cut Samsung Galaxy Tab2 Holder

Vertical Spoon Holder with Ceramic Ramekin Stand
