


![[Laser cut and engrave] Laser Cut Wooden Coffee Time Display Stand with Coffee Accessories](https://storage-us.atomm.com/resource/xtool/community/attachment/xtool-community/a0df5a75-afb1-4325-9401-090e38d50c9d.jpeg?x-oss-process=image/resize,w_1200,h_900,limit_0/interlace,1/format,webp/auto-orient,1)
![[Laser cut and engrave] Laser Cut Wooden Coffee Time Display Stand with Coffee Accessories](data:image/png;base64,iVBORw0KGgoAAAANSUhEUgAAAAoAAAAKCAYAAACNMs+9AAAAAXNSR0IArs4c6QAAABdJREFUKFNjZCASMBKpjmFUId6QIjp4AAppAAuXjCs4AAAAAElFTkSuQmCC)
![[Laser cut and engrave] Laser Cut Wooden Coffee Time Display Stand with Coffee Accessories](https://storage-us.atomm.com/resource/xtool/community/attachment/xtool-community/a0df5a75-afb1-4325-9401-090e38d50c9d.jpeg?x-oss-process=image/resize,w_200,h_150,limit_0/interlace,1/format,webp/auto-orient,1)
![[Laser cut and engrave] Laser Cut Wooden Coffee Time Display Stand with Coffee Accessories](https://storage-us.atomm.com/resource/xtool/community/attachment/xtool-community/358a2adf-6c26-4e8b-bb7b-6eaae0d7791b.png?x-oss-process=image/resize,w_200,h_150,limit_0/interlace,1/format,webp/auto-orient,1)
![[Laser cut and engrave] Laser Cut Wooden Coffee Time Display Stand with Coffee Accessories](https://storage-us.atomm.com/resource/xtool/community/attachment/xtool-community/dac87968-2f6c-4105-a2e6-68cb1cfd654e.png?x-oss-process=image/resize,w_200,h_150,limit_0/interlace,1/format,webp/auto-orient,1)
☕️ Coffee Time
 Coffee Décor Contest
  Instruction
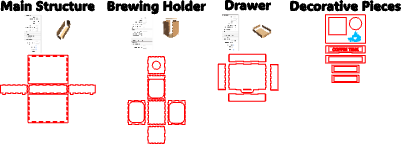


Information
      The Coffee Time station is a handcrafted, compact coffee display and brew station designed specifically around the Outln Nano Portable Electric Espresso Machine and its companion Outln Travel Tumbler. Created exclusively for the Atomm Coffee Décor Contest, this piece blends functional design with warm, modern aesthetics—making it equally suited for daily use, countertop display, or travel-inspired coffee setups.

The station features a clean, modular layout with a dedicated brewing attachment holder that elevates the espresso machine above the cup, creating a true “coffee ritual” moment in a minimal footprint. The main base measures 10” x 7” x 2½”, while the brewing attachment holder measures 6” x 4½” x 4½”, providing stability, balance, and visual symmetry.

Constructed from 3mm Ebony and Birch plywood sourced directly from the xTool online store, the contrasting materials emphasize precision laser-cut joinery and layered depth. The engraved “Coffee Time” drawer panel adds both visual warmth and practical storage, reinforcing the station’s purpose as a complete coffee experience in a single, cohesive piece.

The engraved coffee graphic on the top surface was created using Atomm’s AI, integrating digital creativity with physical craftsmanship. Every element—from proportions to material choice—was intentionally designed to complement the Outln ecosystem while maintaining a timeless, handcrafted look.

This project showcases how thoughtful design, laser craftsmanship, and modern coffee culture can come together in a functional art piece—perfectly sized, purpose-built, and ready for wherever coffee time happens next.
Instruction
Step1: Gather Materials & Set Up Your File
What You’ll Need
- Project file (downloaded to your computer)
- xTool Studio (installed and up to date)
- Material: 3mm (0.118”) plywood - Recommended: xTool 3mm Plywood Ebony + 3mm Birch
- Adhesives & assembly supplies
- Wood glue
- Painter’s tape (great as “laser clamps”)
- Clamps (optional but helpful for the base assembly)
- Finishing supplies
- Clear coat / finish of choice (spray lacquer, polyurethane, or furniture wax)
- Light sandpaper (optional, for cleanup before finishing)
Set Up the Project in xTool Studio
- Download the project file to a known folder (Desktop or a project folder works best).
- Open xTool Studio, then import/load the project file.
Confirm material thickness:
- This design is built for 3mm / 0.118” material.
- Assign operations (Cut / Engrave) as labeled in the file.
- Adjust your cut and engrave settings based on your specific plywood and machine:
- Use your own tested presets if you have them
- If not, run a quick material test grid on the same plywood before cutting the full project
✅ Pro Tip: If your plywood is even slightly over/under true 3mm, check fit with one small test joint before committing to the full cut.
Step2: Assemble the Main Structure


Use the reference photos provided to guide part orientation and assembly order. Dry-fitting before glue is strongly recommended.
Dry Fit First
- Lay out the base panel flat on your work surface.
- Position the left and right side panels so the finger joints align with the slots on the base.
- Gently press the side panels into place, keeping everything square.
- Add the rear panel, aligning its finger joints with the side panels and base.
- Once all pieces fit together cleanly, remove them and prepare for final assembly.
Glue & Assemble
- Apply a small, even amount of wood glue to the finger joints on the base and side panels. (A little goes a long way—avoid squeeze-out.)
- Reassemble the side panels onto the base, pressing firmly until seated.
- Install the rear panel, ensuring all joints are fully engaged.
- Use painter’s tape to pull joints tight and keep the structure square.
- Clamps may be used if desired, but tape works exceptionally well for this build.
Install the Top Panel
- Once the main box feels solid, apply glue to the top edges of the side and rear panels.
- Place the top panel onto the structure, aligning all slots and edges.
- Secure with painter’s tape or light clamping pressure.
Final Check
- Confirm the structure sits flat on the work surface
- Check that all joints are fully seated and square
- Wipe away any excess glue with a damp cloth
📸 Tip: The provided photos show correct panel orientation, joint alignment, and assembly order—refer to them often during this step.
Allow the main structure to dry completely before moving on to the next stage.
Step3: Assemble the Sliding Drawer


Refer closely to the photos provided for correct panel orientation and joint alignment. Dry-fitting is strongly recommended before applying glue.
Dry Fit the Drawer
- Lay the drawer bottom panel flat on your work surface.
- Position the left and right drawer side panels so the finger joints align with the slots in the bottom panel.
- Press the side panels into place gently.
- Add the front drawer panel (the piece with the pull tab), aligning it with the side panels and bottom.
- Finally, position the rear drawer panel to complete the box.
- Confirm the drawer is square and that all joints seat cleanly.
Glue & Assemble
- Apply a small amount of wood glue to the finger joints on the bottom and side panels.
- Reassemble the side panels onto the bottom, pressing firmly into place.
- Install the front panel (with the pull tab), ensuring it is flush and centered.
- Add the rear panel, completing the drawer box.
- Use painter’s tape to pull the joints tight and keep everything square while the glue sets.
- Clamps may be used, but tape works well for this assembly.
Test the Fit
- Once the glue has set enough to hold its shape, test-fit the drawer into the main structure.
- The drawer should slide smoothly without binding.
- If needed, lightly sand the drawer sides or edges for a smoother fit.
📸 Tip: The photos show the correct orientation of the pull tab, side panels, and bottom panel—use them as a visual reference throughout this step.
Allow the drawer to dry completely before moving on to the next stage.
Step4: Assemble the Brewing Holder


The brewing holder creates the elevated platform for the espresso machine. Take your time with orientation and rely on the reference photos to confirm alignment at each stage. Also, be very careful applying pressure when snapping joints in place; too much pressure or an uneven amount of pressure may cause damage to the panel.
Lay Out the Parts
- Arrange all brewing holder pieces on your work surface as shown in the photos:
- Two side frame panels with large rounded openings
- One solid back panel
- One bottom panel
- One top panel with the circular cutout
- Dry-fit all pieces to familiarize yourself with how the holder comes together.
Assemble the Frame
- Start by attaching the side frame panels to the bottom panel, aligning the finger joints.
- Press each joint together gently, ensuring the rounded openings face outward.
- Add the back panel, completing the three-sided structure.
- Confirm everything is square before proceeding.
Install the Top Panel
- Dry-fit the top panel with the circular cutout onto the frame to confirm orientation.
- The circular opening should be centered and aligned over the interior space.
- Apply a light, even layer of wood glue to the top edges of the frame.
- Seat the top panel firmly into place.
Secure & Set
- Use painter’s tape to pull the joints tight and hold the structure square.
- Light clamping pressure may be used, but tape is typically sufficient.
- Wipe away any glue squeeze-out with a damp cloth.
📸 Tip: The photos show the correct orientation of the cutout panel and how the side frames align—use them as your primary reference during this step.
Allow the brewing holder to dry fully before handling or attaching it to the main station.
Step5: Install the Decorative Panels


In this step, you’ll add the decorative elements that give the coffee station its finished look. Refer closely to the photos provided for exact placement and orientation.
Dry Fit First
- Lay the decorative frame piece and the “COFFEE TIME” lettering on the front face of the drawer.
- Confirm the frame sits flush within the recessed opening.
- Arrange the individual letters to ensure spacing and alignment look correct.
- Make any small adjustments now before applying glue.
Install the Decorative Frame
- Apply a thin, even layer of wood glue to the back of the rectangular frame piece.
- Carefully seat it into the recessed area on the front of the station.
- Press firmly and confirm it is centered and square.
- Use painter’s tape to hold it in place while the glue sets, if needed.
Install the “COFFEE TIME” Letters
- Apply a small dot of glue to the back of each letter.
- Place the letters one at a time inside the framed area, following the photo reference for spacing and alignment.
- Use the “throw-away” piece as a guide when placing letters.
- Lightly press each letter into place.
- Step back occasionally to check alignment before the glue sets.
Final Check
- Ensure all decorative pieces sit flat and flush
- Wipe away any excess glue with a damp cloth
- Allow the glue to fully cure before moving or finishing the station
📸 Tip: The photos show exact placement and spacing—use them as your primary guide for this step.
Step6: Apply Finish & Display Your Coffee Station


With assembly complete, it’s time to protect your work and bring out the natural beauty of the wood.
Apply the Finish
- Lightly sand the entire piece if needed, focusing on edges and joints.
- (220–320 grit is ideal.)
- Remove all dust using a soft cloth or compressed air.
- Apply your finish of choice:
- Clear spray lacquer for a clean, modern look
- Polyurethane for durability
- Furniture wax or oil for a softer, natural finish
- Allow the finish to dry fully according to the manufacturer’s instructions.
- Apply additional coats if desired, lightly sanding between coats.
Final Touches
- Once fully cured, reinstall the drawer and confirm smooth operation.
- Test-fit your espresso machine and travel tumbler in the brewing holder.
- Make any final adjustments as needed.
Display & Enjoy
- Place your finished Coffee Time Station on a countertop, desk, or coffee bar and enjoy a purpose-built space designed specifically for your brewing setup.
☕ You built it. You finished it. Now enjoy it.


