![[Laser cut and engrave] レーザーカット木製デスクオーガナイザー引き出し付き](https://image-res.atomm.com/resource/xtool/community/attachment/xtool-community/021792c1-6889-4961-95a9-7532a2954b7e.jpg?x-oss-process=image/resize,m_fill,w_1280,h_960,limit_0/interlace,1/format,webp/auto-orient,1)

![[Laser cut and engrave] レーザーカット木製デスクオーガナイザー引き出し付き](data:image/png;base64,iVBORw0KGgoAAAANSUhEUgAAAAoAAAAKCAYAAACNMs+9AAAAAXNSR0IArs4c6QAAABdJREFUKFNjZCASMBKpjmFUId6QIjp4AAppAAuXjCs4AAAAAElFTkSuQmCC)
![[Laser cut and engrave] レーザーカット木製デスクオーガナイザー引き出し付き](https://image-res.atomm.com/resource/xtool/community/attachment/xtool-community/021792c1-6889-4961-95a9-7532a2954b7e.jpg?x-oss-process=image/resize,m_fill,w_160,h_120,limit_0/interlace,1/format,webp/auto-orient,1)
![[Laser cut and engrave] レーザーカット木製デスクオーガナイザー引き出し付き](https://image-res.atomm.com/resource/xtool/community/attachment/xtool-community/ecf61434-ae80-4e1e-9ffe-714c6247c0cf.jpg?x-oss-process=image/resize,m_fill,w_160,h_120,limit_0/interlace,1/format,webp/auto-orient,1)
![[Laser cut and engrave] レーザーカット木製デスクオーガナイザー引き出し付き](https://image-res.atomm.com/resource/xtool/community/attachment/xtool-community/9d4a5a5a-fa36-4ec9-aa40-50e228143724.jpg?x-oss-process=image/resize,m_fill,w_160,h_120,limit_0/interlace,1/format,webp/auto-orient,1)
![[Laser cut and engrave] レーザーカット木製デスクオーガナイザー引き出し付き](https://image-res.atomm.com/resource/xtool/community/attachment/xtool-community/260e019e-0528-44b5-a764-1c7f06e2c182.png?x-oss-process=image/resize,m_fill,w_160,h_120,limit_0/interlace,1/format,webp/auto-orient,1)
Kumibako Desk Organizer Set — Desktop Station with Drawers & Pen Holders (3mm MDF, LEGO-Style Modular)
 Instruction


Information
Organize your desk with the Kumibako modular system! This set includes 5 modules — two drawer units (3×2, 2×2), two vertical pen holders (1×2), and a stackable tray (2×2) — that connect with stud-and-socket joints. Use the drawers for small items, vertical boxes for pens and markers, and the tray as an open-top catch-all. Stack and arrange to fit your workspace. Cut from 3mm MDF. Part of the Kumibako modular system with more expansion modules available.
Instruction
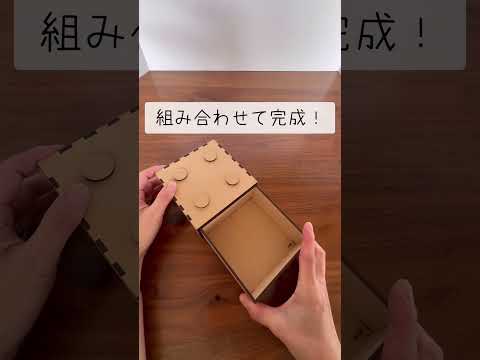
Step1: https://youtube.com/shorts/3klsu-WsYZU
Assembly is the same for all Kumibako drawer types — see the image above (Japanese, but visual enough to follow).
Quick summary:
- Pop out parts by letter group (A→B→C→D→E). Don't mix B and C — they look similar!
- Small parts first: make the handle (A0→A2) and stud connectors (A3→A4).
- Inner drawer box (Parts B): glue marked edges, fold into box.
- Outer shell (Parts C): same method. Test-fit before glue dries.
- Press stud connectors into top holes. Attach handle to drawer front.
- This file contains 4 canvases — base tray, two drawer sizes, and Jubako. Switch canvases in XCS to access each type.
Tips: Use wood glue. Let each step dry before proceeding.
Step2: Before you start

This is a shared assembly guide for all Kumibako types. Drawers use parts A, B, and C. Jubako uses parts A, D, and E.
Use wood glue. Pop out parts by letter group (A, B, C, D, E) and work step by step. Don't mix B and C — they look very similar! Let each sub-assembly dry before moving on. Contains small parts — keep away from young children.
Step3: Small parts — Handle and Stud Connectors
Pop out parts by group (A, B, C, D). Don't mix B and C — they look similar! Make the handle (A0→A2). Make stud connectors (A3→A4 — apply glue where green lines are shown). Wipe excess glue with spatula (A1) or wet tissue. Too much glue causes joint problems later. Let dry before Step 4.
Step4: Inner Drawer Box (Parts B)
Glue and fold using the same method as Step 3. Test-fit the inner box before glue dries. Wipe excess — the drawer will get stuck.
Step5: Outer Shell (Parts C)
Glue and fold using the same method as Step 3. Test-fit the inner box before glue dries. Wipe excess — the drawer will get stuck.
Step6: Attach Connectors and Handle
Press stud connectors into the small round holes on top of the outer shell. Attach the handle to the drawer front. Done! Stack boxes using the stud & socket system. Decorate with paint, crayons, or markers!
Step7: Jubako — Lidded Boxes (Parts D & E)
Jubako uses parts A (stud connectors), D (box body), and E (lid). Fold and glue the box body (D) the same way as the drawer steps. Fold and glue the lid (E). Press stud connectors into the top of the lid. Stack and combine!
Remixes



You may also like

Wooden Desktop Organizer with Multiple Compartments for Stationery and Office Supplies


Kumibako Starter Set — LEGO-Style Stackable Modular Drawers (3mm MDF, 3 Sizes)


Box


Organizador apilable de escritorio


Wooden Desktop Organizer with Shelves and Storage Drawer


Desk storage organiser with draw


Hexagon Desk Organizer Set - 4 Pieces


Stackable Storage Bin


Kumibako Mini Tansu Set — Japanese-Style 4-Drawer Chest with LEGO Studs (3mm MDF, 2 Sizes)

3-tier folding shelf for sales


Wooden desk organizer with pen compartments and storage drawers


Wooden Desktop Storage Box with Pull-Out Drawer


Desk organizer with drawer


Wooden Honeycomb Desk Organizer with Handle and Compartments


Desk organizer with multi-compartments


Wooden box with drawer and lattice lid for storage


Wooden desk organizer with storage compartments and drawer

Cylindrical Pencil Holder with Desk Storage Drawer
