


Report
![[Laser cut and engrave] Laser Engraved Wooden Coffee Capsule Holder with Leaf Design](https://storage-us.atomm.com/resource/xtool/community/attachment/xtool-community/e6ff1d97-fd62-455a-a5b1-e63542762bd0.png?x-oss-process=image/resize,w_1200,h_900,limit_0/interlace,1/format,webp/auto-orient,1)
![[Laser cut and engrave] Laser Engraved Wooden Coffee Capsule Holder with Leaf Design](data:image/png;base64,iVBORw0KGgoAAAANSUhEUgAAAAoAAAAKCAYAAACNMs+9AAAAAXNSR0IArs4c6QAAABdJREFUKFNjZCASMBKpjmFUId6QIjp4AAppAAuXjCs4AAAAAElFTkSuQmCC)
![[Laser cut and engrave] Laser Engraved Wooden Coffee Capsule Holder with Leaf Design](https://storage-us.atomm.com/resource/xtool/community/attachment/xtool-community/e6ff1d97-fd62-455a-a5b1-e63542762bd0.png?x-oss-process=image/resize,w_200,h_150,limit_0/interlace,1/format,webp/auto-orient,1)
![[Laser cut and engrave] Laser Engraved Wooden Coffee Capsule Holder with Leaf Design](https://storage-us.atomm.com/resource/xtool/community/attachment/xtool-community/d499d02f-f1b9-4f98-9f00-4cf76ee1159e.png?x-oss-process=image/resize,w_200,h_150,limit_0/interlace,1/format,webp/auto-orient,1)
![[Laser cut and engrave] Laser Engraved Wooden Coffee Capsule Holder with Leaf Design](https://storage-us.atomm.com/resource/xtool/community/attachment/xtool-community/48009e98-3626-4365-bd7f-0fd74f5606d5.png?x-oss-process=image/resize,w_200,h_150,limit_0/interlace,1/format,webp/auto-orient,1)
![[Laser cut and engrave] Laser Engraved Wooden Coffee Capsule Holder with Leaf Design](https://storage-us.atomm.com/resource/xtool/community/attachment/xtool-community/21f53c84-6976-4ddc-b292-f937f3a117f8.png?x-oss-process=image/resize,w_200,h_150,limit_0/interlace,1/format,webp/auto-orient,1)
Gravity-Fed Pod Tower
 Coffee Organizer Contest
 Instruction
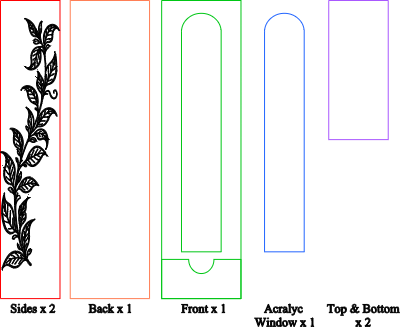
Gravity-Fed Pod Tower
.xcs
Application scenario
Laser processing
Machine & module
xTool D1 Pro
20WCompatibles · 3
Material used

1/2"(12mm) Black Walnut Plywood

1/4"(6mm) Transparent Acrylic
2
70
Information
      The Inspiration:
My goal for this round was to take the daily friction out of the "morning rush." Most coffee pod storage is either hidden in a messy drawer or takes up too much horizontal counter space. I wanted to design a solution that felt like a professional barista’s tool—vertical, sleek, and high-contrast—while honoring the organic beauty of the coffee plant itself.

Functional Innovation:
•	Gravity-Fed Efficiency: The internal channel is precision-measured for smooth pod delivery. By pulling from the bottom, the inventory naturally rotates, ensuring you never have "stale" pods at the back of a drawer.
•	Visual Inventory: The integrated clear acrylic window is a functional necessity, allowing the user to see exactly when it’s time to restock without opening a lid.
•	Minimalist Footprint: By moving to a vertical storage model, I’ve cleared nearly 20 square inches of counter space, perfect for compact "home cafe" setups.

Design Philosophy:
As part of my "DIY Life" brand, I believe storage shouldn't just hide clutter; it should celebrate the ritual. This tower turns your daily caffeine supply into a piece of botanical art.
Instruction
1
Step1
The Design Blueprint
To build this tower, you need 6 main pieces. Assuming standard Nespresso-style pods (approx. 37mm wide), use these dimensions:
1. Front Panel (The Face)
- Outer Size: 80mm x 300mm.
- The Window Cutout: Create a centered rectangle (or pill shape) that is 40mm x 240mm. Position it 20mm from the top.
- The Dispenser Slot: At the very bottom, cut a semi-circle or rectangular notch (approx. 45mm wide x 40mm high) so you can reach in and pull a pod out.
2. Side Panels (x2)
- Size: 60mm x 300mm.
- The Engraving: This is where we place out coffee-leaf vine.
3. Back Panel
- Size: 80mm x 300mm. (Plain solid piece).
4. Top & Bottom Caps (x2)
- Size: 80mm x 60mm.
2
Step2
The Internal "Gravity" Rails
To keep the pods from twisting sideways, you must narrow the inside of the tower.
- Draw two thin strips: 15mm (W) x 280mm (H).
- Glue these to the inside of the Side Panels during assembly. This makes the internal width 50mm, which is the "sweet spot" for standard pods.
3
Step3
Cutting and Engraving:
- There are six main parts to cut, apart from the glide rails.
- Sides panes have engraving ehich you can change for your prefered image
- Use the recommended setting of your specific laser machine
- If you are using blue Diode machine, skip the Acrylic cutting part and using plastic film instead.
4
Step4
Assembly Instructions
- Peel: Remove the protective film from the acrylic/wood.
- Dry Fit: Fit the Back, Sides, and Bottom together to ensure they align.
- Glue: Use acrylic cement (for acrylic) or wood glue (for walnut). Glue the Side Panels to the Back Panel first.
- The Window: Slide your clear acrylic piece (cut to 46mm x 246mm) behind the front face.
- Seal: Glue the Front Face onto the sides. Attach the Top Cap last.
Comments


