
Report
![[Laser cut and engrave] Arch Earring Holder Stand](https://image-res.atomm.com/resource/xtool/community/attachment/xtool-community/c6188f31-3bf9-4eec-b328-0ae9f624cab6.png?x-oss-process=image/resize,w_1200,h_900,limit_0/interlace,1/format,webp/auto-orient,1)
![[Laser cut and engrave] Arch Earring Holder Stand](data:image/png;base64,iVBORw0KGgoAAAANSUhEUgAAAAoAAAAKCAYAAACNMs+9AAAAAXNSR0IArs4c6QAAABdJREFUKFNjZCASMBKpjmFUId6QIjp4AAppAAuXjCs4AAAAAElFTkSuQmCC)
![[Laser cut and engrave] Arch Earring Holder Stand](https://image-res.atomm.com/resource/xtool/community/attachment/xtool-community/c6188f31-3bf9-4eec-b328-0ae9f624cab6.png?x-oss-process=image/resize,w_200,h_150,limit_0/interlace,1/format,webp/auto-orient,1)
![[Laser cut and engrave] Arch Earring Holder Stand](https://image-res.atomm.com/resource/xtool/community/attachment/xtool-community/ece7a410-3c21-4edc-8b8b-0d5dabb0b6c5.png?x-oss-process=image/resize,w_200,h_150,limit_0/interlace,1/format,webp/auto-orient,1)
![[Laser cut and engrave] Arch Earring Holder Stand](https://image-res.atomm.com/resource/xtool/community/attachment/xtool-community/d56fc4e5-c88d-4619-871a-1d2f7b9ecc74.png?x-oss-process=image/resize,w_200,h_150,limit_0/interlace,1/format,webp/auto-orient,1)
![[Laser cut and engrave] Arch Earring Holder Stand](https://image-res.atomm.com/resource/xtool/community/attachment/xtool-community/09598ee0-6e63-4008-a5c6-e1e263e86142.png?x-oss-process=image/resize,w_200,h_150,limit_0/interlace,1/format,webp/auto-orient,1)
![[Laser cut and engrave] Arch Earring Holder Stand](https://image-res.atomm.com/resource/xtool/community/attachment/xtool-community/bc474fdb-5f54-4072-8935-811822032c2a.png?x-oss-process=image/resize,w_200,h_150,limit_0/interlace,1/format,webp/auto-orient,1)
Arch Earring Holder Stand
 Instruction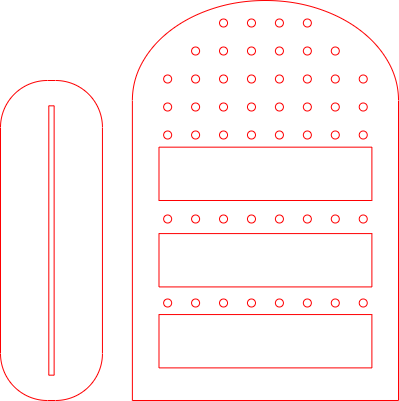
Arch Earring Holder Stand
.xcs
Application scenario
Laser processing
Machine & module

xTool D1 Pro
20WCompatible xTool Machine
New
M2
10W, 20WF2 Ultra UV
5WP3
80WF2 Ultra
40WF1 Ultra
20WM1
5W, 10WD1
5W, 10W, 20WD1 Pro
5W, 10W, 40WP2
55WF1
10WS1
10W, 20W, 40WM1 Ultra
10W, 20WP2S
55WMaterial used

1/8"(3mm) Basswood Plywood

1/4"(6mm) Maple Plywood

174
1589
Information
      Stop losing your favorite earrings in a messy jewelry box!

This Modern Earring Display Stand is the perfect way to organize and showcase your jewelry collection. Designed to hold both tiny studs and long dangly earrings, this stand keeps your pieces beautifully separated, tangle-free, and easy to grab on a busy morning.
Instruction
1
Step1
Physical Setup in the Machine
- Place the Material: Lay your wood flat on the honeycomb panel or slats.
- Secure the Wood: Use "honeycomb pins" or magnets to ensure the wood is perfectly flat. If the wood is warped, the laser will lose focus, and it won't cut through.
- Position the Laser Head: Manually move the laser head (or use the software arrows) to the top-left corner of your material.
2
Step2
Configuring xTool Studio
- Connect Your Device: Open XCS and connect to your S1 or P2 via USB, Wi-Fi, or IP.
- Select Mode:
- Capture the Canvas: * On the P2, click Refresh to take a wide-angle photo of your wood.
- Import Your Design: Open the xcs file you downloaded from Atomm.
3
Step3
Setting the Focus
Proper focus is the difference between a clean cut and a scorched mess.
- Auto-Measure: In the right-hand panel, click the Auto-measure icon (it looks like a small ruler/target).
- S1: The probe will drop down to touch the wood.
- P2: The laser head will move over the material to measure the height via the built-in sensor.
4
Step4
Adjusting "Cut" Parameters
Select your design on the canvas to open the settings panel on the right.
- Processing Type: Change from "Score" or "Engrave" to Cut.
- Setting the Power/Speed:
- Passes: Set to 1 unless the wood is exceptionally thick (over 10mm).
5
Step5
Framing and Starting
- Framing: Click Framing on the bottom right. The laser head will move in a rectangle to show you exactly where the cut will happen. Ensure it doesn't hit any pins or magnets.
- Process: Click Process, then Start.
- Physical Button: Finally, press the Start button on the machine itself to begin the cut.
Comments
Remixes
License



You may also like

Tree Jewelry Organizer Stand 3mm | Laser Cut Earring Holder File (SVG)

2
15

3D Layered jewelry stand. Earrings organizer laser cut. Boho accessory display svg. Drop earring storage.Butterflies

46
328

Earring Stand Laser Cut Files, SVG, Glowforge, Sieraden stand, sieraden display

18
111

Freestanding earring display shelf

7
99

Iridescent Arch Earring Holder Stand

0
0

Earring Stand

2
14

Laser-engraved acrylic earrings and display stands

11
33

Floral Pattern Earring Holder Stand for Jewelry Organization

1
17

'/%3e%3cdefs%3e%3clinearGradient%20id='paint0_linear_1433_15675'%20x1='12'%20y1='3.25'%20x2='16.6891'%20y2='20.75'%20gradientUnits='userSpaceOnUse'%3e%3cstop%20stop-color='%23FF5D80'/%3e%3cstop%20offset='1'%20stop-color='%23FF0035'/%3e%3c/linearGradient%3e%3c/defs%3e%3c/svg%3e)
Support à bijoux

99
553

Jewelry Display Laser Cut | Jewelry Stand | Earrings Stand | Jewelry Holder | CNC File

11
57

Laser Cut Display Stand - 3mm wood

140
899

$2.10
$2.10
Credits210
3D Jewelry stands. Stud earrings organizer laser cut. Boho accessory display. Accessories storage. Drop earring holder. Trinket plate
4

Butterfly earring stand

19
97

Support bijoux arbre / Laser Cut Wooden Tree Jewelry Earring Holder Stand

56
289

Wood Earring Display Stand | Laser Cut Jewelry Holder | front Woman Silhouette Organizer | Earrings Showcase

40
141

Wooden Phone cover laser cut
4
25

Earring Display Board
8
37

Xtools Remote stand - Less than one board and made on F1 Ultra

4
26