![[Laser cut and engrave] Wooden Phone cover laser cut](https://image-res.atomm.com/resource/xtool/community/attachment/xtool-community/12ceba54-7a7f-4987-b701-edd904e7a402.png?x-oss-process=image/resize,m_fill,w_1280,h_960,limit_0/interlace,1/format,webp/auto-orient,1)
![[Laser cut and engrave] Wooden Phone cover laser cut](data:image/png;base64,iVBORw0KGgoAAAANSUhEUgAAAAoAAAAKCAYAAACNMs+9AAAAAXNSR0IArs4c6QAAABdJREFUKFNjZCASMBKpjmFUId6QIjp4AAppAAuXjCs4AAAAAElFTkSuQmCC)
![[Laser cut and engrave] Wooden Phone cover laser cut](https://image-res.atomm.com/resource/xtool/community/attachment/xtool-community/12ceba54-7a7f-4987-b701-edd904e7a402.png?x-oss-process=image/resize,m_fill,w_160,h_120,limit_0/interlace,1/format,webp/auto-orient,1)
![[Laser cut and engrave] Wooden Phone cover laser cut](https://image-res.atomm.com/resource/xtool/community/attachment/xtool-community/938dc5af-00ed-46a9-8c25-3b1ba3ee8567.png?x-oss-process=image/resize,m_fill,w_160,h_120,limit_0/interlace,1/format,webp/auto-orient,1)
Wooden Phone cover laser cut
 Instruction

Information
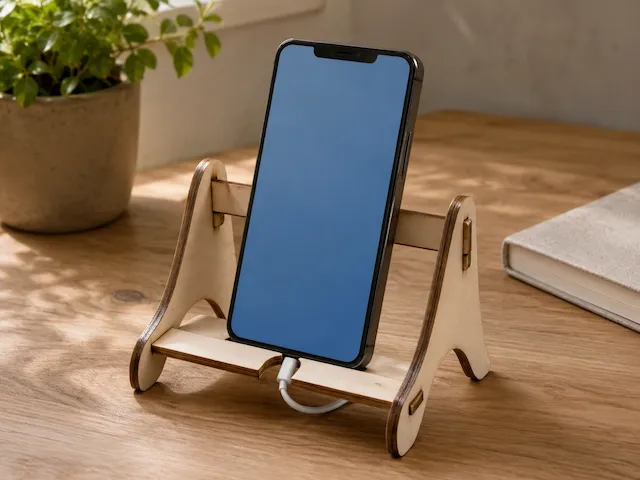
Laser-cut phone stand made from 3 mm plywood or MDF, composed of two interlocking slot-fit parts: a vertical back plate and a horizontal base. The design is optimized for clean cutting on a laser cutter, with no engraving elements. Assembly requires no screws or glue — the two pieces slide together through matching slots. The file can be scaled or the slot width adjusted to match different material thicknesses and kerf tolerances.
Instruction
Step1
Materials & Preparation
Recommended material: 3 mm plywood or MDF
Import the SVG files into your laser-cutting software
Make sure:
Units are set to millimeters
Scale is 1:1
All paths are assigned to cut (no engraving)
⚙️ Tip: If your material is not exactly 3 mm, adjust the slot width to match the real thickness, allowing ~0.1–0.2 mm tolerance for kerf.
Laser Cutting Settings (general guidance)
Use standard cut settings for your machine and material
Run a small test cut first to confirm fit and edge quality
Avoid scorching by tuning speed / power as needed
✔ The edges should be clean and the parts should slide together firmly but not forcefully.
Assembly Steps
Place the base piece flat on the table.
Align the slot in the back plate with the slot in the base.
Slide the back plate down into the slot until fully seated.
Make sure the parts are perpendicular and stable.
🧩 No glue or screws are required — it is a slot-fit friction assembly.
Using the Phone Stand
Place your phone against the back plate
The small front lip holds the phone in place
The optional cutout allows charging cable clearance
Customization Options
You can modify the design by:
Changing the angle or height of the back plate
Scaling for tablets or larger phones
Adjusting slots for different thickness materials
Adding engraving or decorative cutouts
Remixes



You may also like

Support telephone


Foldable Phone Holder


Phone support
Wooden Phone Holder for Desk


Laser Cut Wooden Phone Stand with Geometric Lattice Pattern - AI, DXF, EPS, SVG, CDR - Digital Download


Laser Engraved Bamboo Phone Stand with Cartoon Character Design Mario


Laser Engraved Wooden Tablet Picture Holder with Plant Motif


Wooden phone holder with lion head pattern


Laser Cut Wooden Phone Stand with Tree of Life Engraving


Bee design mobile phone holder


Laser Cut Wooden Phone Holder with xTool Logo


Tablet holder


Highland Cow Laser Engraving images and settings for Bamboo

Laser Engraved Bamboo Phone Stand with fallout Design

Adjustable desk stand for smartphone and tablet


Phone holder - Bernard Family


Cat Shaped Desk Phone Holder


Laser Engraved Bamboo Phone Stand with taylor Swiftie Design