
![[Laser cut and engrave] IFA Pocket Maze](https://storage-public.atomm.com/xtool/community/attachment/xtool-community/8ed03cc2-8fdf-4a5f-b6c3-3b1a0c6f7020.png?x-oss-process=image/resize,m_fill,w_1280,h_960,limit_0/interlace,1/format,webp/auto-orient,1)
![[Laser cut and engrave] IFA Pocket Maze](data:image/png;base64,iVBORw0KGgoAAAANSUhEUgAAAAoAAAAKCAYAAACNMs+9AAAAAXNSR0IArs4c6QAAABdJREFUKFNjZCASMBKpjmFUId6QIjp4AAppAAuXjCs4AAAAAElFTkSuQmCC)
![[Laser cut and engrave] IFA Pocket Maze](https://storage-public.atomm.com/xtool/community/attachment/xtool-community/8ed03cc2-8fdf-4a5f-b6c3-3b1a0c6f7020.png?x-oss-process=image/resize,m_fill,w_160,h_120,limit_0/interlace,1/format,webp/auto-orient,1)
![[Laser cut and engrave] IFA Pocket Maze](https://storage-public.atomm.com/xtool/community/attachment/xtool-community/6b44ab63-722a-4a25-b008-7dab59b24ba9.jpeg?x-oss-process=image/resize,m_fill,w_160,h_120,limit_0/interlace,1/format,webp/auto-orient,1)
![[Laser cut and engrave] IFA Pocket Maze](https://storage-public.atomm.com/xtool/community/attachment/xtool-community/e8875b32-6850-43f7-9285-f7f0ab385169.gif)
IFA Pocket Maze
 xTool IFA Creative Challenge
 Instruction


Information
Bring XTOOL to the IFA: This compact three-layer ball maze created for the xTool IFA Creative Challenge is made from colored MDF, plywood and clear acrylic. It turns the IFA and xTool names into playable paths with a bold X at the center. A quick-to-make, interactive souvenir that combines technology, creativity and fun.
Instruction
Step1: First Look & Materials

Small enough to take home, tricky enough to keep you playing!
This three-layer pocket maze turns IFA and xTool into part of the game itself. A colored MDF base creates strong contrast, plywood forms the maze, and clear acrylic keeps the ball safely inside. Designed as an interactive IFA giveaway, it combines technology, creativity and play in one compact object.
Materials
- Colored MDF for the bottom layer
- 3 mm plywood for the maze layer
- 3 mm clear acrylic for the cover
- 4 × M3 × 8 screws
- 1 small ball that fits the maze
- A small amount of glue
Tools
- Tweezers
- Screwdriver
Here is the Insta-Link:
Instagram
Step2: Layout / CAD


I designed this maze with the help of sketchup make - a free and easy-to-use CAD software.
The design consists of three perfectly aligned layers.
Instead of simply engraving the names, I wanted to built “IFA” and “XTOOL” directly into the playable paths. An X forms the visual and mechanical center of the maze, surrounded by junctions, alternative routes and dead ends.
The four corner holes align the layers and make final assembly quick and simple.
Step3: Laser Cutting

All three layers were processed with the xTool P2.
For the coloured part i added a version for other themes without the white marks.
Engrave and cut the colored MDF, plywood and clear acrylic as indicated in the included project files. The correct processing settings are already saved with each layer.
Important: Keep the small inner pieces from the A in “IFA” and the two Os in “XTOOL”. They are needed during assembly!
Step4: Quick Assembly
Assembly only takes a few minutes
- Place the removed maze cut-out on the colored MDF base as a temporary positioning template.
- Use tweezers to glue the small inner pieces of the A and the two Os into their correct positions.
- Carefully remove the positioning template.
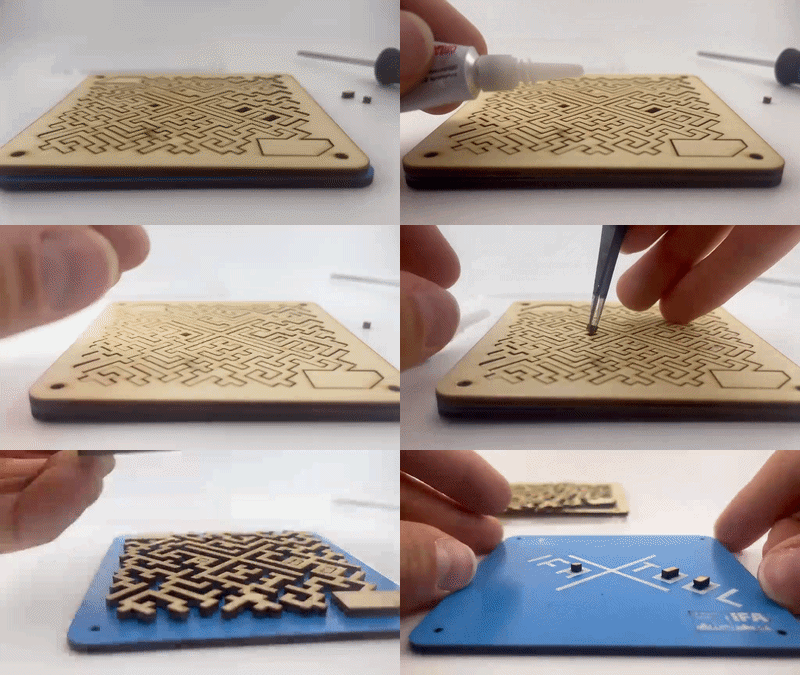
4. Place the ball inside the maze.
5. Stack the plywood maze and clear acrylic cover on top of the MDF base.
6. Insert one M3 × 8 screw into each corner and tighten them evenly. Do not overtighten the acrylic
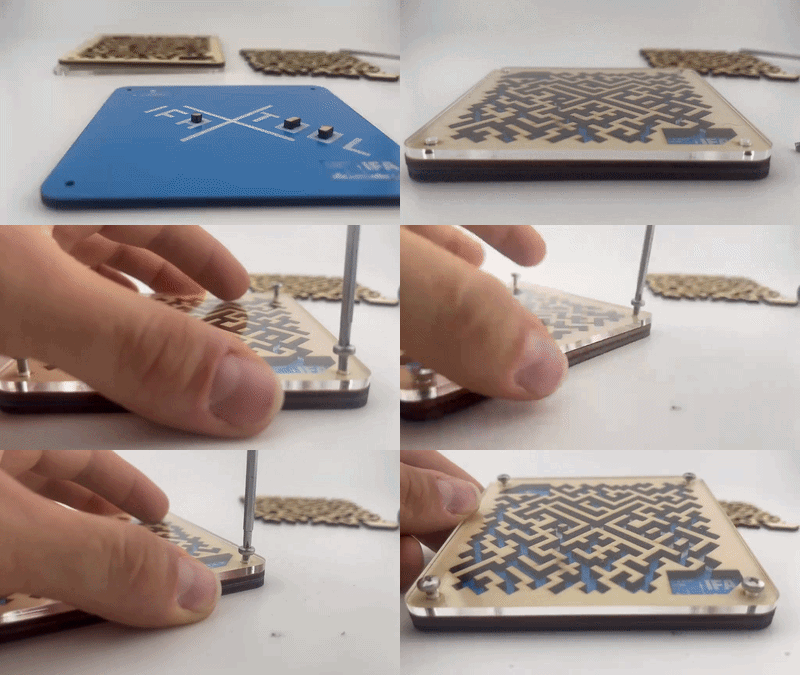
That’s it—the maze is ready to play!
Step5: Find the Way!
Tilt it, turn it and try again: Can you guide the ball through the IFA and xTool paths without getting trapped in a dead end?
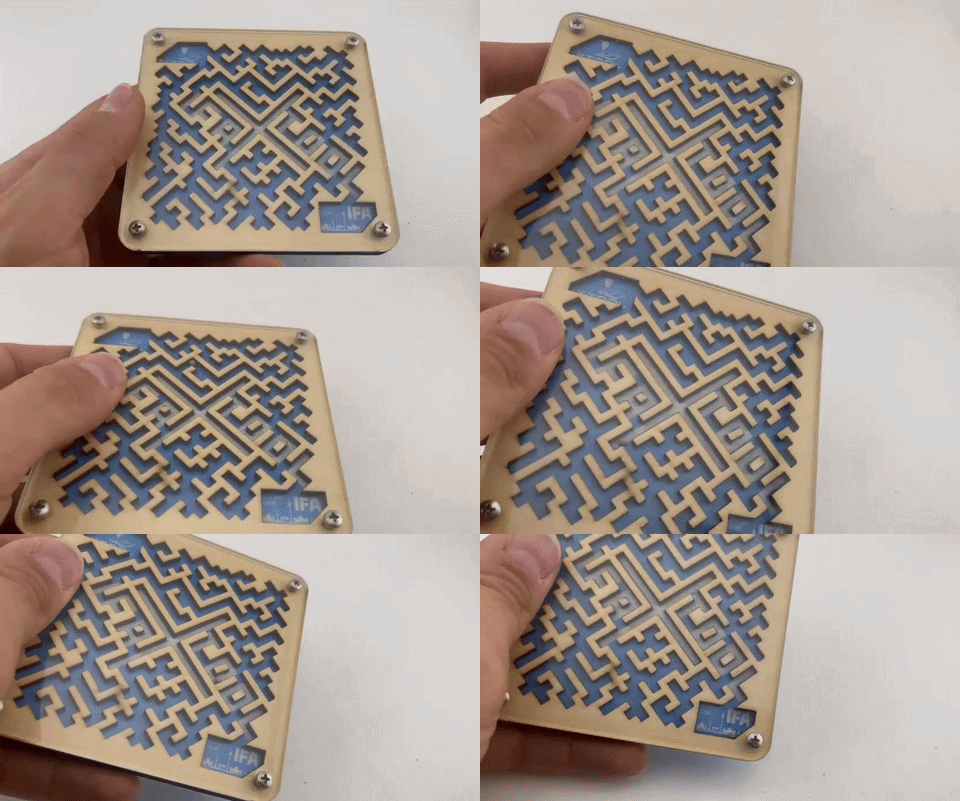
This maze is part souvenir, part game and part maker showcase. It is quick to produce, easy to carry and perfect for sharing at an exhibition booth.
Inspired by IFA’s “The Future Is Now” and xTool’s “The Human Age of Making,” this project turns technology into something people can touch, play with and take home.
Made for the xTool IFA Creative Challenge 2026.
#xToolIFA2026 #xToolMade #IFA2026 #LaserCut #PocketMaze
Remixes



You may also like

Dinosaur Maze Puzzle Toy for Kids


Laser Cut Wooden Marble Maze Puzzle – DIY Interactive Game for Kids & Adults – xTool File


Bunny Shape Maze Puzzle Toy for Kids Laser Cut. Kids Laser Design. Toys and Games SVG. Easter Design


Week 1 Task - Maze


Laser Cut 3 Pieces Interlocking Wooden Burr Puzzle


Hexagonal Wooden Tiling Brain Teaser Puzzle


25-Piece Mini Jigsaw Puzzle – 10×10 cm


Puzzle outline to generate personalized jigwaw.


Frog Shaped Children's Marble Maze Puzzle Game Laser Cut. Magnetic Animal Maze Toys. Kids Laser. Gift Idea


3D Valentine's day maze toys bundle. Kids maze puzzle laser cut. Layered labyrinth game svg. Anniversary gift. Heart. Hot air balloon


Maze

Laser Cut Wooden Katamino Puzzle Game with Storage Box


Jigsaw Puzzle Svg | Educational Puzzles for Children


Jigsaw Puzzle Svg | Educational Puzzles for Children


Jigsaw Puzzle Svg | Educational Puzzles for Children | Colour Puzzles


Laser Cut Six Piece Cross Puzzle

150 Pcs Puzzle Blueprint - Total Size 150x200mm - Square size 15x10mm

asdwqeafasf
