![[Laser cut and engrave,Inkjet printing] Fungi To Be With Mushroom Keychain](https://storage-public.atomm.com/xtool/community/attachment/xtool-community/1febbd9b-cb02-42a6-b738-d1d8a1b9e0e7.JPG?x-oss-process=image/resize,m_fill,w_1280,h_960,limit_0/interlace,1/format,webp/auto-orient,1)
Fungi To Be With Mushroom Keychain
 Instruction


Information
      I wanted to try the inkjet printing on plywood. I saw on different tutorials that you can get better results, if you use some fixative on the wood, but I couldn't find it in the EU store, so I made a few tries by myself.
The design here is created by AI, then a halftone maker - to make it retro :)
Instruction
Step1: Testing the wood printing


I had white wood stain and white chalk paint at home, so I made 3 versions of these designs with automated print settings.
On the first picture you can see the pre-paint plywood sheet - the bright white part is the chalk paint, the bottom shade is stain. I let it dry, then I put it into my M2, and printed the design. I used the same settings everywhere - on plain wood, and these 2 painted ones.
The results are totally different: the chalk paint is the most messy, then the plain wood - the best result came from the stained wood.
Step2: Cut


I cut all designs, you can see them together on the first picture
Step3: Sand the edges


I used a bit of sanding to make the edges clear.
Step4: Varnish - DON'T DO!

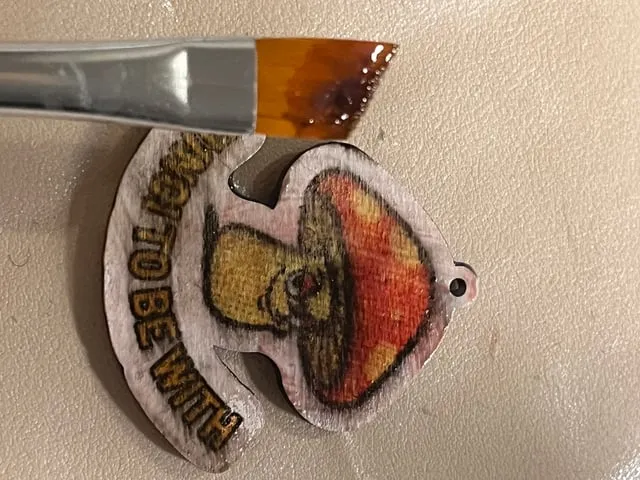
This is the part, what you want to avoid! I thought it would be good to make it more durable, so I added a thin coat - and messed the whole painting up!
Maybe with spray varnish, or UV coating it would get better… the paintbrush method definately did not work.
Step5: Add charm or keyholder settings


You can add a bag clasp to it, and ready to go … you have a fun design :)
https://www.reddit.com/r/xToolOfficial/s/t7ryQ2lt0E
Remixes
License



You may also like

Retro Burnout Bouquet — Halftone Sticker Pack for the Tired & Thriving


Happy Frog Keychain


Wooden ornament depicting a fox sleeping under a mushroom


Ghost keychain - engraved wood design

Laser Engraved Mushroom Design Metal Keychain/bag tag


Frog keychain


Just a Little Ray of Pitch Black Skeleton Umbrella Keychain


Lustige Halloween-Schlüsselanhänger – gravierte Comic-Motive


Cute Mushroom Character Vinyl Stickers


Disappointed Frog leather keychain


Laser Cut Wooden Mushroom Ornament with Hanging Hole


Runder Schlüsselanhänger aus Holz mit buntem Lippen-Motiv

Cute Taco Character Keychain


Laser Engraved Wooden Mushroom Floral Keychain


Cute wooden keychain with smiling tea cup


Keychain with Bowser motif


Cute wooden mushroom-shaped earrings

Porte-clés en bois en forme de petits monstres mignons