


![[Laser cut and engrave] Laser Engraved Wooden Ghost and Mushroom Keychain](https://storage-us.atomm.com/resource/xtool/community/attachment/xtool-community/ed218d4f-477e-49e6-88dc-4d96742e3ff7.JPG?x-oss-process=image/resize,w_1200,h_900,limit_0/interlace,1/format,webp/auto-orient,1)
![[Laser cut and engrave] Laser Engraved Wooden Ghost and Mushroom Keychain](data:image/png;base64,iVBORw0KGgoAAAANSUhEUgAAAAoAAAAKCAYAAACNMs+9AAAAAXNSR0IArs4c6QAAABdJREFUKFNjZCASMBKpjmFUId6QIjp4AAppAAuXjCs4AAAAAElFTkSuQmCC)
![[Laser cut and engrave] Laser Engraved Wooden Ghost and Mushroom Keychain](https://storage-us.atomm.com/resource/xtool/community/attachment/xtool-community/ed218d4f-477e-49e6-88dc-4d96742e3ff7.JPG?x-oss-process=image/resize,w_200,h_150,limit_0/interlace,1/format,webp/auto-orient,1)
![[Laser cut and engrave] Laser Engraved Wooden Ghost and Mushroom Keychain](https://storage-us.atomm.com/resource/xtool/community/attachment/xtool-community/edd173c3-2c0a-482e-9593-c677983155f9.JPG?x-oss-process=image/resize,w_200,h_150,limit_0/interlace,1/format,webp/auto-orient,1)
![[Laser cut and engrave] Laser Engraved Wooden Ghost and Mushroom Keychain](https://storage-us.atomm.com/resource/xtool/community/attachment/xtool-community/056aca96-9d44-4a2b-93d0-c648b9852a83.JPG?x-oss-process=image/resize,w_200,h_150,limit_0/interlace,1/format,webp/auto-orient,1)
Ghost keychain - engraved wood design
 Instruction
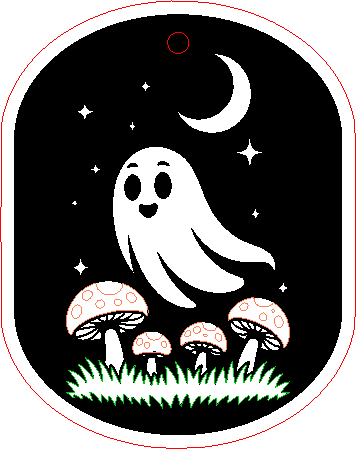


Information
A cute ghost design in a keychain - made with 'reverse engraving'
Instruction
Step1: Engrave and cut the design

I made this design with AI. Then, in Xtool program, I traced the image, and changed a bit to create this final version. I wanted to use ‘reverse engraving’, so here the ghost, the mushroom and the moon and stars are remain original, with a frame. The ‘background’ is engraved.
The settings are fit to 10W M1 machine with air assist and riser base. You can pre-paint the plywood, if you want; I added some extra white color tone later.
Step2: Sanding


As after engraving the design gets a bit smokey, I decided to sand a bit. I use fine sanding paper to sand on front, back and sides as well.
Step3: Paint & Seal (optional)


I wanted my design to pop out, so I added a bit of white acrylic paint over everything. I used a fine-tip Posca marker.
Then, with matte varnish, I sealed the design everywhere.
Wait until it's dried completely.
Step4: Add keyholder settings


I added a strong keyholder to the design, and that's it.
You can make it as magnet or earrings - as you like :)


