
Report
![[Laser cut and engrave] Father’s Day Toolbox – Gift & Treat Holder](https://storage-public.atomm.com/xtool/community/attachment/xtool-community/6272a4ee-9236-4e38-ad13-3ff9158267bb.jpeg?x-oss-process=image/resize,w_1200,h_900,limit_0/interlace,1/format,webp/auto-orient,1)
![[Laser cut and engrave] Father’s Day Toolbox – Gift & Treat Holder](data:image/png;base64,iVBORw0KGgoAAAANSUhEUgAAAAoAAAAKCAYAAACNMs+9AAAAAXNSR0IArs4c6QAAABdJREFUKFNjZCASMBKpjmFUId6QIjp4AAppAAuXjCs4AAAAAElFTkSuQmCC)
![[Laser cut and engrave] Father’s Day Toolbox – Gift & Treat Holder](https://storage-public.atomm.com/xtool/community/attachment/xtool-community/6272a4ee-9236-4e38-ad13-3ff9158267bb.jpeg?x-oss-process=image/resize,w_200,h_150,limit_0/interlace,1/format,webp/auto-orient,1)
![[Laser cut and engrave] Father’s Day Toolbox – Gift & Treat Holder](https://storage-public.atomm.com/xtool/community/attachment/xtool-community/08baa741-4516-4406-a46c-41ab9bda0479.jpeg?x-oss-process=image/resize,w_200,h_150,limit_0/interlace,1/format,webp/auto-orient,1)
![[Laser cut and engrave] Father’s Day Toolbox – Gift & Treat Holder](https://storage-public.atomm.com/xtool/community/attachment/xtool-community/dd76ddcc-5b4f-46fa-ab65-7d2b661be6c2.jpeg?x-oss-process=image/resize,w_200,h_150,limit_0/interlace,1/format,webp/auto-orient,1)
![[Laser cut and engrave] Father’s Day Toolbox – Gift & Treat Holder](https://storage-public.atomm.com/xtool/community/attachment/xtool-community/d025c6b0-7255-4fce-b721-71260a4c1824.jpeg?x-oss-process=image/resize,w_200,h_150,limit_0/interlace,1/format,webp/auto-orient,1)
![[Laser cut and engrave] Father’s Day Toolbox – Gift & Treat Holder](https://storage-public.atomm.com/xtool/community/attachment/xtool-community/e8105b81-cc63-44e0-855b-555c871be0b8.jpeg?x-oss-process=image/resize,w_200,h_150,limit_0/interlace,1/format,webp/auto-orient,1)
Father’s Day Toolbox – Gift & Treat Holder
 Instruction
Fathers day boc
.xs
Application scenario
Laser processing
Machine & module

xTool S1
40WMaterial used

Cardboard

43
1062
Information
      This Father's Day toolbox is a creative gift box designed to look like a classic tool carrier. Decorated with wrench details and the phrase “Happy Father’s Day”, it provides space for sweets, small gifts, vouchers, or other surprises. The toolbox design makes it a perfect handmade gift for dads who enjoy tools, DIY projects, or simply appreciate a thoughtful gesture.

I used 2mm thick Cardboard, but you can scale it by 150% for 3mm material

Reddit: https://www.reddit.com/r/xToolOfficial/comments/1u6tbfh/fathers_day_present/
Instruction
1
Step1: Laser Cut All Parts

Preview

Preview
Laser cut all toolbox components from your chosen material.
2
Step2: Attach the Side Panels

Preview

Preview
Glue the side panels onto the base plate as shown in the images.
3
Step3: Attach the Front and Back Panels

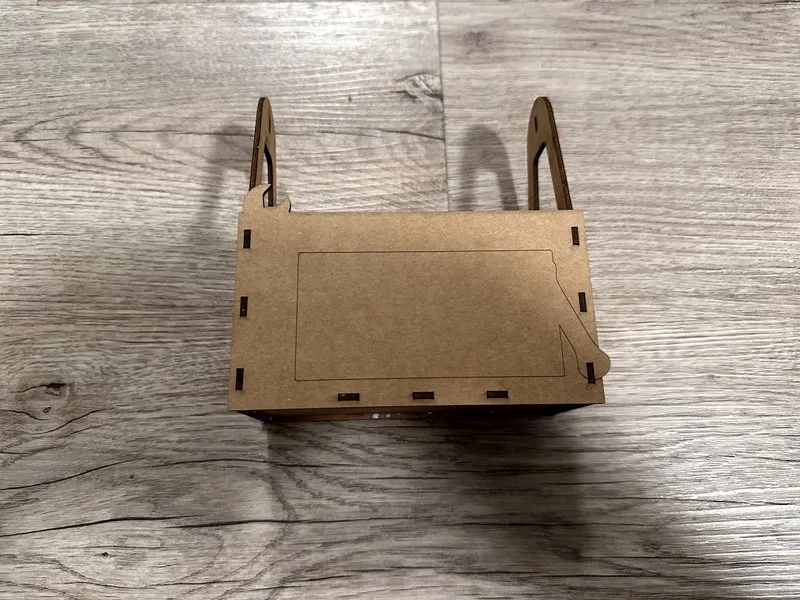
Preview
Preview
Glue the front and rear panels onto the structure.
4
Step4: Install the Handle

Preview
Glue the handle between the side panels as shown in the images.
5
Step5: Attach the Front Sign

Preview
Glue the decorative front sign onto the front panel.
This can be cut from a contrasting color for a more eye-catching look.
6
Step6: Add the Handle Decorations

Preview

Preview
Glue the decorative signs and wrench details onto the front and back sides of the handle.
7
Step7: Apply the Lettering

Preview
Glue the “Happy Father’s Day” lettering onto the front sign.
8
Step8: Add the Small Details

Preview
Glue the screw details into their designated positions and attach the wrench decoration onto the front sign.
Comments
Remixes



You may also like

Congrats Cheers To You Father's Day Gift Cardbox with Wine Glass and Bottle Icons

4
19

$2.20
$2.20
Credits220
3D Father's day gift boxes bundle laser cut. Wooden father gift storage. Present holder. Grandpa gift. 10 Designs

11

'/%3e%3cdefs%3e%3clinearGradient%20id='paint0_linear_1433_15752'%20x1='12.5'%20y1='5'%20x2='12.5'%20y2='19.2596'%20gradientUnits='userSpaceOnUse'%3e%3cstop%20stop-color='%232F7FFF'/%3e%3cstop%20offset='1'%20stop-color='%232661F1'/%3e%3c/linearGradient%3e%3c/defs%3e%3c/svg%3e)
 Template
Happy Father's Day Card Giftbox

1


Father's Day Wooden Match Box Holder - Engisign Design & Print

11
23

Personalized Letter Box for Father's Day (gift challenge week 3)

207
481

Happy Fathers Day Wooden Blocks

5
4

Father's Day Personalized Wooden Gift Box Set with Mustache Motif

28
52

Father’s Day “Cheers to Dad” Mini Liquor Bottle Holder

3
9
The Man The Myth The Legend Father's Day Wooden Brandy Gift Box

1
5

Grill Shaped Father's Day Gift Card/Condiment Holder Box

65
363

FATHERS DAY CUBE

2
17

$2.25
$2.25
Credits225
Wooden Beer Bottle Caddy with Integrated Bottle Opener and Coasters Laser Cut Bundle. Father's Day Gift Idea

2
 Template
Love You Dad Card Giftbox
3

'/%3e%3cdefs%3e%3clinearGradient%20id='paint0_linear_1433_15726'%20x1='12'%20y1='5.25'%20x2='12'%20y2='18.75'%20gradientUnits='userSpaceOnUse'%3e%3cstop%20stop-color='%23FFC654'/%3e%3cstop%20offset='1'%20stop-color='%23FF8D12'/%3e%3c/linearGradient%3e%3c/defs%3e%3c/svg%3e)
Spacious Grill Box for BBQ Sauces and Condiments, Father's Day Gift Box, BBQ Organizer

32
101

Happy Father's Day with a message. Dad's toolbox. The best dad in the world

9
56

Laser Cut Wooden Dad Gift Basket Happy Father's Day Small

47
374

Beer Holder for Father's Day

18
119

Wooden box with medieval sword and shield

38
213