
Report
![[Laser cut and engrave] Laser Cut Wooden Tic Tac Toe Game with Heart and Cross Pieces](https://storage-us.atomm.com/resource/xtool/community/attachment/xtool-community/dccddbb3-dbcb-46cb-9f4b-6534e365232b.png?x-oss-process=image/resize,w_1200,h_900,limit_0/interlace,1/format,webp/auto-orient,1)
![[Laser cut and engrave] Laser Cut Wooden Tic Tac Toe Game with Heart and Cross Pieces](data:image/png;base64,iVBORw0KGgoAAAANSUhEUgAAAAoAAAAKCAYAAACNMs+9AAAAAXNSR0IArs4c6QAAABdJREFUKFNjZCASMBKpjmFUId6QIjp4AAppAAuXjCs4AAAAAElFTkSuQmCC)
![[Laser cut and engrave] Laser Cut Wooden Tic Tac Toe Game with Heart and Cross Pieces](https://storage-us.atomm.com/resource/xtool/community/attachment/xtool-community/dccddbb3-dbcb-46cb-9f4b-6534e365232b.png?x-oss-process=image/resize,w_200,h_150,limit_0/interlace,1/format,webp/auto-orient,1)
![[Laser cut and engrave] Laser Cut Wooden Tic Tac Toe Game with Heart and Cross Pieces](https://storage-us.atomm.com/resource/xtool/community/attachment/xtool-community/76e452d2-c157-4809-b883-7e78a76d8958.png?x-oss-process=image/resize,w_200,h_150,limit_0/interlace,1/format,webp/auto-orient,1)
![[Laser cut and engrave] Laser Cut Wooden Tic Tac Toe Game with Heart and Cross Pieces](https://storage-us.atomm.com/resource/xtool/community/attachment/xtool-community/4ea6574a-274a-486e-bc14-1ddc503d9e6f.png?x-oss-process=image/resize,w_200,h_150,limit_0/interlace,1/format,webp/auto-orient,1)
Valentine’s Day Minimalist Tic-Tac-Toe
 Instruction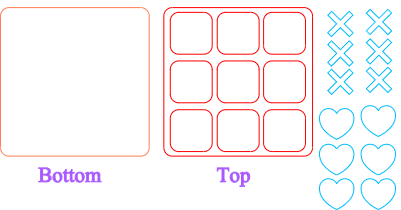
Tic Tac To
.xcs
Application scenario
Laser processing
Machine & module

xTool P2S
55WCompatible xTool Machine
New
M2
10W, 20WF1 Ultra
20WM1
5W, 10WD1
5W, 10W, 20WD1 Pro
5W, 10W, 20W, 40WP2
55WF1
10WS1
10W, 20W, 40WM1 Ultra
10W, 20WMaterial used

1/8"(3mm) Red Acrylic

1/2"(12mm) Pine Ponderosa Plywood

1/4"(6mm) Red Oak Plywood

1/2"(12mm) Black Walnut Plywood

23
697
Information
      Elevate game night with this handcrafted, minimalist Tic-Tac-Toe set. Featuring a solid light oak base, this 6x6 board balances rustic warmth with modern flair.

You can make it using Acrylic, if you has a CO2 one. For everyone else, wood is good enough with some touch of Red and Brown paint and love :)
Instruction
1
Step1
Design Setup in XCS
- Import your Design: Bring in the board grid, the six 'X' shapes, and the six heart shapes.
- Separate by Material: Use the Color Layer panel to assign a different color to each material type.
- The "Pocket" Trick: For a premium feel, select the 9 squares of the grid and set them to Engrave instead of just Score. This creates a slight indentation for the pieces to sit in.
2
Step2
The Oak Board (Processing Layer 1)
- Place Oak: Secure your 1/4" Oak in the machine.
- Auto-Measure: Use the probe to set the height.
- Settings:
- Outer Square (Cut): Power 100% / Speed 5mm/s (S1 20W/40W).
- Grid Lines (Score): Power 30% / Speed 50mm/s.
- Optional Pocket (Engrave): Power 40% / Speed 150mm/s.
- Outer Square (Cut): Power 100% / Speed 5mm/s (S1 20W/40W).
- Process: Hide the other layers and click Start.
3
Step3
The Walnut X's (Processing Layer 2)
- Place Walnut: Swap the oak for your 1/8" Walnut.
- Settings:
- Outline (Cut): Power 100% / Speed 10mm/s.
- Outline (Cut): Power 100% / Speed 10mm/s.
- Process: Hide the Oak and Acrylic layers, then click Start.
4
Step4
The Red Acrylic Hearts (Processing Layer 3)
- Place Acrylic: Swap in the 1/8" Red Acrylic. Leave the protective paper/film on to prevent flashback marks on the surface.
- Settings:
- Outline (Cut): Power 100% / Speed 8mm/s.
- Outline (Cut): Power 100% / Speed 8mm/s.
- Process: Hide the Wood layers and click Start.
5
Step5
Finishing & Assembly
- Clean the Acrylic: Peel the protective film off the hearts. If there is any "frosting" on the edges, wipe with a microfiber cloth.
- Sand the Wood: Use 220-grit sandpaper to lightly sand the Oak board and Walnut X's. This removes any smoke stains.
- Oil/Seal: Apply a light coat of linseed oil or beeswax to the Oak and Walnut. This makes the wood grain "pop" and creates that beautiful off-white to deep-brown contrast.
Comments
Remixes



You may also like
valentine's day puzzle
valentine's day box
valentine's day mandala
valentine's day gift
valentine's day card

Laser Cut Wooden Tic Tac Toe Game with Red Heart Pieces

3
22

$2.75
$2.75
$5.50
Credits275
Tiny Tic-Tac-Toe Valentine – Digital Cut File

0

Valentine's Day Tic Tac Toe Game with Heart and X Pieces
2
7

Lasergeschnittenes Tic Tac Toe Spiel

6
38

This is a Valentine Tic Tac Toe Board

39
160

Laser Cut Wooden Tic Tac Toe Game Board with Heart and Angel Pieces

3
33

Tic Tac Toe Game Acryl Transparent
5
17

Laser Cut Wooden Christmas Tic Tac Toe Game with Festive Pieces

12
31
Laser Cut Tic Tac Toe Game for Kids

14
79

Laser Cut Wooden Tic Tac Toe Love edition Game with Bear and Heart Pieces
17
31

Wooden Tic Tac Toe Laser Cut. Game Board. Beer and Clover Pieces. Shamrock. St. Patrick's Day. Party Board Game
4
19

$4.95
$4.95
Credits495
Valentine's Day Tic Tac Toe

26

Valentine's Day Tic-Tac-Toe with Heart and Teddy Bear

31
124

Coffee Tic-Tac-Toe – Beans vs. Coffee Pots

18
34

Laser Cut Acrylic Tic Tac Toe Game Board with Raised Pieces
5
32

the tic tac toe basketball

0
2

Wooden Easter Tic-Tac-Toe Game
7
14

spring tic tac toe with bees and flowers
0
4