
The xTool Screen Printer is the first screen-printing system that uses a laser to burn the stencils. Instead of the messy, day-long emulsion-and-light process, you engrave a pre-coated screen on an xTool laser and start printing in about an hour.
This guide explains what the Screen Printer is, what it costs, how it works, what you can make, and how to set it up and use it.
Key Takeaways
- The xTool Screen Printer is the first screen-printing solution that makes stencils with a laser instead of emulsion and UV exposure.
- It cuts stencil creation from around 24 hours to about one hour, with laser precision up to 0.01 mm.
- It needs a compatible xTool laser (S1, P2, or D1 Pro) to engrave the pre-coated screens — the laser is sold separately.
- It starts around $349–399 and is an affordable way into home screen printing for shirts, posters, and more.

What is the xTool Screen Printer?
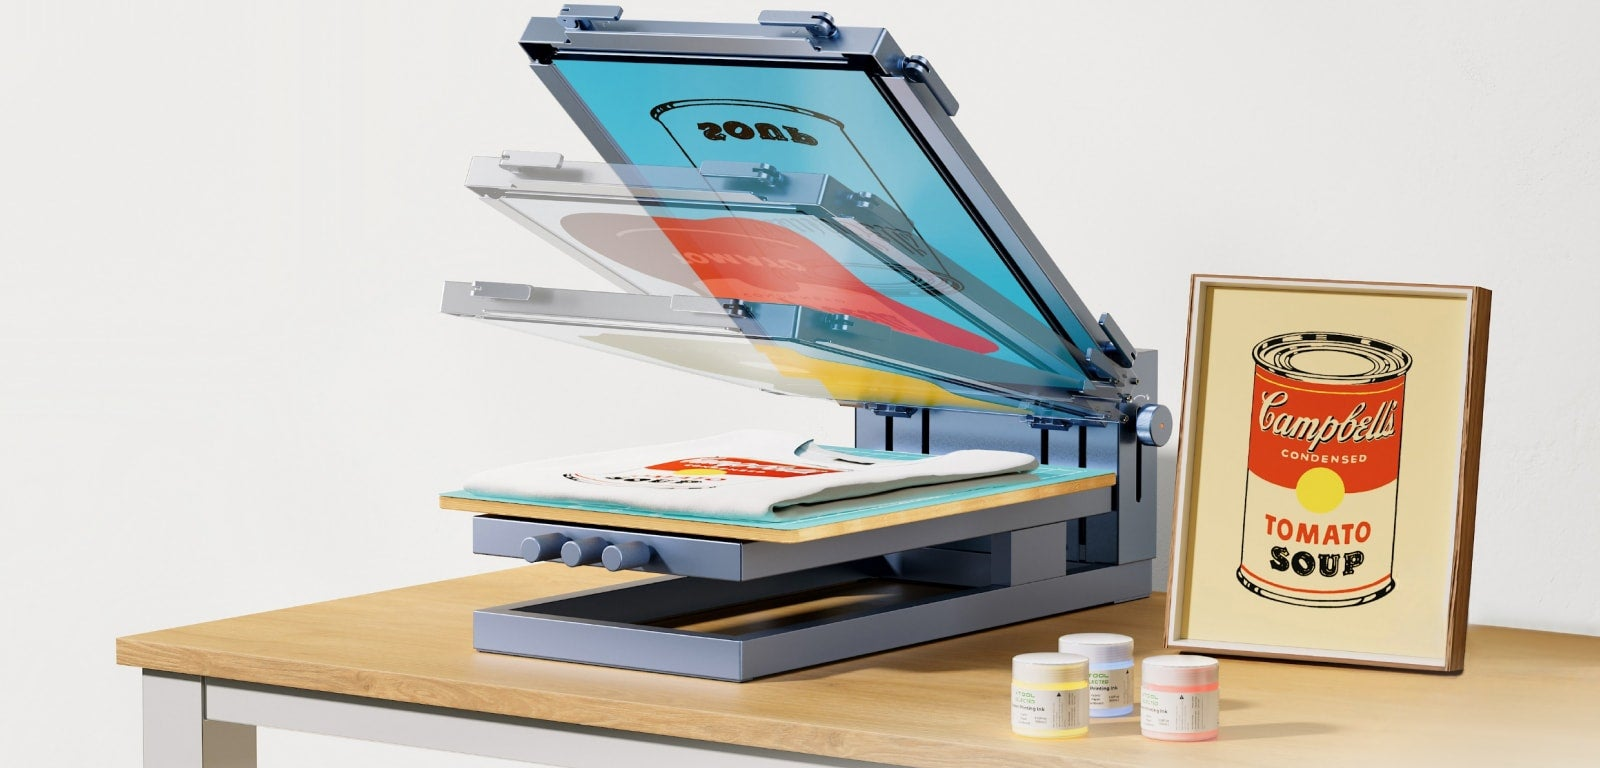
The xTool Screen Printer is a compact screen-printing kit built around one idea: use a laser to make the stencil. You place a pre-coated screen on a compatible xTool laser, the laser burns your design into the emulsion in minutes, and you print with ink and a squeegee — no darkroom, chemicals, or UV exposure unit.
Its EasyStretch frame tensions a screen in about 30 seconds, and features like one-click color separation and halftone make multicolor and photo-style prints approachable for beginners.
| Type | Laser-assisted screen-printing kit |
|---|---|
| Stencil method | Laser-engraved pre-coated screens (no emulsion/UV) |
| Laser precision | Up to 0.01 mm stencil detail |
| Stencil time | ~1 hour (vs ~24 hours the traditional way) |
| Screens | 100-mesh stainless; 100+ prints per screen |
| Frame | EasyStretch — tensions a screen in ~30 seconds |
| Requires | A compatible xTool laser (S1, P2, or D1 Pro), sold separately |
What is the pricing of the xTool Screen Printer?
The Screen Printer is one of xTool’s most affordable add-ons. Figures are in USD as of July 2026 and move with promotions; the laser to engrave screens is a separate purchase.
| Option | What you get | Price (approx.) |
|---|---|---|
| Single-color kit | Frame, pre-coated screens, and printing tools | from ~$349 |
| Multi-color kit | Adds registration tools for layered, multicolor prints | ~$399 |
| Required separately | A compatible xTool laser (S1, P2, or D1 Pro) | see the machine’s own price |
If you already own an xTool laser, the Screen Printer is an inexpensive way to add a whole new product line; if not, budget for a compatible machine too.
How does the xTool Screen Printer work?
The workflow replaces the traditional darkroom process with a quick laser step:
- Design your artwork in xTool Creative Space, using one-click color separation or halftone if needed.
- Engrave a pre-coated screen on your xTool laser — the beam burns away the emulsion to form the stencil in minutes.
- Stretch the screen onto the EasyStretch frame (about 30 seconds).
- Print by pulling ink across the screen with a squeegee onto your shirt, paper, or other surface.
Where can you buy the xTool Screen Printer?
- xTool official store (xtool.com) — single- and multi-color kits, screens, and bundles.
- Amazon & craft retailers — the kit is also sold through Michaels and other stores.
- Authorized resellers — screen-printing and maker suppliers that carry xTool.
What can you make with the xTool Screen Printer?
Screen printing is fast and cheap per unit once a screen is made, so it suits small batches and repeat designs:
- Apparel — T-shirts, hoodies, tote bags, and team or event merch.
- Posters & art prints — bold, layered designs on paper and card.
- Packaging & signage — printed labels, tags, and small signs.
- Mixed media — add printed color to wood, acrylic, and other laser projects.
How to set up the xTool Screen Printer
- Assemble the frame and base on a flat surface; the kit ships mostly pre-assembled.
- Load a pre-coated screen and tension it with the EasyStretch strips and wrenches.
- Have a compatible xTool laser (S1, P2, or D1 Pro) ready with xTool Creative Space installed.
- Gather your ink, squeegee, and blanks, and do a test print to dial in coverage.
How to use the xTool Screen Printer
- Engrave your design into a pre-coated screen on the xTool laser.
- Mount the screen on the EasyStretch frame and align it over your blank.
- Apply ink along the top of the screen.
- Pull the squeegee down firmly and evenly to push ink through the stencil.
- Lift, cure the ink per its instructions, and repeat for the next print or color.
What can the xTool Screen Printer print on?
With the right ink, screen printing works on a wide range of surfaces:
| Surface | Examples | Ink type |
|---|---|---|
| Fabric | Cotton & blend shirts, hoodies, tote bags | Water-based or plastisol textile ink |
| Paper & card | Posters, art prints, cards | Water-based ink |
| Wood | Signs, plaques, laser-cut pieces | Acrylic / water-based ink |
| Other | Some plastics and coated surfaces | Compatible specialty ink |
Match the ink to the surface and cure it as directed so prints stay durable through washing and use.
xTool Screen Printer alternatives
Screen printing is one of several ways to decorate apparel. If it isn’t the right fit, here are the main alternatives and where each shines.
xTool Apparel Printer
Full-color DTF
xTool’s DTF printer handles gradients and photo detail that flat screen printing can’t, on any fabric color. Far pricier and better suited to varied, full-color runs than single-color batches.
Procolored P13 DTF Printer
Budget desktop DTF
A lower-cost desktop DTF printer for full-color transfers. It’s a cheaper route into detailed apparel prints than a pro DTF machine, though DTF has per-print film and powder costs.
xTool Heat Press
Apply transfers
Not a printer itself — it presses transfers you cut or buy onto garments. The simplest, cheapest way to decorate single items, but not for printing your own screens.
How to choose a way to print shirts
Match the method to your designs and volumes:
| If you want… | Best method | Option |
|---|---|---|
| Cheap per unit at volume, few colors | Screen printing | xTool Screen Printer |
| Full-color, photo-style designs | DTF printing | xTool Apparel Printer, Procolored |
| Quick one-offs and small runs | Heat transfer | xTool Heat Press + HTV/DTF |
| Lowest startup cost | HTV or a manual kit | Heat press, traditional screen kit |
The xTool Screen Printer wins on speed and cost once you print the same bold design many times. Choose DTF (the xTool Apparel Printer or a Procolored) for detailed, multicolor artwork, or a heat press for occasional one-offs. Fully manual kits like Speedball or a Riley Hopkins press cost less upfront but take far longer per screen.
Final thoughts
The xTool Screen Printer makes real screen printing approachable by swapping the darkroom for a laser. For anyone who already owns a compatible xTool machine, it’s a low-cost way to add durable, batch-friendly prints to an apparel or merch line.
It pairs naturally with the rest of the ecosystem — see how it fits alongside the lasers and printers in our overview of xTool machines.
Frequently asked questions about the xTool Screen Printer
Do I need a laser to use the xTool Screen Printer?
Yes. The screens are made by engraving them on a compatible xTool laser (S1, P2, or D1 Pro). If you don’t own one, you’ll need to buy the laser separately.
How is it different from traditional screen printing?
It replaces the messy emulsion-and-UV-exposure step with a quick laser engrave, cutting stencil creation from about a day to roughly an hour, with sharper detail.
How many prints does one screen last?
Each laser-engraved 100-mesh screen holds up for at least a hundred prints, so a single design pays off across a batch.
Can it print more than one color?
Yes — the multi-color kit adds registration tools, and one-click color separation and halftone help you layer colors and print photo-style artwork.
Is the xTool Screen Printer good for beginners?
It’s one of the easiest ways into screen printing: mostly pre-assembled, 30-second screen stretching, beginner-friendly software, and thousands of ready-to-print designs.
