
![[Laser cut and engrave] Laser Cut Wooden Monitor Stand Riser with Cable Management](https://image-res.atomm.com/resource/xtool/community/attachment/xtool-community/6f2bbb36-6944-461a-b935-21ef3336d1a9.jpeg?x-oss-process=image/resize,w_1200,h_900,limit_0/interlace,1/format,webp/auto-orient,1)
![[Laser cut and engrave] Laser Cut Wooden Monitor Stand Riser with Cable Management](data:image/png;base64,iVBORw0KGgoAAAANSUhEUgAAAAoAAAAKCAYAAACNMs+9AAAAAXNSR0IArs4c6QAAABdJREFUKFNjZCASMBKpjmFUId6QIjp4AAppAAuXjCs4AAAAAElFTkSuQmCC)
![[Laser cut and engrave] Laser Cut Wooden Monitor Stand Riser with Cable Management](https://image-res.atomm.com/resource/xtool/community/attachment/xtool-community/6f2bbb36-6944-461a-b935-21ef3336d1a9.jpeg?x-oss-process=image/resize,w_200,h_150,limit_0/interlace,1/format,webp/auto-orient,1)
![[Laser cut and engrave] Laser Cut Wooden Monitor Stand Riser with Cable Management](https://image-res.atomm.com/resource/xtool/community/attachment/xtool-community/3aa3347c-4a1e-4ae9-b7c2-cdfbaf75e938.jpeg?x-oss-process=image/resize,w_200,h_150,limit_0/interlace,1/format,webp/auto-orient,1)
Material Pinholder for S1
 Instruction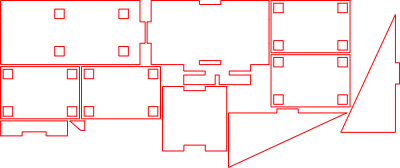


Information
This laser-cut material pin holder is designed specifically for the xTool S1, providing an organized and stable way to store material pins during laser projects. The construction ensures strength and precision, while the compact design keeps pins easily accessible at your workspace. Ideal for improving workflow and keeping your laser setup tidy.
Instruction
Step1: Laser Cut All Parts

Laser cut all required parts from your chosen material.
Step2: Attach the First Side Wall

Glue the first side wall onto the base plate as shown in the images.
Step3: Attach the Second Side Wall

Glue the second side wall in place, aligning it carefully.
Step4: Attach the Back Wall

Glue the back wall onto the assembly, as shown in the images.
Step5: Glue the Small Side Element

Glue the small side element onto the base plate.
Note: Positioning is shown clearly in the images.
Step6: Add the Small Reinforcement Piece

Glue the smaller reinforcement part into place, as shown in the images.
Step7: Assemble the Pin Holder Block

Glue the four identical plates together, making sure they are perfectly aligned and flush.
Step8: Mount the Pin Holder Block

Glue the assembled block onto the large plate, aligning it precisely with the holes.
Step9: Final Assembly

Glue the completed unit onto the base plate as shown in the images.
Step10: Ready to Use

Insert the material pins into the designated holes — the holder is now ready for use.
Step11: Mount the Pin Holder to the xTool S1

Slightly lift the xTool S1 and slide the material pin holder underneath from the side. Carefully lower the machine so the holder is clamped securely underneath.
Make sure the holder is positioned between the machine’s feet, not directly under one of them.
Remixes



You may also like

Support pour épingle magnétique à nid d'abeille S1


Pencil engraving jig for Xtool S1


Organizer board for laces, tapes


height/depth meter M1


Business Card Jig 85mm x 55mm Laser Cut Template


Multi-jig plate


S1-40 watt name plate jig

Plateau organisateur en bois découpé au laser pour petites étiquettes métalliques en 38x25 JIG


Wooden Keychain Jig


Business card jig with base plate for F2


Material Spacer Used With xTool Honeycomb Material Pins


Jig for soft pens xTool S1


Laser jig for aluminum bottle openerkeychain with 2 mm wood


Laser Cut F1 Centering Jig with Grid and Circle Markings

Aluminum Bottle Opener Jig


Keychain Rig 27x64mm M1 Ultra

Lackierhilfe


Laser Cut Wooden 4" Coaster Jig
