
![[Laser cut and engrave] Cutting Board Conversion Kit: Adapt Any Cutting Board For 1 Handed Use](https://storage-public.atomm.com/xtool/community/attachment/xtool-community/715bbcaa-ceb6-458a-8ff1-3ae5ac791ed7.jpg?x-oss-process=image/resize,w_1200,h_900,limit_0/interlace,1/format,webp/auto-orient,1)
![[Laser cut and engrave] Cutting Board Conversion Kit: Adapt Any Cutting Board For 1 Handed Use](data:image/png;base64,iVBORw0KGgoAAAANSUhEUgAAAAoAAAAKCAYAAACNMs+9AAAAAXNSR0IArs4c6QAAABdJREFUKFNjZCASMBKpjmFUId6QIjp4AAppAAuXjCs4AAAAAElFTkSuQmCC)
![[Laser cut and engrave] Cutting Board Conversion Kit: Adapt Any Cutting Board For 1 Handed Use](https://storage-public.atomm.com/xtool/community/attachment/xtool-community/715bbcaa-ceb6-458a-8ff1-3ae5ac791ed7.jpg?x-oss-process=image/resize,w_200,h_150,limit_0/interlace,1/format,webp/auto-orient,1)
![[Laser cut and engrave] Cutting Board Conversion Kit: Adapt Any Cutting Board For 1 Handed Use](https://storage-public.atomm.com/xtool/community/attachment/xtool-community/3106e561-a5d9-4668-913b-3321b46fb1aa.jpg?x-oss-process=image/resize,w_200,h_150,limit_0/interlace,1/format,webp/auto-orient,1)
![[Laser cut and engrave] Cutting Board Conversion Kit: Adapt Any Cutting Board For 1 Handed Use](https://storage-public.atomm.com/xtool/community/attachment/xtool-community/3b2658ed-a5b9-429b-ae40-0594016de1aa.jpg?x-oss-process=image/resize,w_200,h_150,limit_0/interlace,1/format,webp/auto-orient,1)
![[Laser cut and engrave] Cutting Board Conversion Kit: Adapt Any Cutting Board For 1 Handed Use](https://storage-public.atomm.com/xtool/community/attachment/xtool-community/40b289c9-452e-4c5b-bed0-445a04202a38.jpg?x-oss-process=image/resize,w_200,h_150,limit_0/interlace,1/format,webp/auto-orient,1)
![[Laser cut and engrave] Cutting Board Conversion Kit: Adapt Any Cutting Board For 1 Handed Use](https://storage-public.atomm.com/xtool/community/attachment/xtool-community/c76000c2-019d-480f-90c1-4196d925c5aa.jpg?x-oss-process=image/resize,w_200,h_150,limit_0/interlace,1/format,webp/auto-orient,1)
![[Laser cut and engrave] Cutting Board Conversion Kit: Adapt Any Cutting Board For 1 Handed Use](https://storage-public.atomm.com/xtool/community/attachment/xtool-community/e884e494-a678-49e0-a3e5-5cc27d4474a9.jpg?x-oss-process=image/resize,w_200,h_150,limit_0/interlace,1/format,webp/auto-orient,1)
![[Laser cut and engrave] Cutting Board Conversion Kit: Adapt Any Cutting Board For 1 Handed Use](https://storage-public.atomm.com/xtool/community/attachment/xtool-community/bb47d779-072d-4716-a3d0-d01c58db1a6a.jpg?x-oss-process=image/resize,w_200,h_150,limit_0/interlace,1/format,webp/auto-orient,1)
![[Laser cut and engrave] Cutting Board Conversion Kit: Adapt Any Cutting Board For 1 Handed Use](https://storage-public.atomm.com/xtool/community/attachment/xtool-community/993691fe-9a78-425c-a0dd-e241a94a4249.png?x-oss-process=image/resize,w_200,h_150,limit_0/interlace,1/format,webp/auto-orient,1)
![[Laser cut and engrave] Cutting Board Conversion Kit: Adapt Any Cutting Board For 1 Handed Use](https://storage-public.atomm.com/xtool/community/attachment/xtool-community/89cbcbfd-5fe3-4ace-b41f-c1217e2ccca5.png?x-oss-process=image/resize,w_200,h_150,limit_0/interlace,1/format,webp/auto-orient,1)
Cutting Board Conversion Kit: Adapt Any Cutting Board For 1 Handed Use
 Instruction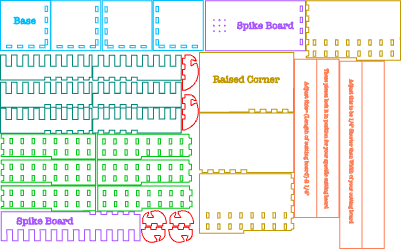


Information
      Losing the use of one hand shouldn't mean losing the ability to cook for yourself.

I'm an occupational therapist, and I built this for a patient recovering from a stroke who has the use of only one functional hand — so he could prep his own food again instead of depending on someone else to do it for him. It's made for anyone working with one hand: stroke and TBI survivors, amputees, and people with arthritis.
The kit converts any cutting board into an adaptive, one-handed workstation, using repositionable parts:

A spike board that holds a potato, apple, onion, etc still for peeling and cutting.
Fences to brace food while you slice — including a corner fence that cradles a slice of bread so you can spread mayo or peanut butter one-handed.
Rubber-band hooks that clamp onto the edge of any board, any size, to hold food down with steady tension.

Pieces moves anywhere on the board, so one kit adapts to any task and any kitchen — it adapts the cutting board you already own instead of replacing it.
It's laser-cut, simple to assemble, and the files are free to download below. If someone you love is relearning the kitchen with one hand, you can build this for them this weekend. That's the whole point: independence, made by hand, passed on.
Made to matter. 🛠️

*Do not cut on any of these pieces during use.
*Finish with cutting board oil.
Instruction
Step1: Measure your cutting board, then Adjust Length of Orange Pieces
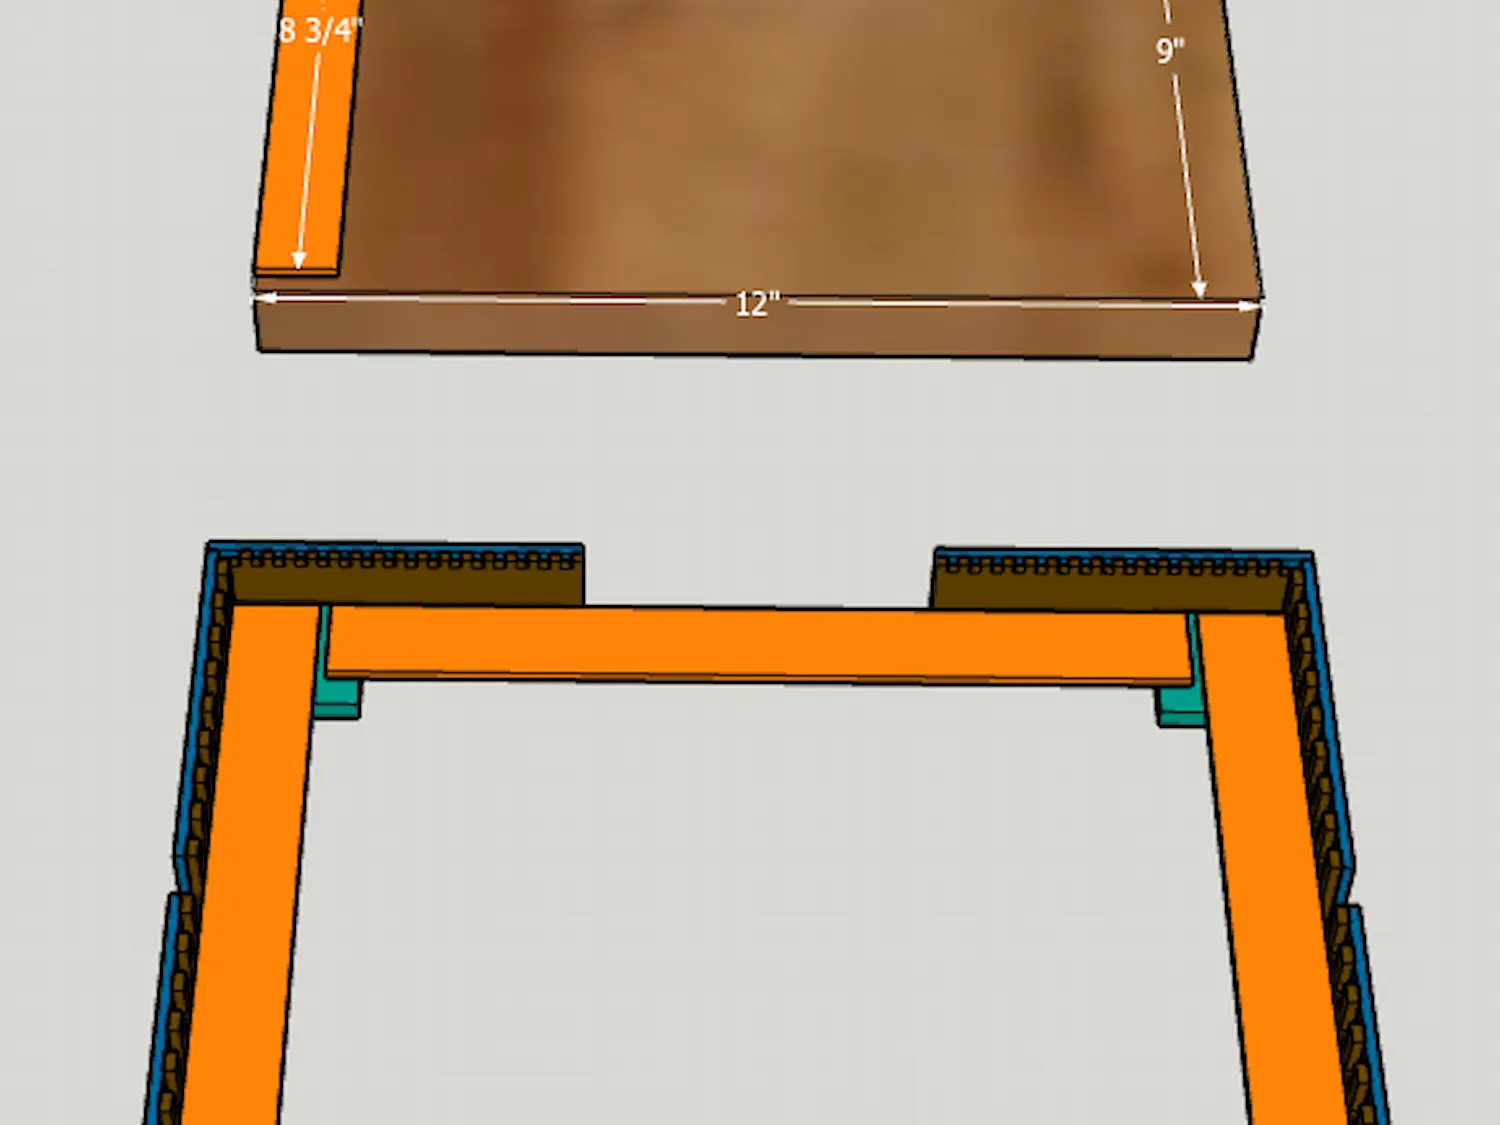
This is how to fit the kit to your cutting board and keep it secure.
- Adjust the Width/Shorter pieces first. Subtract 0.25" from the width of your cutting board, then make adjust the length of two orange pieces.
- Subtract 2.25" from the length of your cutting board,then adjust the other two orange pieces.
Step2: Decide amount of nails, adjust and Cut It Out
I have entirely too many nails in mine because it is what my patient wanted.
i recommend only 3-6 nails. Delete any of the pilot holes from the spike board as you like.
Step3: Assembly


You'll make three regular sides and one raised side with a fence.
You can switch it up if you want two raised sides, but one should be plenty.
- Glue and attach Dark Green pieces into the base
- Apply glue to the joints and inside of the light green pieces then attach it to the outside of the dark green pieces
- Repeat for the others. Same process for the Raised corners (yellow)
Step4: Assemble Spike Board

This is represented in purple on xtool studio.
Decide how you want it oriented.
Typically right handed users will want it mounted on the left and vice versa for left handed users.
Insert nails and tap in with hammer so the heads sit below the surface.
Step5: Fitting to your cutting board and securing it

Width first:
Position cutting board in place between four corner pieces a little over an inch from the edges to leave room for the orange pieces. Then glue the orange pieces to the base for the width.
Length second:
lift cutting board onto it's side so the length is down, pisition the two sides to snug up agains the cutting board then glue the final two orange pieces in place.
*Do not glue it to the cutting board. you will need to be able to pull it out for cleaning.
*position it “Comfortably snug” so it stays in place but is also easily removable.
Step6: Bonus
I've included some fences in the second canvas. Feel free to customize these for your preferences if you want them. I find that one additional fence can be helpful.
For the accessories that are often moved around, it may be helpful to lightly sand the tips to allow it to register in the holes easier.
Step7: Apply Cutting Board/ Food Safe oil.
Step8
https://www.facebook.com/permalink.php?story_fbid=pfbid02EvjxH7KbPatr5PzeHsKDXDoiBphACexPsqcFRzeQ6FbbkWwEGsBzvvzQojbjgJGgl&id=100070953737754
Remixes
License



You may also like

Laser Engraved Wooden Kitchen Conversion Cutting Board


Cutting Board with Cutting Guide (ENG & GER)


Laser Engraved Wooden Cheese Cutting Board


Laser Engraved Bamboo Cutting Board with Grilling Times Chart


Laser Engraved Wooden Cutting Board Vegetable Crime Scene Design


Laser Engraved Bamboo Cutting Board with Humorous Bull Design


Laser Engraved Bamboo Cutting Board with Measurement Guide


Laser Engraved Cutting Board with Kitchen Conversion Measurements


Kitchen Conversion Chart Cutting Board with Liquid and Dry Measurement References


Laser Cut Wooden Kitchen Cutting Board with Floral Engraving


Personalized Laser Engraved Wooden Cutting Board with Decorative Corners


Kitchen Conversions Chart Bamboo Cutting Board


Cut Cheese Not Coke Charcuterie Cutting Board Image File


Laser Engraved Bamboo Sushi How-To Cutting Board

Let Me Cook” – Cutting Board


Laser Engraved Bamboo Cutting Board with Virgin Mary Design

Personalized Wooden Cutting Board with Kitchen Utensil Motif


3D Rustic Cutting Board. Kitchen chopping board laser cut files. Wooden rustic cutting board. Spring. Flowers
