
![[Laser cut and engrave] Custom engraved Whiskey Decanter](https://image-res.atomm.com/resource/xtool/community/attachment/xtool-community/0f87f9d6-c746-44a3-8455-083449078c23.jpeg?x-oss-process=image/resize,w_1200,h_900,limit_0/interlace,1/format,webp/auto-orient,1)
![[Laser cut and engrave] Custom engraved Whiskey Decanter](data:image/png;base64,iVBORw0KGgoAAAANSUhEUgAAAAoAAAAKCAYAAACNMs+9AAAAAXNSR0IArs4c6QAAABdJREFUKFNjZCASMBKpjmFUId6QIjp4AAppAAuXjCs4AAAAAElFTkSuQmCC)
![[Laser cut and engrave] Custom engraved Whiskey Decanter](https://image-res.atomm.com/resource/xtool/community/attachment/xtool-community/0f87f9d6-c746-44a3-8455-083449078c23.jpeg?x-oss-process=image/resize,w_200,h_150,limit_0/interlace,1/format,webp/auto-orient,1)
![[Laser cut and engrave] Custom engraved Whiskey Decanter](https://image-res.atomm.com/resource/xtool/community/attachment/xtool-community/a935a77b-b3b1-434d-8a69-de29b3e9a115.jpeg?x-oss-process=image/resize,w_200,h_150,limit_0/interlace,1/format,webp/auto-orient,1)
![[Laser cut and engrave] Custom engraved Whiskey Decanter](https://image-res.atomm.com/resource/xtool/community/attachment/xtool-community/a029449c-b57a-43c4-8cf4-7327bb38e71b.jpeg?x-oss-process=image/resize,w_200,h_150,limit_0/interlace,1/format,webp/auto-orient,1)
![[Laser cut and engrave] Custom engraved Whiskey Decanter](https://image-res.atomm.com/resource/xtool/community/attachment/xtool-community/ae7faf81-0781-4f41-966c-01b9160489a5.jpeg?x-oss-process=image/resize,w_200,h_150,limit_0/interlace,1/format,webp/auto-orient,1)
![[Laser cut and engrave] Custom engraved Whiskey Decanter](https://image-res.atomm.com/resource/xtool/community/attachment/xtool-community/fd8150aa-f9b8-4400-92d1-2f7a344a21e4.jpeg?x-oss-process=image/resize,w_200,h_150,limit_0/interlace,1/format,webp/auto-orient,1)
![[Laser cut and engrave] Custom engraved Whiskey Decanter](https://image-res.atomm.com/resource/xtool/community/attachment/xtool-community/04e4642c-ccde-429f-93f5-d71a5639328a.jpeg?x-oss-process=image/resize,w_200,h_150,limit_0/interlace,1/format,webp/auto-orient,1)
Custom engraved Whiskey Decanter
 Instruction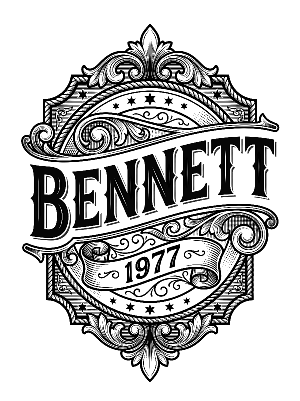


Instruction
Step1: Place decanter on laser bed and obtain accurate measurement
I placed the decanter on the bed of the F2 Ultra UV and put a small piece of painters tape over the top of it to obtain an accurate measurement to focus the laser
Step2: Adjust the measurement to account for the tape
I added 0.1 mm to the measurement to account for the tape.
Step3: Create design
For this step, I used xtool studio AI capabilities to create an ornate vintage western design with my last name and year of birth to engrave on the whiskey decanter.
Step4: import and scale design
I imported the design created by xtool studio and then I removed the background and scaled it to fit onto the decanter. One challenge I did have was positioning it on the decanter since it is clear and was multi sided. In order to better frame it and ensure the correct positioning I again used some painters tape around the portion of the bottle that I wanted to engrave. This allowed me to visually see the perimeter of the engraving area on my computer screen and better position the design.
Step5: Process and enjoy
The last step is the best! Simply close the lid to the laser, click start and process, and enjoy the show. I was extremely impressed with the results I received with the built in settings.
Remixes
License



You may also like

Laser Engraved Merry & Bright Wine Bottle


Whiskey


Black Stainless Steel Best Man Flask with Whiskey Quote


Black Metal Flask with Whiskey and Wilderness Wolf Illustration


Round wooden dish brushes with letter monograms


Laser engraved lens protection cap F2 Ultra UV with 'This Is Fine' Dog Meme Design

Chef Knife with 2 Corinthians 5:17 Bible Verse Inscription


Laser Engraved Black Flask With Quote


Bottom Engraved Whiskey Glass


Custom Engraved Glass Perfume Bottle


New Year 2026 Whiskey Bottle and Shot Glasses

Corn on the cob engraved on a corn kernel

Metal coin with intricate Viking Jelling Era knotwork pattern

Dead Serious About Whiskey Matte Black Metal Flask with Cowboy Skull Graphic

Custom Engraving on Wine Glasses


Jack Daniel's Branded Metal Slim Wallet


Leather Wallet with Custom Engraved Name

Personalized Whiskey Glass with Compass and World Map Design
