
![[Laser cut and engrave] Laser Cut Easter Bunny Treat Sign with Carrot and Egg Instructions](https://image-res.atomm.com/resource/xart/result/748833/4805646a-e51c-4826-b02b-925d50742c95.png?x-oss-process=image/resize,w_1200,h_900,limit_0/interlace,1/format,webp/auto-orient,1)
![[Laser cut and engrave] Laser Cut Easter Bunny Treat Sign with Carrot and Egg Instructions](data:image/png;base64,iVBORw0KGgoAAAANSUhEUgAAAAoAAAAKCAYAAACNMs+9AAAAAXNSR0IArs4c6QAAABdJREFUKFNjZCASMBKpjmFUId6QIjp4AAppAAuXjCs4AAAAAElFTkSuQmCC)
![[Laser cut and engrave] Laser Cut Easter Bunny Treat Sign with Carrot and Egg Instructions](https://image-res.atomm.com/resource/xart/result/748833/4805646a-e51c-4826-b02b-925d50742c95.png?x-oss-process=image/resize,w_200,h_150,limit_0/interlace,1/format,webp/auto-orient,1)
![[Laser cut and engrave] Laser Cut Easter Bunny Treat Sign with Carrot and Egg Instructions](https://image-res.atomm.com/resource/xtool/community/attachment/xtool-community/fbfc9b33-a1b4-4c7c-a1ba-a85531d295bf.png?x-oss-process=image/resize,w_200,h_150,limit_0/interlace,1/format,webp/auto-orient,1)
Tabla de cortar de cartel de golosinas para conejos de Pascua
 Instrucción
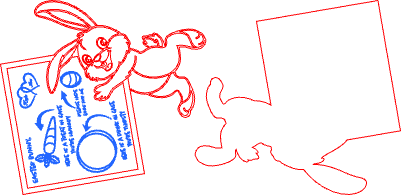


Información
La Pascua llegará antes de que te des cuenta. Creé una tabla de cortar para los premios de conejito pensando fuera de lo común. La imagen puede usarse como grabado por sí sola, o cortarse como una tabla con forma de conejito. Si disfrutas del proyecto, dale algo de cariño dándole like y descargando.
Instrucción
Paso1: Personalizar archivo

1. Modificar el texto para incluir el nombre de los niños en los corazones.
2. Coloca la tabla de cortar en la máquina.
3. Usa la medida automática en el P2S para obtener la distancia correcta.
4. Añade un rectángulo del tamaño del tablero, centra la imagen en el rectángulo eligiendo alinear el centro.
5. Alinear los bordes con el lateral de la tabla.
Paso2: Tablero de grabado/corte por proceso

1. Introduce los ajustes de grabado. Usé 30 de potencia, 500 de velocidad, 100 líneas por cm, 1 paso y corte 60 de potencia, 15 velocidades, 1 pasada.
2. Procesar el expediente.
3. Pinta la pieza de contorno de madera de negro. Pinta las piezas interiores como en la foto o elige tu propio esquema de colores.
4. Limpia el cartel de la tabla de cortar con un poco de agua y jabón. Sella la pieza de la tabla con aceite de calidad alimentaria después (mineral, cera de abeja, etc.) si no cortas una capa de acrílico transparente. (Usa la misma pieza que el tablero de respaldo. Puedo sellar la parte pintada.
5. Pega las piezas recortadas al tablero de respaldo.
Remixes


También te puede gustar

Ilustración de conejito de Pascua y huevo Glædelig Påske Cartel de madera


Hexágonos de pared de conejito de Pascua y huevo de madera cortados con láser


Cartel de pared de corona de Pascua (3) con lazos de malla y detalles de conejo


Relieve 3D del Conejo de Pascua


Azulejos grabados con láser - Familia de los Conejos de Pascua


Conejo de Pascua con girasoles y huevos en relieve profundo

Cartel colgante de pared de primavera con motivo de conejo de Pascua

Arte mural de madera cortada con láser en forma de huevo con diseño de diente de león

Feliz Conejo de Pascua


Cartel de corona floral de Pascua de la tripulación de conejitos cortados con láser


Feliz Pascua

Decoración de pared de conejos de Pascua y huevos hexagonales cortados con láser

Arte decorativo de pared de conejito de Pascua de madera cortada con Stecnil


'/%3e%3cdefs%3e%3clinearGradient%20id='paint0_linear_1433_15726'%20x1='12'%20y1='5.25'%20x2='12'%20y2='18.75'%20gradientUnits='userSpaceOnUse'%3e%3cstop%20stop-color='%23FFC654'/%3e%3cstop%20offset='1'%20stop-color='%23FF8D12'/%3e%3c/linearGradient%3e%3c/defs%3e%3c/svg%3e)
El conejo de Pascua


Salto con arte personalizado / personalizado de conejo de Pascua con levantacéfalos de césped y zanahorias

Feliz Pascua con taquilleo redondo con detalles florales y de huevo


Conejo Negro con Huevos de Pascua Arte en la Pared


Cartel rastreador de código QR de trineo navideño cortado con láser para Santa
