


![[Laser cut and engrave] Laser Cut Decorative Wooden Wall Art with Porto Script](https://storage-us.atomm.com/resource/xtool/community/attachment/xtool-community/c8ec76cb-9cfa-4f0f-a48d-cfd8404949c0.jpeg?x-oss-process=image/resize,w_1200,h_900,limit_0/interlace,1/format,webp/auto-orient,1)
![[Laser cut and engrave] Laser Cut Decorative Wooden Wall Art with Porto Script](data:image/png;base64,iVBORw0KGgoAAAANSUhEUgAAAAoAAAAKCAYAAACNMs+9AAAAAXNSR0IArs4c6QAAABdJREFUKFNjZCASMBKpjmFUId6QIjp4AAppAAuXjCs4AAAAAElFTkSuQmCC)
![[Laser cut and engrave] Laser Cut Decorative Wooden Wall Art with Porto Script](https://storage-us.atomm.com/resource/xtool/community/attachment/xtool-community/c8ec76cb-9cfa-4f0f-a48d-cfd8404949c0.jpeg?x-oss-process=image/resize,w_200,h_150,limit_0/interlace,1/format,webp/auto-orient,1)
![[Laser cut and engrave] Laser Cut Decorative Wooden Wall Art with Porto Script](https://storage-us.atomm.com/resource/xtool/community/attachment/xtool-community/0d6f19e2-2659-4975-96fa-4913ab416ca0.jpeg?x-oss-process=image/resize,w_200,h_150,limit_0/interlace,1/format,webp/auto-orient,1)
![[Laser cut and engrave] Laser Cut Decorative Wooden Wall Art with Porto Script](https://storage-us.atomm.com/resource/xtool/community/attachment/xtool-community/d18affa8-7000-4d53-b86b-aeaeee402250.jpeg?x-oss-process=image/resize,w_200,h_150,limit_0/interlace,1/format,webp/auto-orient,1)
![[Laser cut and engrave] Laser Cut Decorative Wooden Wall Art with Porto Script](https://storage-us.atomm.com/resource/xtool/community/attachment/xtool-community/079e3a20-cb51-4b7e-8568-146c63694f1d.jpeg?x-oss-process=image/resize,w_200,h_150,limit_0/interlace,1/format,webp/auto-orient,1)
![[Laser cut and engrave] Laser Cut Decorative Wooden Wall Art with Porto Script](https://storage-us.atomm.com/resource/xtool/community/attachment/xtool-community/29fb1a9e-8776-4de6-be0e-1b1da21e9a28.jpeg?x-oss-process=image/resize,w_200,h_150,limit_0/interlace,1/format,webp/auto-orient,1)
Portuguese Tiles Wall Art — Layered Laser Cut Design (SVG + XCS)
 Instruction
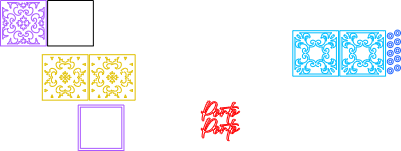


Information
      Inspired by the timeless beauty of traditional Portuguese tiles (Azulejos), this layered wall art design blends classic ornamental patterns with a modern laser-crafted composition.

The project features an elegant tile-style frame, rich decorative layers, and a central word element (as shown in the example: Porto), creating a striking piece that celebrates Portuguese culture, heritage, and craftsmanship.

Designed with depth and balance in mind, this artwork is perfect for home décor, studios, cafés, or as a meaningful gift. The layered construction adds shadow, texture, and a handcrafted feel that elevates the final result.

This design can be customized with different words, colors, or finishes while maintaining the original tile-inspired concept.

🎨 Customization Ideas

Change the central word (city name, family name, short phrase)
Use neutral tones for a classic tile look
Add gold, white, or blue accents inspired by traditional azulejos
Apply light distressing for a rustic, aged finish

🏡 Perfect For

Wall décor & statement pieces
Portuguese-themed interiors
Gift ideas & cultural souvenirs
Laser makers looking for elegant layered projects

Yeshleeart laser craft
Instruction
Step1
⚙️ Laser Cutting & Assembly Instructions
📌 Recommended Materials
MDF 3 mm (main layers and decorative elements)
Plywood or MDF 3–6 mm (frame structure)
Acrylic can also be used for accent layers if desired
🪚 Suggested xTool Settings (reference only — always test first)
Cut (MDF 3 mm):
Power: 100%
Speed: 5–6 mm/s
Passes: 1–2 (depending on material density)
Engrave (optional texture/details):
Power: 50–60%
Speed: 180–220 mm/s
Passes: 1
🧩 Assembly Steps
Cut all layers according to the file layout.
Lightly sand edges if needed for a clean finish.
Paint or stain individual layers before assembly
(this helps achieve better contrast and texture).
Start assembling from the back layer to the front, aligning each tile pattern carefully.
Glue layers progressively, ensuring even spacing and alignment.
Attach the central word element last for precise positioning.
Mount inside a frame or add a back support for wall hanging.


