


![[Laser cut and engrave] Laser Engraved Dragon Head Wooden Token with Intricate Design](https://storage-us.atomm.com/resource/xtool/community/attachment/xtool-community/9fc67122-c3a1-4054-9399-64e70fba6184.jpg?x-oss-process=image/resize,w_1200,h_900,limit_0/interlace,1/format,webp/auto-orient,1)
![[Laser cut and engrave] Laser Engraved Dragon Head Wooden Token with Intricate Design](data:image/png;base64,iVBORw0KGgoAAAANSUhEUgAAAAoAAAAKCAYAAACNMs+9AAAAAXNSR0IArs4c6QAAABdJREFUKFNjZCASMBKpjmFUId6QIjp4AAppAAuXjCs4AAAAAElFTkSuQmCC)
![[Laser cut and engrave] Laser Engraved Dragon Head Wooden Token with Intricate Design](https://storage-us.atomm.com/resource/xtool/community/attachment/xtool-community/9fc67122-c3a1-4054-9399-64e70fba6184.jpg?x-oss-process=image/resize,w_200,h_150,limit_0/interlace,1/format,webp/auto-orient,1)
![[Laser cut and engrave] Laser Engraved Dragon Head Wooden Token with Intricate Design](https://storage-us.atomm.com/resource/xtool/community/attachment/xtool-community/f8714faa-1389-408b-9b57-0d1ca0c10adc.jpg?x-oss-process=image/resize,w_200,h_150,limit_0/interlace,1/format,webp/auto-orient,1)
Dragon Head Coin
 Instruction
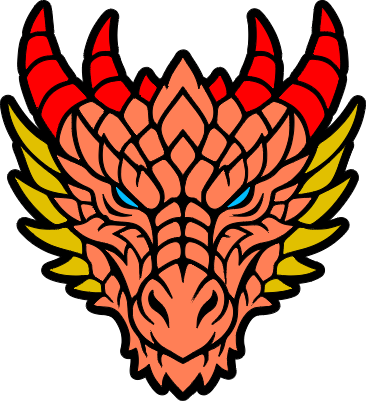

Information
I recently have been trying my hand at color engravings on coins. This was a first successful attempt. I though I would give it a share with you all to use as you would see fit! Enjoy!
Instruction
Step1: Before you begin
I started with this project using various recommended test grids to gain a color scheme. When I could not get what I wanted, I started to make my own test grids…and used a lot of coins in the process…lol.
I used the 40mm brass coins from xTool. I have used other coins but these are exceptionally well made and give very clear engraves with some great heft. I can't recommend these coins enough. If you want to purchase them, follow this link to get yours:
This was made with the F2 using the C engrave settings. The image of the dragons head was generated with AIMake and then traced. I then did an offset to get the black backdrop. When that was done, I copied the original dragons head and pasted it to one side then subtracted the original design from the black backdrop.
I selected the pasted dragons head and released the compound vector so each part was its own separate piece. Next I selected each piece of the dragons head (Multiples if they were going to be the same color) and used the test grids I created to add in the tones I wanted for the selected piece/pieces. After I did that, I moved it to where it overlapped each of its corresponding blank area in the black backdrop. I continued to do this until I had every piece colored and moved.
This was fun to do and I am looking forward to getting into more complex pieces as I become accustomed to doing this.
I have been told this can be done on the F1 but to be honest, it took almost 45 to 50 minutes for this to engrave on the F2 and so I can only imagine how long it would take on the F1.
Step2: Engrave your coin
Be sure the coin is clean and free of dust and debris. Use the camera function of the F2 to center the design on the coin and then run the framing just to be sure the design is sitting where you want on the coin.
There are 22 different settings for this piece, each providing a different color shade. Some are barely noticeable but it is there. Using the settings I provided will give you the white horns, yellowed jaw spikes and a range of ochres and browns to fill out the scales. If you want to decrease the time and you do not care for the black outline, you can delete that setting/part and it will considerably decrease your engrave time.
I really hope you enjoy this.
Step3: If you like this....
I work hard to create various items. With this plan, I now have 100 items that are either completely and wholey designed by me or, in the case of 2 plans, remixes of exceptional products.
If you like this design and what to check out my other projects, please do so at the following link. It will really help me out if you visit them and at least give them a thumbs up if you like them.
https://www.atomm.com/profile/15190?utm_source=Social_Share
I have a bunch of free products and a few premiums. Check them out and let me know what you think.
Happy Crafting!


