


![[Laser cut and engrave] Snowman Stand with Reversible Sign](https://storage-us.atomm.com/resource/xtool/community/attachment/xtool-community/b68eaf4f-4a3b-4235-97bc-0113bbf79842.JPG?x-oss-process=image/resize,w_1200,h_900,limit_0/interlace,1/format,webp/auto-orient,1)
![[Laser cut and engrave] Snowman Stand with Reversible Sign](data:image/png;base64,iVBORw0KGgoAAAANSUhEUgAAAAoAAAAKCAYAAACNMs+9AAAAAXNSR0IArs4c6QAAABdJREFUKFNjZCASMBKpjmFUId6QIjp4AAppAAuXjCs4AAAAAElFTkSuQmCC)
![[Laser cut and engrave] Snowman Stand with Reversible Sign](https://storage-us.atomm.com/resource/xtool/community/attachment/xtool-community/b68eaf4f-4a3b-4235-97bc-0113bbf79842.JPG?x-oss-process=image/resize,w_200,h_150,limit_0/interlace,1/format,webp/auto-orient,1)
![[Laser cut and engrave] Snowman Stand with Reversible Sign](https://storage-us.atomm.com/resource/xtool/community/attachment/xtool-community/c996b2b0-5e57-4d2a-9d5c-df4115571c87.JPG?x-oss-process=image/resize,w_200,h_150,limit_0/interlace,1/format,webp/auto-orient,1)
![[Laser cut and engrave] Snowman Stand with Reversible Sign](https://storage-us.atomm.com/resource/xtool/community/attachment/xtool-community/1c4cd8cd-0509-4ca2-bcc6-ba4f96cdab8c.JPG?x-oss-process=image/resize,w_200,h_150,limit_0/interlace,1/format,webp/auto-orient,1)
Snowman Stand with Reversible Sign
 Instruction
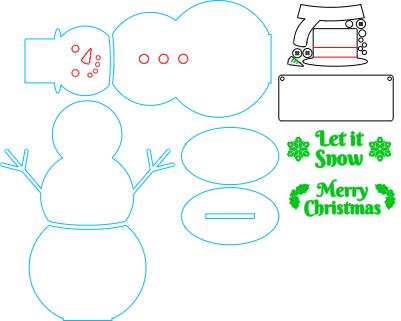

Information
This snowman stand is just over 21 inches tall but is designed so it can still be cut out on the S1 without the conveyor. It comes with a reversible and removable sign that can also be customized.
Instruction
Step1: Process Material


This project uses 6mm maple plywood and 3mm basswood plywood. If you use different material, you will need to make sure the tabs on the bottom fit into the slot in the base. The blue lines are cut for the 6mm material, the black lines are cut for the 3mm material, red lines are score, and green lines are engrave. Process your material. If you want to paint the sign, then do not engrave anything on it and follow the steps for it later. If you want to leave it wood, then you can go ahead and engrave.
Step2

Paint and/or stain as desired. Paint the front and the back of the sign.
Step3: Engrave Sign


Once the sign is completely dry, cover it with painters tape. Be sure the edges line up but do not overlap. Place the sign in your machine and use the edges to mark your processing area. Place the desired text/image in the center of your processing area. Engrave and remove the tape once it is finished. Turn the sign over and do the same thing for the back. Now, add rope or desired material to the holes.
Step4: Assemble


Glue the 2 base pieces together. Take the bottom snowman section with the button score lines and turn it over so the back is facing up. Glue the other bottom section to it as shown in the image. Glue the piece with the arms to the bottom pieces making sure the painted or stained side is facing down. Turn your piece back over and glue on the head piece. All the score lines should now be facing up. Now, glue on the 3mm pieces using the score lines as guides. Last, glue the snowman into the base. You can now hang the sign on the arms of the snowman. Enjoy!


