


Report
![[Laser cut and engrave] Amstaff Color Engraving (F2U)](https://storage-us.atomm.com/resource/xart/result/566715/ab8d3838-c161-4d65-8d24-627457ab0d16.png?x-oss-process=image/resize,w_1200,h_900,limit_0/interlace,1/format,webp/auto-orient,1)
![[Laser cut and engrave] Amstaff Color Engraving (F2U)](data:image/png;base64,iVBORw0KGgoAAAANSUhEUgAAAAoAAAAKCAYAAACNMs+9AAAAAXNSR0IArs4c6QAAABdJREFUKFNjZCASMBKpjmFUId6QIjp4AAppAAuXjCs4AAAAAElFTkSuQmCC)
![[Laser cut and engrave] Amstaff Color Engraving (F2U)](https://storage-us.atomm.com/resource/xart/result/566715/ab8d3838-c161-4d65-8d24-627457ab0d16.png?x-oss-process=image/resize,w_200,h_150,limit_0/interlace,1/format,webp/auto-orient,1)
![[Laser cut and engrave] Amstaff Color Engraving (F2U)](https://storage-us.atomm.com/resource/xtool/community/attachment/xtool-community/ba9605df-88c5-405b-9c53-7250670d43d5.jpg?x-oss-process=image/resize,w_200,h_150,limit_0/interlace,1/format,webp/auto-orient,1)
![[Laser cut and engrave] Amstaff Color Engraving (F2U)](https://storage-us.atomm.com/resource/xtool/community/attachment/xtool-community/4bfaa20d-ce64-4ea2-b23f-16660b83b0cd.png?x-oss-process=image/resize,w_200,h_150,limit_0/interlace,1/format,webp/auto-orient,1)
Amstaff Color Engraving (F2U)


Amstaff_Colorful
.xcs
Application scenario
Laser processing
Machine & module
xTool F2 Ultra
40W, 60WCompatibles · 10
Material used

201 Stainless Steel
167
2981
Information
OMG, I can’t handle this level of cuteness! 🐾
This little metallic-engraved amstaff (name is Kira) looks absolutely stunning — the shiny finish makes her sparkle like a tiny masterpiece.
All I want is for her to stay healthy, happy, and right by my side for every moment to come. 🥰🎀
Dog lovers, gather around — you seriously don’t want to miss this!
Here’s how I created the design:
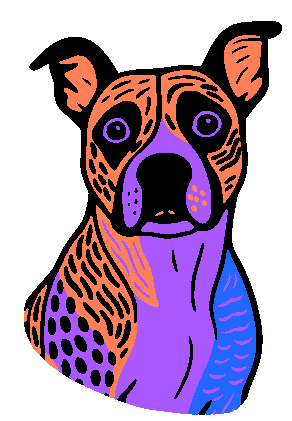
1. I made an illustration of my dog to capture her shape and features exactly the way I wanted. (please see the pictures I attached)
2. I divided the image into multiple individual parts, so each area of her body could be edited separately. (also included in photos)
3. I assigned specific colors to each piece to achieve the metallic gradient effect I imagined for the final look.
Seeing it all come to life on the F2 Ultra is honestly magical. ✨🎨
Just use my settings, they are already prepared.
Please NOTE: Colors will vary depending on the material you use. Mine are stainless 201 and 314
Instruction
1
Step1: Creating design

Preview
I made an illustration of my dog to capture her shape and features exactly the way I wanted. You can use AI tools for this, or draw that by yourself.
2
Step2: Separating layers

Preview

Preview

Preview
3 More images
I divided the image in Photoshop into multiple individual parts, so each area of her body could be edited separately.
3
Step3: Choosing the colors based on my test grid

Preview
I assigned specific colors based on my previous material test array to each piece to achieve the metallic gradient effect I imagined for the final look. You can choose your own, but my presets are already there. (please don't mind the colors on the dog layers in xcs, there is not enough of colour pallete to make it exact)
4
Step4: Engrave!

Preview
Hit process and have fun!
Comments


