
Report
![[Laser cut and engrave] Laser Cut Pink Doll Crib Toy with Star Cutouts](https://storage-us.atomm.com/resource/xtool/community/attachment/xtool-community/1ac65775-46a5-43a5-b0bb-314dee83ff4c.jpg?x-oss-process=image/resize,w_1200,h_900,limit_0/interlace,1/format,webp/auto-orient,1)
![[Laser cut and engrave] Laser Cut Pink Doll Crib Toy with Star Cutouts](data:image/png;base64,iVBORw0KGgoAAAANSUhEUgAAAAoAAAAKCAYAAACNMs+9AAAAAXNSR0IArs4c6QAAABdJREFUKFNjZCASMBKpjmFUId6QIjp4AAppAAuXjCs4AAAAAElFTkSuQmCC)
![[Laser cut and engrave] Laser Cut Pink Doll Crib Toy with Star Cutouts](https://storage-us.atomm.com/resource/xtool/community/attachment/xtool-community/1ac65775-46a5-43a5-b0bb-314dee83ff4c.jpg?x-oss-process=image/resize,w_200,h_150,limit_0/interlace,1/format,webp/auto-orient,1)
![[Laser cut and engrave] Laser Cut Pink Doll Crib Toy with Star Cutouts](https://storage-us.atomm.com/resource/xtool/community/attachment/xtool-community/ab804fb2-a0da-4b68-85d1-dc7b146e7cfc.jpg?x-oss-process=image/resize,w_200,h_150,limit_0/interlace,1/format,webp/auto-orient,1)
![[Laser cut and engrave] Laser Cut Pink Doll Crib Toy with Star Cutouts](https://storage-us.atomm.com/resource/xtool/community/attachment/xtool-community/08c48c13-ce7d-4ce0-9736-1c3650fbb773.jpg?x-oss-process=image/resize,w_200,h_150,limit_0/interlace,1/format,webp/auto-orient,1)
Tiny Cradle/Cot for Dollhouse approx. 1:16 Scale - Suitable for Sylvanian Families (Calico Critters) Babies
 Remix
Remix Instruction
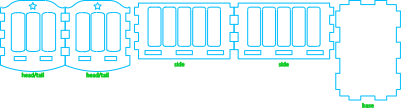
Craddle_small
.xcs
Application scenario
Laser processing
Machine & module
xTool M1 Ultra
20WMaterial used
1/8"(3mm) MDF Board
3mm MDF

38
982
Information
I loved the look of original creator's rocking cot. I just downsized it to make it the right scale (approx. 1:16) for my daughter's Sylvanian Families (Calico Critters) baby dolls. I believe the original design was using 1.6mm thick material but I only have 3mm so I adjusted the the cutouts to suit 3mm MDF.
This remix is based on

Miniature rocking cradle dollhouse
 mariaalvarez
Instruction
1
Step1: Laser Cut Materials
Adjust setout of elements in the app to suit your material size and arrangement.
2
Step2: Add paint and embellishments
I just spray painted 2 coats of generic spray paint. Note that thick paints and overlays may affect how well the pieces slot together.
3
Step3: Assemble
Assemble the pieces by putting the base piece with the head and tail of the cot first, then install the sides. Add clear drying wood glue or superglue to the joints to provide permanent bond.
Comments
