
Report
![[Laser cut and engrave] Mama Bear Wooden Heart Ornament with Floral Design](https://image-res.atomm.com/resource/xtool/community/attachment/xtool-community/bf7b8f63-209f-4364-b4b9-0ef951abe7e5?x-oss-process=image/resize,w_1200,h_900,limit_0/interlace,1/format,webp/auto-orient,1)
![[Laser cut and engrave] Mama Bear Wooden Heart Ornament with Floral Design](data:image/png;base64,iVBORw0KGgoAAAANSUhEUgAAAAoAAAAKCAYAAACNMs+9AAAAAXNSR0IArs4c6QAAABdJREFUKFNjZCASMBKpjmFUId6QIjp4AAppAAuXjCs4AAAAAElFTkSuQmCC)
![[Laser cut and engrave] Mama Bear Wooden Heart Ornament with Floral Design](https://image-res.atomm.com/resource/xtool/community/attachment/xtool-community/bf7b8f63-209f-4364-b4b9-0ef951abe7e5?x-oss-process=image/resize,w_200,h_150,limit_0/interlace,1/format,webp/auto-orient,1)
![[Laser cut and engrave] Mama Bear Wooden Heart Ornament with Floral Design](https://image-res.atomm.com/resource/xtool/community/attachment/xtool-community/5e742eb9-2f18-4c80-9121-56795226371d.jpg?x-oss-process=image/resize,w_200,h_150,limit_0/interlace,1/format,webp/auto-orient,1)
Mama Bear Mother's Day Ornament
 Instruction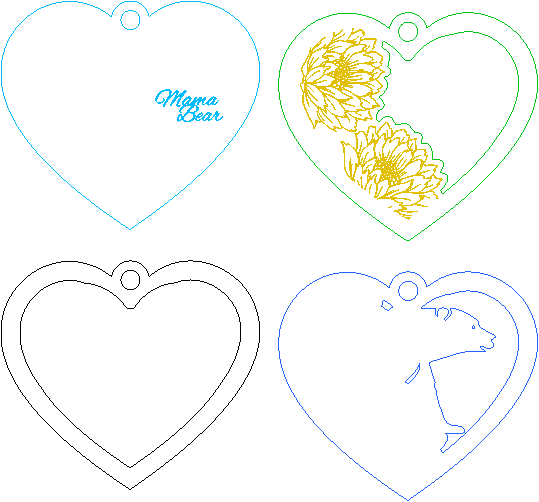
Mother'sDayMamaBear
.xcs
Application scenario
Laser processing
Machine & module

xTool D1 Pro
10WCompatible xTool Machine
M2
10W, 20WF2 Ultra UV
5WP3
80WF2 Ultra
40WF1 Ultra
20WM1
5W, 10WD1
5W, 10W, 20WD1 Pro
5W, 20W, 40WP2
55WF1
10WS1
10W, 20W, 40WM1 Ultra
10W, 20WP2S
55WMaterial used

5/16"(8mm) Basswood Plywood

40
1409
Information
Ornament made for my mother-in-law who is a mama bear ready to protect her children even though they are fully adults.
Instruction
1
Step1: File Setup

Preview
eview layers and confirm everything looks good.
If you want to customize or change the message:
- copy everything, layer in the correct order, and change to engrave (This will allow you to see the position of the message)
- Adjust wording of engraved message
- Delete the top layers, besides the text and bottom “whole” layer
- Copy these two layers to replace the original. Make sure the layers are returned to cut for the “whole” layer and engrave for the message.
2
Step2: Cut Out Layers
Cut out the layers with your machine.
3
Step3: Glue Ornament together

Preview

Preview

Preview
Glue the 2nd layer (bear) on top of bottom layer (text), clamp or use something heavy to keep them together until it sets. Add the third layer (flowers) and clamp/set. Finally, add the final layer and clamp/set. Add a string if you want to hang the ornament.
Comments
Remixes



You may also like

'/%3e%3cdefs%3e%3clinearGradient%20id='paint0_linear_1433_15726'%20x1='12'%20y1='5.25'%20x2='12'%20y2='18.75'%20gradientUnits='userSpaceOnUse'%3e%3cstop%20stop-color='%23FFC654'/%3e%3cstop%20offset='1'%20stop-color='%23FF8D12'/%3e%3c/linearGradient%3e%3c/defs%3e%3c/svg%3e)
Teddy Bear Flower Collector Gift For Mother's Day

85
509

Pink Mother's Day Flower Pot Decoration with Happy Mother's Day Text

19
94

14 Wooden mothers day plant tag for gift decoration

19
111

Magnet Maman en bois

16
86

Mother’s Day Heart Stands – Set of 14 (7+7) Laser-Ready Decorations (EN & DE Texts)
12
134

$2.11
$2.11
$7.03
Credits211
Mama Floral Round Hanging Ornament

4

Happy Mother's Day Heart Shaped Wooden Decoration with Floral Design

71
577

Heart-shaped wooden decoration with colorful flowers and 'Mum' text

18
52

'/%3e%3cdefs%3e%3clinearGradient%20id='paint0_linear_1433_15752'%20x1='12.5'%20y1='5'%20x2='12.5'%20y2='19.2596'%20gradientUnits='userSpaceOnUse'%3e%3cstop%20stop-color='%232F7FFF'/%3e%3cstop%20offset='1'%20stop-color='%232661F1'/%3e%3c/linearGradient%3e%3c/defs%3e%3c/svg%3e)
 Template
Mother's Day Ornament

6


Rose for mother's day

89
757

Happy Mother's Day sitter decoration with hearts

8
47

Happy Mother's Day Floral Decoration with Flower Stick
16
99

Heart-shaped Mumma Bear decoration with personalized names

11
29

How to Create a Mother's Day Gift with xTool M1 | xTool M1 Laser Cutter Wooden Rose for Mother's Day

82
418

Kocham Cie Mamo Heart Shaped Mother's Day Ornament

4
11

$1.99
$1.99
Credits199
4 Designs Perfect for Mother's Day - Floral Decorations

1

Happy Mother's Day heart-shaped cake topper
14
120

Cake Topper Mama

13
142