
![[Laser cut and engrave] Miniature modell for TrillionTrees](https://storage-public.atomm.com/xtool/community/attachment/xtool-community/b0cde328-9f90-4e3b-b91b-ee4969f82418.jpeg?x-oss-process=image/resize,w_1200,h_900,limit_0/interlace,1/format,webp/auto-orient,1)
![[Laser cut and engrave] Miniature modell for TrillionTrees](data:image/png;base64,iVBORw0KGgoAAAANSUhEUgAAAAoAAAAKCAYAAACNMs+9AAAAAXNSR0IArs4c6QAAABdJREFUKFNjZCASMBKpjmFUId6QIjp4AAppAAuXjCs4AAAAAElFTkSuQmCC)
![[Laser cut and engrave] Miniature modell for TrillionTrees](https://storage-public.atomm.com/xtool/community/attachment/xtool-community/b0cde328-9f90-4e3b-b91b-ee4969f82418.jpeg?x-oss-process=image/resize,w_200,h_150,limit_0/interlace,1/format,webp/auto-orient,1)
![[Laser cut and engrave] Miniature modell for TrillionTrees](https://storage-public.atomm.com/xtool/community/attachment/xtool-community/e5b65d6e-54fb-4b36-af78-b9895c7d37cf.jpeg?x-oss-process=image/resize,w_200,h_150,limit_0/interlace,1/format,webp/auto-orient,1)
![[Laser cut and engrave] Miniature modell for TrillionTrees](https://storage-public.atomm.com/xtool/community/attachment/xtool-community/34554d01-e918-49fc-97e5-c5986e6857b8.jpeg?x-oss-process=image/resize,w_200,h_150,limit_0/interlace,1/format,webp/auto-orient,1)
![[Laser cut and engrave] Miniature modell for TrillionTrees](https://storage-public.atomm.com/xtool/community/attachment/xtool-community/5c651440-c0e0-444b-9355-9ec8e4a31f32.jpeg?x-oss-process=image/resize,w_200,h_150,limit_0/interlace,1/format,webp/auto-orient,1)
![[Laser cut and engrave] Miniature modell for TrillionTrees](https://storage-public.atomm.com/xtool/community/attachment/xtool-community/28bf03c8-3563-4643-8c11-b5b612ada932.jpeg?x-oss-process=image/resize,w_200,h_150,limit_0/interlace,1/format,webp/auto-orient,1)
![[Laser cut and engrave] Miniature modell for TrillionTrees](https://storage-public.atomm.com/xtool/community/attachment/xtool-community/9a13fa0c-0b4b-44c2-a697-999fbd004c9d.jpeg?x-oss-process=image/resize,w_200,h_150,limit_0/interlace,1/format,webp/auto-orient,1)
TrillionTrees 的微型模型


教程
步骤1: 摘要:TrillionTrees 的微型模型
作为XTool制作者,我们经常使用来自自然的材料:木材、胶合板、纸张、纸板、软木、皮革等等。尤其是在大小木工项目中,比如激光切割或实际房屋建造,大自然为我们提供了使项目得以实现的资源。
这就是为什么我想让这个微缩模型不仅仅是一个漂亮的物件。如果我们利用大自然的资源来制作,也应该找到回馈社会的方式。
我选择TrillionTrees,是因为森林提供了栖息地、储存碳、保护生态系统,并为我们提供了许多喜爱的材料。支持森林保护和恢复工作与这个项目契合。
这是我参加1%创客挑战赛的作品。我的目标是展示即使是小型创客项目也能产生真正的影响。
我也会在Instagram上分享这个项目。每给那个帖子点赞,我就捐1欧元给TrillionTrees。二维码指向此页面:
你可以在这里看到Instagram帖子:
https://www.instagram.com/p/DZyHWsjicHr/?utm_source=ig_web_copy_link&igsh=MzRlODBiNWFlZA==
我很想挑战所有在自己城镇、村庄、学校、工作坊、创客空间或社区重现这个项目的人,做类似的事情:
去建造它。分享出来吧。激励他人。回馈点东西。
一个项目看起来可能很小。一个点赞看起来可能很小。一棵树看起来可能很小。
但许多小动作也能成长为更大的事业!
让我们让它变得有意义——也让我们一起帮助某样东西成长起来。
步骤2: 创意与CAD设计


我们的想法是设计一个微型景观,易于激光切割,易于适应,适合公共场所,方便众多观众观看。
该项目特别适合市政厅、学校、图书馆、社区中心、教堂、博物馆、创客空间或其他公共空间等建筑。看到模型的人越多,就越多人能了解TrillionTrees,扫描链接,分享想法,并支持捐赠挑战。
我用SketchUp创建了CAD设计,就像我在其他项目中所做的那样。首先,我用3D构建模型,检查比例、材料厚度和连接。
设计应为:
- 易于切割,
- 组装后稳定,
- 明显可识别为微型模型,
- 适合公开展示,
- 与树木和自然相连,
- 尺寸可适应,
- 而且足够简单,方便别人重建。
步骤3: 准备激光文件

在激光软件中,我整理了零件,检查切割线,并将不同材料分成不同的切割工作。
在这个项目中,木质部件和丙烯酸河是分开切割的,因为它们需要不同的设置。
在最终切割前,先测试插槽连接。你也可以在这里自定义雕刻,例如:
- the TrillionTrees 名称,
- 你的城镇或村庄名称,
- "Make It Matter",
- 二维码,
- 或一个小说明牌。
步骤4: 激光切割零件

锉刀准备好后,你可以开始激光切割。
使用最适合你自己机器和材料的设置。如果你添加文字、标志或二维码,先测试雕刻。
对于许多小件或分层的部分,保持零件有序并按文件夹的顺序摆放在桌上会很有帮助。
激光切割后,我唯一用的后期处理就是打磨。用小砂纸或细砂纸帮助磨平边缘,去除轻微的烧痕,然后再上色和组装。
步骤5: 上色


组装前,我给树木和河流上色。
这些部分我用的是喷漆。这速度快,且适合许多小部件。用几层薄涂而不是一层厚涂,这样细节和连接点都能保持干净。
河流的部分只需根据附图绘制底部。
组装前让所有涂漆部件完全干透。
步骤6: 集会
现在模型可以逐步组装。
有些零件非常小,所以镊子在放置细节、对齐零件和插入精致部件时很有帮助。
我为每个组装步骤制作了一个简短的GIF,这样你可以看到所有步骤是如何组合在一起的。
第6.1步:组装小房子
首先,我组装了小房子。先从墙壁开始,然后再加屋顶。在压紧或粘合前检查是否对齐
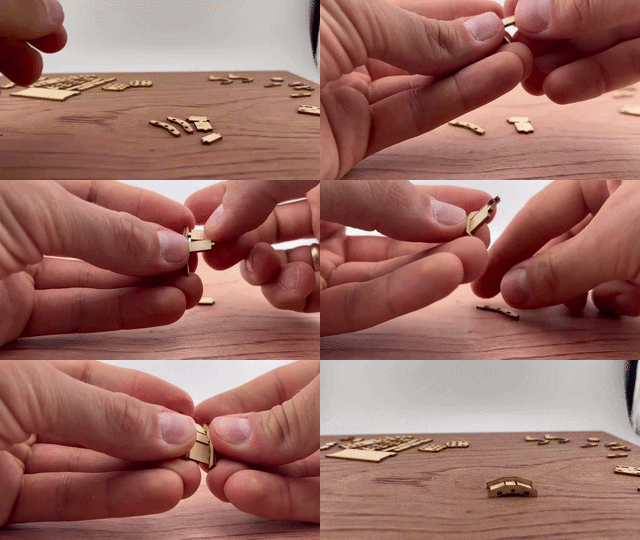
。步骤6.2:桥接
组装接下来,我组装了桥接器。它在视觉上连接了景观,并框住了河流区域。
在永久修复前,确保它坐得笔直且所有部件对齐。
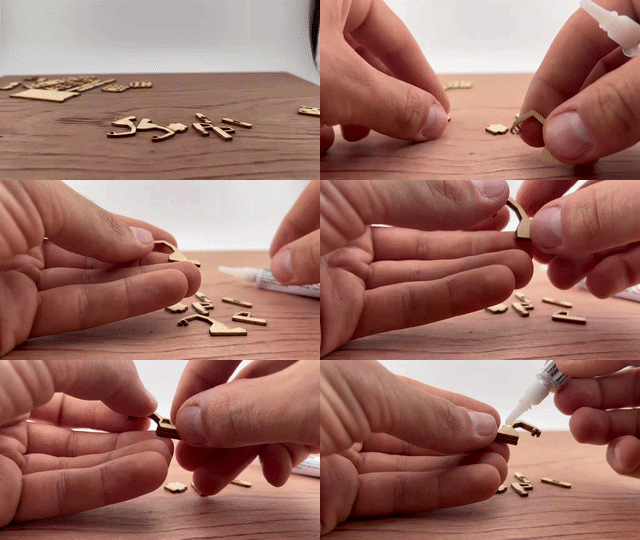
步骤6.3:组装挖掘机
然后我组装了挖掘机。这部分有几个小细节,所以镊子在这里特别有用。
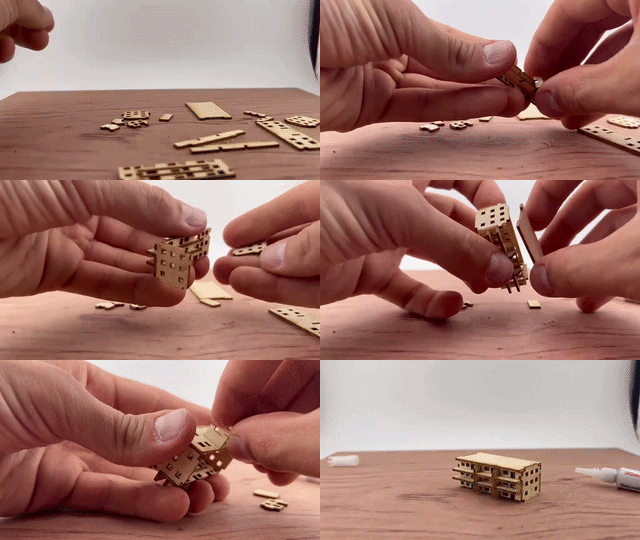
步骤6.4:组装大房子
大房子的工作原理类似,但包含更多部分。
先从主结构开始,然后添加屋顶和细节。检查房子是否笔直,边缘是否干净。
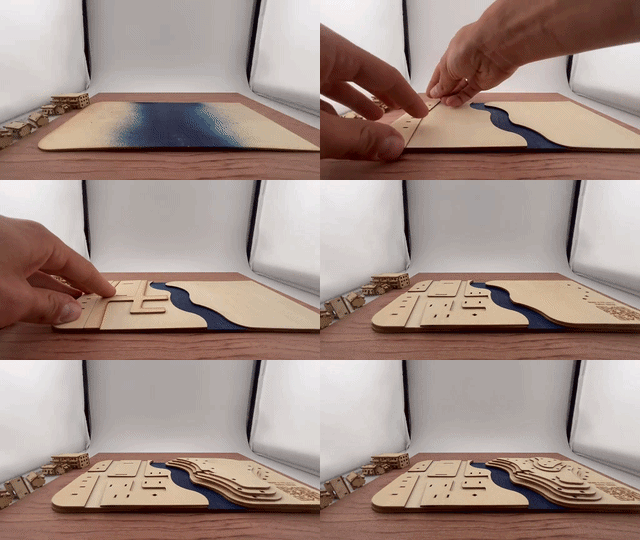
步骤6.5:最终装配1 — 分层地形
在第一个最终装配步骤中,我将景观图层叠放,但尚未固定。
这有助于在粘合前检查整体构图,也更容易看到房屋、树木、桥梁、挖掘机及其他部件的放置位置。
步骤6.6:最终装配2 — 房屋、树木和细节的放置
当我对分层底座满意并粘合在一起后,我开始放置各个元素:房屋、树木、桥梁和挖掘机。
关于房屋,我附上了一张图片,展示了小型和中型房屋可以安置的位置。各部分的标记如下:
- A = 小房子 — 使用3次
- B = 中等房屋/普通房屋 — 使用2次
- C = 谷仓
为A的小房子有固定的建议位置。中型房B和谷仓C可以根据你喜欢的外观更自由地放置。
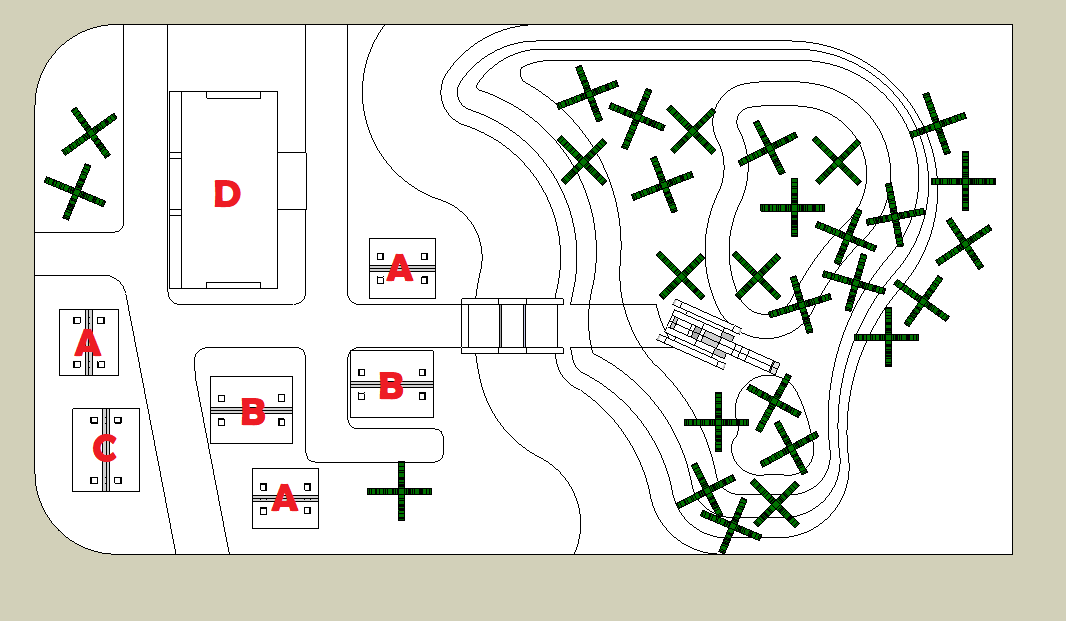
之后,我一步步添加了桥梁、挖掘机和树木。镊子在这里非常有用,尤其是在准确放置较小的树木和细节时。
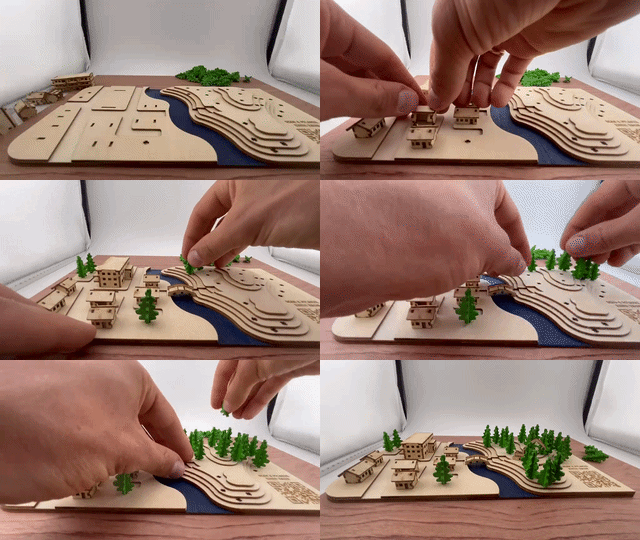
步骤7: 可选最终上色和细节

组装后,如果你愿意,可以添加最终的色彩细节。
我用丙烯颜料刷屋顶,增加对比,让房子更突出。
你可以保持模型自然简洁,或者根据你的风格增加更多颜色。你还可以添加:
- 捐赠牌匾,
- 雕刻信息,
- 你的城镇或村庄名称,
- 二维码,
- 或简短的TrillionTrees理念说明。
步骤8: 分享、点赞、捐赠
我会把我的项目发到Instagram上,并每获得一个点赞,就捐1欧元给TrillionTrees。
如果你自己做一个版本,我邀请你做类似的事情:
- 选择自然或植树组织,
- 分享你的项目,
- 设定你自己的捐赠目标,
- 并鼓励他人加入。
一个点赞很小。一棵树很小。一个创客项目很小。
但许多小动作也能成长为更大的事业。
祝你玩得开心——让我们让它变得有意义。
二创



您可能也喜欢

激光切割微型自行车DXF文件


手工制作的木制微型大炮模型,细节精致


'/%3e%3cdefs%3e%3clinearGradient%20id='paint0_linear_1433_15726'%20x1='12'%20y1='5.25'%20x2='12'%20y2='18.75'%20gradientUnits='userSpaceOnUse'%3e%3cstop%20stop-color='%23FFC654'/%3e%3cstop%20offset='1'%20stop-color='%23FF8D12'/%3e%3c/linearGradient%3e%3c/defs%3e%3c/svg%3e)
激光切割微型咖啡店模型,内饰精细


带有彩色玻璃窗的微型哥特式教堂模型


带有精致细节的木制微型房屋模型


微型木制绞刑架模型,配有精细的楼梯和平台


浮动奇幻城堡微缩模型激光切割设计。益智游戏。木制拼图。儿童房


激光切割木质教堂模型


绿黑相间车库的微型模型


激光切割木制风车模型,配有红色螺旋桨风扇


微型木制房屋模型


木制微型房屋模型,周围环绕着白色花朵


带有xTool旗帜装饰的木制微型灯塔模型


激光切割车库与汽车SVG模型 |DIY微缩模型套件 |3毫米胶合板工艺


空客A-320比例模型飞机


激光切割冠状病毒3D模型DXF文件


激光切割木质大众甲壳虫模型套件


激光切割木质房屋模型,配有精细的窗户和门