![[Laser cut and engrave] Square paper container with printed text interior](https://image-res.atomm.com/resource/xtool/community/attachment/xtool-community/98bc83af-1d94-4de6-9afa-de832a738b21.jpg?x-oss-process=image/resize,w_1200,h_900,limit_0/interlace,1/format,webp/auto-orient,1)
Environmentally Friendly Seed Starter Plant Pots from Junk Mail
 Instruction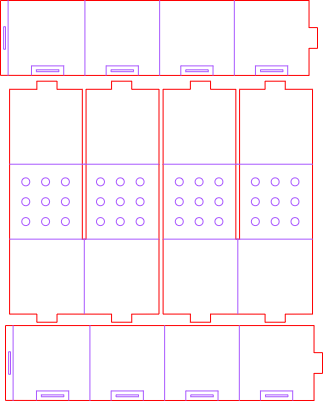


Information
      It's garden time!  This little project will allow you to recycle that junk mail into biodegradable seed starter pots.  You make these, put in the dirt, put in the seed, and plant the whole thing, pot and all, when the seedling is ready. One 8.5 inch by 11 inch piece of paper makes two seed starter pots.

Total time to make two pots about ten minutes.  One to load/align the paper, three for cutout, six for folding.  Make them with your kids!
Instruction
Step1: Alignment and Setup


first align your piece of paper on the P2/P2S bed. The design is a close fit, so put the clamps on the corners and make certain to use the close view to ensure that the cutting doesn't run over the body of any clamp. Press the clamps to make sure they're fully down.
Next, and this is important, check the settings of your P2/P2S air pump. Not the exhaust fan, the air pump. This is the pump that blows air onto the piece being cut while the laser is running. This must be set very low (I use 10%) to make certain that the paper isn't blown all over the place.
Step2: Cutout


Cut the pieces out. One 8.5" x 11" piece of paper will yield two ‘inner’ and two ‘outer’ pieces. In the picture I've marked which is which.
We're being good recyclers here - the finished piece will use no tape, no glue, no staples. There are tabs and slots that lock it all together. It is meant to last for years? Absolutely not. Just hang together long enough to get a seedling started and ready for transplantation.
Step3: Start folding inner part


Score lines are provided that make folding easy. Actually, the hard part was getting the laser power low enough to score without cutting! The parts of the inside with the drainage holes are crossed over each other and the paper folded on all the score lines inward. The sets of drainage holes will line up with each other and when you've folded correctly you've got a 5-sided box with the holes on the bottom and four sides with a tab pointing up on all four sides.
Step4: Fold and attach the strap


the strap, or outer, piece, is pre-folded on its score lines, both the big ones and the scores for the loops/slots that the tabs will fit into. Fold everything inward. The outer piece will wrap around the inner piece and when all the tabs/slots are lined up it will hold things together.
The idea here is that the four tabs of the inner box will slide into the four slots of the outer piece. and then there's one tab/slot for the outer piece to make it act like a belt around the inner piece.
Step5: Details of tabs and slots


What's supposed to happen all around the top of the little planter is that the four bent-in slots of the outer piece line up with the four vertical tabs of the inner piece. I find it best to clinch one tab/slot first and work my way around, you may experience differently. Then there's also a tab/slot to hold the outer piece together like a belt.
There's a little bit of a trick to clinching the tab/slot pairs. Make sure the tab pokes all the way through the slot, and then solidly fold the slot part IN at the same time you fold the tab part over OUTWARD. You want them to clinch each other. A single slide-and-pinch motion works.
For the outer piece, brace the box with the thumb of one hand on the inside while you clinch (pinch) the tab of the outer piece with the thumb/finger of the other hand.
Wishing you happy gardening!
Remixes



You may also like

Wooden Flower Planter Box SVG | Laser Cut Garden Decor (Digital Download)


3D Funny planters bundle. Plant holder laser cut files. Kids room decoration. Wooden flower box. Plant riser. Animals svg. Plant lover gift


Feelin' Tropical Elephant Planter Box laser cut


Scalloped Edge Wooden Rectangular Planter Boxes for Tabletop Centerpieces


Love Grows Here Mother's Day Mechanical Wooden Planter Box Sign


Couple Swan Box Display Papercut SVG


Constructions, turn waste into things. Storrage-Box for the "Waste into"Parts from Atomm


Square wooden planter box with heart cutout pattern


Gift box plant pot for 2 small flower pots.


pot potpourri lid


Laser Cut Wooden Letter to Santa Christmas Mail Holder


3D Funny planter. Plant holder laser cut files. Kids room decoration. Dog svg. Wooden flower box. Plant riser. Animals svg. Plant lover gift

Mail Holder


Personalised welcome paper napkin

Deer Repellant Irish Spring Soap Holders for Flower Gardens

Butterfly Box Display Papercut SVG

Shipping box from Cardboard


Simple 4" Coaster Holder
