
Report
![[Laser cut and engrave] Laser Cut Red Christmas Stocking Ornament with Name Tag](https://image-res.atomm.com/resource/xtool/community/attachment/xtool-community/c8b72a1b-ce67-41b7-a856-70b8cc5cf58d.png?x-oss-process=image/resize,w_1200,h_900,limit_0/interlace,1/format,webp/auto-orient,1)
![[Laser cut and engrave] Laser Cut Red Christmas Stocking Ornament with Name Tag](data:image/png;base64,iVBORw0KGgoAAAANSUhEUgAAAAoAAAAKCAYAAACNMs+9AAAAAXNSR0IArs4c6QAAABdJREFUKFNjZCASMBKpjmFUId6QIjp4AAppAAuXjCs4AAAAAElFTkSuQmCC)
![[Laser cut and engrave] Laser Cut Red Christmas Stocking Ornament with Name Tag](https://image-res.atomm.com/resource/xtool/community/attachment/xtool-community/c8b72a1b-ce67-41b7-a856-70b8cc5cf58d.png?x-oss-process=image/resize,w_200,h_150,limit_0/interlace,1/format,webp/auto-orient,1)
![[Laser cut and engrave] Laser Cut Red Christmas Stocking Ornament with Name Tag](https://image-res.atomm.com/resource/xtool/community/attachment/xtool-community/0abecb48-eef9-4d5b-ac26-25578273084f.JPG?x-oss-process=image/resize,w_200,h_150,limit_0/interlace,1/format,webp/auto-orient,1)
![[Laser cut and engrave] Laser Cut Red Christmas Stocking Ornament with Name Tag](https://image-res.atomm.com/resource/xtool/community/attachment/xtool-community/78898506-f550-4600-b550-b5ff663c0608.JPG?x-oss-process=image/resize,w_200,h_150,limit_0/interlace,1/format,webp/auto-orient,1)
![[Laser cut and engrave] Laser Cut Red Christmas Stocking Ornament with Name Tag](https://image-res.atomm.com/resource/xtool/community/attachment/xtool-community/eb217fe9-47c6-423b-942f-472d26d513a4.JPG?x-oss-process=image/resize,w_200,h_150,limit_0/interlace,1/format,webp/auto-orient,1)
![[Laser cut and engrave] Laser Cut Red Christmas Stocking Ornament with Name Tag](https://image-res.atomm.com/resource/xtool/community/attachment/xtool-community/adea4fe8-0c3d-46cb-a924-55e3ba0cd59a.png?x-oss-process=image/resize,w_200,h_150,limit_0/interlace,1/format,webp/auto-orient,1)
![[Laser cut and engrave] Laser Cut Red Christmas Stocking Ornament with Name Tag](https://image-res.atomm.com/resource/xtool/community/attachment/xtool-community/306a501a-4b4f-48cd-b0b5-e8d59fdfe261.png?x-oss-process=image/resize,w_200,h_150,limit_0/interlace,1/format,webp/auto-orient,1)
Layered Red Christmas Stocking Ornament with Name Tag
 Instruction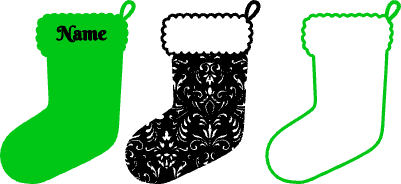
3 Layer Stocking
.xcs
Application scenario
Laser processing (30min)
Machine & module

xTool S1
20WCompatible xTool Machine
New
M2
10W, 20WF2 Ultra UV
5WF2
5W, 15WP3
5W, 80WF2 Ultra
40W, 60WF1 Ultra
20WM1
5W, 10WD1
5W, 10W, 20WD1 Pro
5W, 10W, 20W, 40WP2
55WF1
2W, 10WS1
10W, 40WM1 Ultra
10W, 20WP2S
55WF2 Ultra (Single)
60WMaterial used

1/8"(3mm) Faux Maple MDF Board

126
2584
Information
      I have really come to love layered art. It is very complicated and at times tedious and frustrating, but I am always left with a sense of satisfaction once the piece comes together. This is a simple, beginner friendly template that can be used as an ornament, wall art, magnet, or even hung on a mantle at the fireplace! Please not, because of the cut intricacy, this needs to be at minimum 5-6 inches tall.

This project merges two different AI requests into one.

Prompt 1: "layered Christmas stocking with ornamental pattern design". Ai asked me what style of pattern and I said geometric (which was not what I was looking for, I found out). As a result I said: "can you change the pattern so it is ornamental instead of geometric?" I still wasn't happy, so I decided to submit a photo of a pattern I liked and prompted: "please make the ornamental features look like the attached image." I still wasn't satisfied so I prompted: "please apply that image's pattern to all aspects of the stocking except the top where their typically is white fluff. Also remove all color but white, red, and black outlines." This made it better but it was still not what I was hoping for. So I prompted: "keep everything the same but remove the triangles in the center and let them just be the red and white ornamental pattern."

This got me to where I thought I wanted to be. Upon live tracing it. I found it would be better to merge the silhouette (filled in shape) provided in the stocking AI with an ai generated pattern.

I then prompted AI to create a pattern similar to a photo I submitted (as shown in the photos) using the prompt "create a pattern like this". It spit out a similar design but with more intricacy so I said, "make it slightly more simple and black and white."

I took that image and live traced it into Illustrator, then overlayed it onto the silhouette of the stocking created in the first prompt and subtracted the design from the silhouette in pathfinder.

#AiMakeHolidayContest
Instruction
1
Step1: Gather materials and load the file
IMPORTANT: If you do not want a name, delete the placeholder text. If you do, make sure to change the name, the size of the text, font, etc.
2
Step2: Cut the pieces
I used power 95% and speed 6 for the MDF hardboard with white coating from Home Depot.
3
Step3: Clean the pieces and push any remaining pieces out

Preview
The hardboard will have a brown residue. This washes off with a wipe, magic eraser, etc. Often times, some of the smaller pieces won't fall through during the cut, so you will need to pluck them out with a small tool.
4
Step4: Paint the layers

Preview

Preview

Preview

Preview
The bottom layer is the stocking silhouette (white)
The middle layer is the design. This should come out as one piece (red)
Top layer: Outline (black)
5
Step5: Glue the pieces together

Preview
Using a wood glue of your choice, glue each piece together in the order above. Place a book or clamps to keep the layers secure while drying.
Comments
Remixes
License

This work contains AI-generated content.


You may also like

Personalized Laser Cut Wooden Name Tags on Plush Christmas Stockings

2
6

$2.79
$2.79
$9.30
Credits279
Laser Cut Wooden Christmas Stocking Ornament with Tree and Stars

2

Wooden Christmas stocking ornament

11
44

Laser Cut Wooden Christmas Stocking Ornaments for Kids to Color

13
56

Laser Cut Christmas Ornament with Stocking and Gift Design 🎁 🧦

4
12

3D Christmas stocking. Xmas layered wall decor laser cut. Christmas decoration. Bunting banner svg. Stocking fireplace garland

10
86

Laser Cut Wooden Christmas Ornament with Squirrel in Stocking

1
4

Dog Christmas Stocking Ornament Decoration Laser Cut. Pets SVG. Christmas Tree Toy. Free Design. Christmas Ornament

8
45

Wooden Christmas Ornaments with Animal and Snowflake

16
49

Personalized Laser Cut Wooden Christmas Ornament with Names

24
153

Christmas tree ornament.
45
76

$2.79
$2.79
$9.30
Credits279
Laser Cut Wooden Christmas Stocking Ornament with Reindeer Design
1

2025 Christmas Stocking Ornament

0
21

Personalized Red Christmas Ornament with Santa and Name

116
758

Night Before Christmas Acrylic Stocking
1
4

Laser Engraved Wooden Christmas Stockings Ornament with Names

5
8

'/%3e%3cdefs%3e%3clinearGradient%20id='paint0_linear_1433_15726'%20x1='12'%20y1='5.25'%20x2='12'%20y2='18.75'%20gradientUnits='userSpaceOnUse'%3e%3cstop%20stop-color='%23FFC654'/%3e%3cstop%20offset='1'%20stop-color='%23FF8D12'/%3e%3c/linearGradient%3e%3c/defs%3e%3c/svg%3e)
Laser Cut Wooden Christmas Tree Ornament with Red Bow - Talavera Inspired

18
91

Laser Cut Wooden Christmas Gnome Ornament with Nordic Pattern

67
44