
There are three real ways to embroider something: by hand with a needle, by machine from a digitised file, or by sending it to someone who does it for a living. They suit completely different situations.
This guide walks through all three with the actual steps, the stitches worth learning first, and the mistakes that ruin a first attempt — most of which happen before any stitching starts.
Design something to stitchFree generators for clean artwork you can trace or digitise.Explore generatorsKey Takeaways
- Hooping and stabiliser decide whether the result puckers. That is preparation, not stitching.
- By hand, six stitches cover almost everything you will want to do.
- By machine, artwork must be digitised into a stitch file before it can be stitched at all.
Why Embroider Rather Than Print?
It lasts
Thread survives repeated washing far better than most printed or pressed decoration, which is why uniforms and workwear are embroidered rather than printed.
It reads as considered
Texture and sheen make an embroidered logo look deliberate in a way flat print does not, and that perception is most of why businesses pay for it.
It works on thick and awkward items
Caps, towels, bags, denim and fleece all take embroidery. Some of them take heat transfer badly or not at all.
The trade is detail. Photographs, gradients and very fine text are beyond thread, and for those heat transfer vinyl or printing is the better answer. If you are still deciding whether embroidery is the right technique at all, start with what embroidery is.
What You Need to Embroider
By hand
A hoop to hold the fabric taut, embroidery needles, embroidery floss, small sharp scissors, and a fabric with a reasonably even weave. Cotton or linen is far easier to learn on than jersey.
By machine
A machine, embroidery thread, finer bobbin thread, stabiliser backing, embroidery needles, and a digitised design. Stabiliser is not optional — it is what stops the fabric distorting under the needle.
The design itself
By hand you transfer an outline onto the fabric. By machine you need a stitch file: either one built into the machine, one bought ready-made, or your own artwork digitised.

The things you can make yourself
Hoops, floss organisers and wooden blanks to stitch onto are all common laser-cut projects, and the Atomm community files tagged embroidery are mostly that sort of thing — accessories and blanks rather than stitch files. Useful once the floss starts multiplying.
Method 1: How to Embroider by Hand
The cheapest way to start, and the one where the learning is entirely in your hands.
Step 1: Transfer the design
Trace the outline onto the fabric with a water-soluble pen, transfer paper, or by tracing against a window. Keep it light — you are marking a guide, not drawing the finished thing.
Step 2: Hoop the fabric
Lay the fabric over the inner ring, press the outer ring down, then tighten and pull the edges until it is drum-taut. Slack fabric is the main cause of a puckered result.
Step 3: Thread up and anchor
Embroidery floss comes as six strands; separate out two or three for most work. Anchor with a few tiny stitches on the back rather than a knot, which shows as a lump under the fabric.
Step 4: Work outlines, then fills
Stitch the outlines first so the shapes are defined, then fill inside them. Working in the other order makes it very hard to keep edges clean.
Step 5: Finish off and press
Weave the tail under existing stitches on the back instead of knotting. Press face down on a towel so the iron does not flatten the stitches.
Keep the tension even, not tight
Beginners pull too hard, which puckers the fabric around every stitch. Aim for thread that lies flat against the cloth without dimpling it — consistency matters far more than tightness.
Method 2: How to Embroider With a Machine
The machine handles the stitching. Your job is preparation and file management, and that is where things go wrong.
Step 1: Get a stitch file
Use a built-in design, buy a ready-made one, or digitise your own artwork in software. Brother machines read PES; other brands use their own formats.
Step 2: Choose and attach stabiliser
Cut-away stabiliser for stretchy and loose fabrics, tear-away for stable woven ones, and a water-soluble topper for towels and fleece so stitches do not sink into the pile.
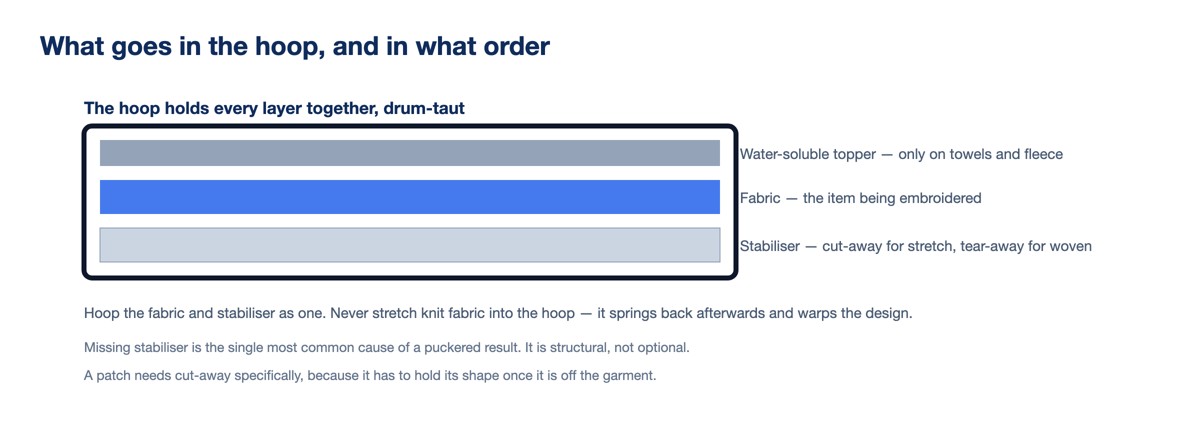
Step 3: Hoop fabric and stabiliser together
Both layers go in the hoop, drum-taut, with the design area centred. Do not stretch knit fabric while hooping — it will spring back after stitching and distort the design.
Step 4: Load the file and check placement
Send the file by USB, position the design on screen, and trace its outline with the machine before stitching. Ten seconds of tracing prevents a design landing off-centre on a finished garment.
Step 5: Stitch, changing thread on cue
The machine stops at each colour change. Rethread, restart, and watch the first few stitches of each block — that is where thread breaks show up.
Step 6: Trim, remove stabiliser, press
Snip jump threads, tear or cut away the excess stabiliser, dissolve any topper with water, and press face down.
Method 3: Order Custom Embroidery
Worth taking seriously rather than treating as a cop-out, because below a certain volume it is simply cheaper.
What you send
Vector artwork, the garment or its details, thread colours, and the placement and size you want. A good supplier digitises the file as part of the job.
What it costs
Usually a one-off digitising fee plus a per-item price that falls with quantity. The digitising fee is the part people forget.
When it makes sense
A dozen shirts once. A machine, thread, stabiliser and needles run past $350 before you have stitched anything, so a small run is hard to justify against a supplier.
The Stitches Worth Learning First
Six hand stitches cover the overwhelming majority of designs.
| Stitch | Use it for | Difficulty |
|---|---|---|
| Running stitch | Simple outlines, dashed lines | Easiest |
| Back stitch | Solid outlines and lettering | Easy |
| Split stitch | Smooth curved outlines | Easy |
| Satin stitch | Filling small shapes solidly | Moderate |
| French knot | Dots, eyes, flower centres | Moderate |
| Chain stitch | Decorative lines and borders | Moderate |

Learn back stitch and satin stitch first. Between them they handle an outline and a fill, which is most of what any design needs.
The Three Methods Compared
| By hand | By machine | Ordered | |
|---|---|---|---|
| Cost to start | Under $30 | From $299.99 | Per item, plus digitising |
| Time per piece | Hours | Minutes | Days of lead time |
| Repeatability | Every piece differs | Identical | Identical |
| Skill needed | Stitching technique | Hooping and digitising | None |
| Best for | One-off, personal pieces | Batches and repeat work | Small runs, no equipment |
What Is the Best Way to Embroider?
If you are learning for its own sake
By hand. Under thirty dollars of kit, no digitising, and the skill transfers to everything else you might do later.
If you need twenty of the same thing
By machine, or ordered. Hand-stitching twenty identical logos is a poor use of a week.
If you need a dozen shirts once
Ordered. The equipment cost does not pay back at that volume, and a supplier absorbs the digitising.
If this is becoming a business
By machine, and buy hoop size rather than features — the reasoning is in our beginner machine guide.
1. Brother PE800
The machine most people end up wanting
If you have decided on the machine route, hoop size is the specification that will matter in a year. A 5″ x 7″ area covers full-size designs without splitting them across two hoopings.
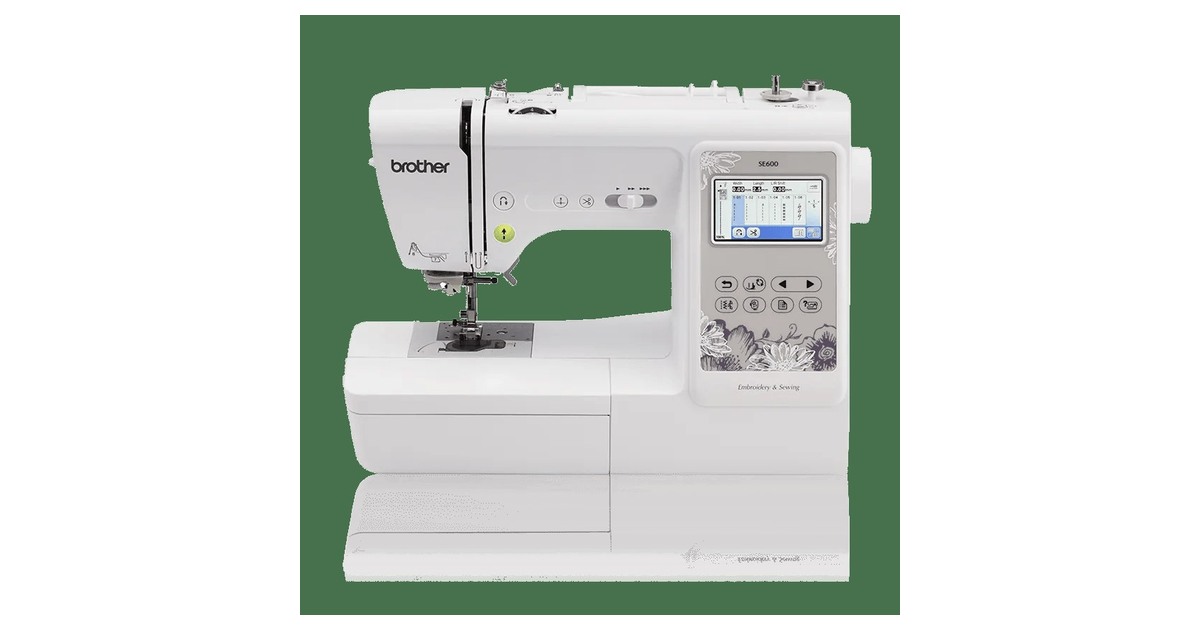
It embroiders only. If you also want to sew, the SE600 at $399.99 does both with a smaller 4″ x 4″ hoop.
Pros
- Large enough hoop for garment-sized designs
- No splitting and re-hooping
- USB transfer, standard PES files
Cons
- Does not sew
- Costs more than double the entry model
Brother PE800: the sensible machine to grow into rather than out of.
Mistakes That Ruin a First Attempt
Mistake 1: No stabiliser
The commonest machine-embroidery failure. Without backing, the fabric distorts under the needle and the design puckers permanently.
Mistake 2: Slack hooping
If the fabric can shift, stitches land in the wrong place relative to each other. It must be drum-taut before you start.
Mistake 3: Stretching knit fabric into the hoop
It springs back afterwards and the design warps. Hoop it flat, do not pull it tight.
Mistake 4: Ordinary thread in the bobbin
Bobbin thread is finer for a reason. Sewing thread underneath builds bulk and puckers the back.
Mistake 5: Skipping the placement trace
Machines will happily stitch a beautiful design two inches off-centre on a finished shirt.
Mistake 6: Ironing face up
It flattens the stitches and kills the texture you just spent an hour building. Press face down on a towel.
Conclusion
Hand embroidery is the cheapest way to actually learn, and six stitches will carry you a long way. Machine embroidery moves the difficulty from your hands to preparation and file work, and rewards you with speed and repeatability.
Whichever route, the failures are nearly all preparation: stabiliser, hooping tension, and checking placement before the needle moves. Get those three right and most first attempts come out well.
And for a dozen items once, ordering is not giving up — it is the cheaper answer, and the equipment will still be there when the volume justifies it. Patches are a slightly different job with its own rules — see how to make embroidered patches.
Frequently Asked Questions about How to Embroider
How do you start embroidering?
Hoop the fabric drum-taut, transfer a simple outline, separate two or three strands from six-strand floss, and anchor on the back with small stitches rather than a knot. Back stitch and satin stitch cover most designs.
What stitches should a beginner learn?
Back stitch for outlines and satin stitch for fills will handle most designs. Running stitch, split stitch, French knots and chain stitch round out the set of six worth knowing.
Do you need a hoop to embroider?
In practice yes. The hoop holds the fabric taut so it cannot shift while stitches go in. Fabric that moves under the needle puckers, and on a machine the hoop also sets the maximum design size.
What is stabiliser and do I need it?
Stabiliser is backing that supports fabric under the needle. For machine embroidery it is required: cut-away for stretchy fabrics, tear-away for stable wovens, and a water-soluble topper for towels and fleece.
Can I embroider by machine without digitising?
Only using designs that are already stitch files — built into the machine or bought ready-made. Your own artwork has to be digitised into a format like PES before a machine can stitch it.
Is it cheaper to order custom embroidery?
For small runs, usually. A machine plus thread, stabiliser and needles passes $350 before you stitch anything, while a supplier charges a one-off digitising fee plus a per-item price.
How long does embroidery take?
By hand, hours for a small design. By machine, minutes to about an hour depending on stitch count, plus preparation time for hooping and stabiliser, which is where most of the effort sits.
Design something to stitch
Free Atomm generators produce clean outlines to trace or digitise.
