
Report
![[Laser cut and engrave] Easter Bunny Placeholder](https://image-res.atomm.com/resource/xart/result/10579/36976a0e-ea93-4a03-8ce5-438046b63b81.png?x-oss-process=image/resize,w_1200,h_900,limit_0/interlace,1/format,webp/auto-orient,1)
Easter Bunny Placeholder
 Instruction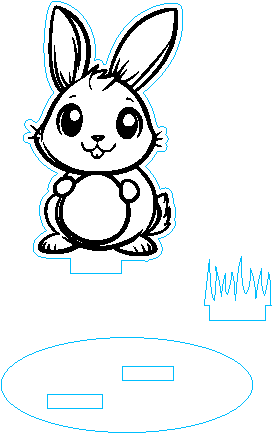
easter bunny placeholder
.xcs
Application scenario
Laser processing
Machine & module

xTool S1
40WCompatible xTool Machine
New
M2
10W, 20WF2 Ultra UV
5WF2
15WP3
80WF2 Ultra
40WF1 Ultra
20WM1
5W, 10WD1
5W, 10W, 20WD1 Pro
5W, 10W, 20W, 40WP2
55WF1
10WS1
10W, 20WM1 Ultra
10W, 20WP2S
55WMaterial used

1/8"(3mm) Basswood Plywood

9
760
Information
A little joyful bunny holding an easter egg with Your name on it!
Instruction
1
Step1: Engrave and cut
The file is ready to make!
The black layer is set to engrave, my settings go from 40 to 50%pwr and 250spd
The blue layers are set to cut, my settings are 85%pwr and 13spd
Inside the egg You can engrave or score the name of the person which is sitting at that spot!
This project is suitable for every Xtool machine!
2
Step2: Assembly

Preview
The project is composed to be glued into the baseplate:
- glue the bunny figure into the hole in the back
- glue the grass figure into the hole in the front
Comments
Remixes
License

This work contains AI-generated content.


You may also like

Easter Bunny Laser Cut File | Bunny Egg Stand Laser Cut | Easter Wreath SVG

5
24

Laser Cut Easter Bunny Cross Table Decoration on Wooden Base

3
8

Bunny holding a Happy Easter sign

4
8

Easter Bunny and Egg with Money Clip Holder, gift for kids on easter 2026

1
15

Laser Cut Happy Easter Bunny Egg Table Decoration

11
34

'/%3e%3cdefs%3e%3clinearGradient%20id='paint0_linear_1433_15726'%20x1='12'%20y1='5.25'%20x2='12'%20y2='18.75'%20gradientUnits='userSpaceOnUse'%3e%3cstop%20stop-color='%23FFC654'/%3e%3cstop%20offset='1'%20stop-color='%23FF8D12'/%3e%3c/linearGradient%3e%3c/defs%3e%3c/svg%3e)
Egg in an Easter basket

14
38

Laser Cut Wooden Easter Bunny Egg Holder with Colorful Eggs

5
34

Laser Cut Wooden Easter Bunny Shelf Sitter Decoration (Easter Rabbit Decor)

8
31

$1.99
$1.99
Credits199
Laser Cut Creme Egg holding Easter Bunny on stand.

1

'/%3e%3cdefs%3e%3clinearGradient%20id='paint0_linear_1433_15675'%20x1='12'%20y1='3.25'%20x2='16.6891'%20y2='20.75'%20gradientUnits='userSpaceOnUse'%3e%3cstop%20stop-color='%23FF5D80'/%3e%3cstop%20offset='1'%20stop-color='%23FF0035'/%3e%3c/linearGradient%3e%3c/defs%3e%3c/svg%3e)
Laser Cut Easter Bunny Window Ornament

5
9

happy easter

0
12

Easter Bunny Gift Holder – Layered Money & Treat Pocket

10
53

Easter Egg Hanging Ornament with Bunny and Flower Motif

3
15

Laser Cut Wooden Easter Bunny Decoration with Floral Design

9
75

Colorful Laser Cut Easter Gnome Holding Painted Striped Egg Decoration
9
42

Easter Bunny Princess with Egg
73
589

Easter Bunny with Decorated Egg – Egg Holder (Single & Double-Sided Version)
21
130

Easter Money Holder Laser Cut. Easter Ornament. 3D Easter Bunny. Happy Easter SVG. Easter Basket Accessory. Spring Design

27
154