![[Laser cut and engrave] A Spiderman](https://image-res.atomm.com/resource/xtool/community/attachment/xtool-community/40f91c75-fa8f-47eb-a9a6-d5c0a119b408.jpg?x-oss-process=image/resize,w_1200,h_900,limit_0/interlace,1/format,webp/auto-orient,1)
![[Laser cut and engrave] A Spiderman](data:image/png;base64,iVBORw0KGgoAAAANSUhEUgAAAAoAAAAKCAYAAACNMs+9AAAAAXNSR0IArs4c6QAAABdJREFUKFNjZCASMBKpjmFUId6QIjp4AAppAAuXjCs4AAAAAElFTkSuQmCC)
![[Laser cut and engrave] A Spiderman](https://image-res.atomm.com/resource/xtool/community/attachment/xtool-community/40f91c75-fa8f-47eb-a9a6-d5c0a119b408.jpg?x-oss-process=image/resize,w_200,h_150,limit_0/interlace,1/format,webp/auto-orient,1)
![[Laser cut and engrave] A Spiderman](https://image-res.atomm.com/resource/xtool/community/attachment/xtool-community/75ebf475-c4c2-474c-8ad6-86de2887a436.jpg?x-oss-process=image/resize,w_200,h_150,limit_0/interlace,1/format,webp/auto-orient,1)
A Spiderman
 Instruction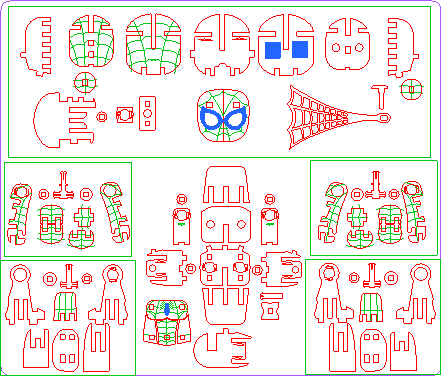


Information
      New files uploaded 25 Jan 2026  Added file formats for LBRN2, XCS, DXF, SVG and AI

Enjoy!

Video assembly link here!  https://youtu.be/g7Ae2XfoTYE
Instruction
Step1: Cut out all pieces


I found a few discrepancies when I went back over the pattern.
I'm going to fix the head/neck connection (the little gear assembly that goes into the base of the head. It's so ridiculously small that it disintegrates on the laser.
In the last picture of the head there is a light spot that was an unnecessary tab that was sticking out. I clipped it off and removed it from the pattern.
Step2: Assemble Body


Again, as I was assembling the body I found an extra tab sticking out and corrected it on the pattern.
There is a top view (2nd to last picture above) where there is a notch in the front of the square piece that faces toward the front of the body. it doesn't fit well otherwise.
This is the hardest step as far as I am concerned. i use tweezers to get the two gears in and then get the square piece in. Put some glue on it so it doesn't come out.
Step3: Arms


Layout pieces as shown and glue together. The arms are cut so that the gear points to the back of the shoulder.
Put a small amount of glue to hold the arm in the gear.
Step4: Assemble and connect legs


The leg assembly i glue the round piece and the gear on the “T” connector.
I put the gear side towards the inside of the leg.
The bottom of the foot and the slide in pieces and the front of the leg have a flat side that goes towards the inside of the leg.
Step5: Attach head

Attach the head to the body.
That's it.
All of these have a similar assembly with a few pieces that differ slightly.
Have fun and let me know if you have any questions….
Remixes



You may also like

spider


Laser Cut Apache Helicopter SVG File


Revolver


spiderman


Adventure Car Model


Laser Cut Wooden Vintage Car Model Kit on Workbench


Laser cut and engraved wooden fire truck with turntable ladder / Lasergeschnittenes und graviertes Feuerwehrauto ( Feuerwehr Drehleiter ) aus Holz


Laser Cut Wooden Formula 1 Car Model Kit - Formel 1 Wagen - F1 Auto - Design 2


Laser cut super Hero Batman


Absolute Batman

Laser Cut Wooden Biplane Model Toy with Propeller

Laser Cut Dollhouse SVG File with Furniture – 3mm Wood Compatible

Wooden toy Bi-Plane


'/%3e%3cdefs%3e%3clinearGradient%20id='paint0_linear_1433_15675'%20x1='12'%20y1='3.25'%20x2='16.6891'%20y2='20.75'%20gradientUnits='userSpaceOnUse'%3e%3cstop%20stop-color='%23FF5D80'/%3e%3cstop%20offset='1'%20stop-color='%23FF0035'/%3e%3c/linearGradient%3e%3c/defs%3e%3c/svg%3e)
Lamborghini Murcielago


Laser Cut Model: Overlanding Rover

Laser Cut Wooden Ford Model Car Puzzle Kit

'/%3e%3cdefs%3e%3clinearGradient%20id='paint0_linear_1433_15726'%20x1='12'%20y1='5.25'%20x2='12'%20y2='18.75'%20gradientUnits='userSpaceOnUse'%3e%3cstop%20stop-color='%23FFC654'/%3e%3cstop%20offset='1'%20stop-color='%23FF8D12'/%3e%3c/linearGradient%3e%3c/defs%3e%3c/svg%3e)
Laser Cut Miniature Coffee Shop Model with Detailed Interior


3D Wooden Train Model
