Report
![[Laser cut and engrave] Mickey Mouse Multi Layer Laser Cut Wall Art Decor](https://image-res.atomm.com/resource/xtool/community/attachment/xtool-community/c22b1da2-df47-4620-9cae-73bd8e61d4f1?x-oss-process=image/resize,w_1200,h_900,limit_0/interlace,1/format,webp/auto-orient,1)
![[Laser cut and engrave] Mickey Mouse Multi Layer Laser Cut Wall Art Decor](data:image/png;base64,iVBORw0KGgoAAAANSUhEUgAAAAoAAAAKCAYAAACNMs+9AAAAAXNSR0IArs4c6QAAABdJREFUKFNjZCASMBKpjmFUId6QIjp4AAppAAuXjCs4AAAAAElFTkSuQmCC)
![[Laser cut and engrave] Mickey Mouse Multi Layer Laser Cut Wall Art Decor](https://image-res.atomm.com/resource/xtool/community/attachment/xtool-community/c22b1da2-df47-4620-9cae-73bd8e61d4f1?x-oss-process=image/resize,w_200,h_150,limit_0/interlace,1/format,webp/auto-orient,1)
![[Laser cut and engrave] Mickey Mouse Multi Layer Laser Cut Wall Art Decor](https://image-res.atomm.com/resource/xtool/community/attachment/xtool-community/433aabbc-9efe-4ffe-afc0-edd1d5052778.jpeg?x-oss-process=image/resize,w_200,h_150,limit_0/interlace,1/format,webp/auto-orient,1)
![[Laser cut and engrave] Mickey Mouse Multi Layer Laser Cut Wall Art Decor](https://image-res.atomm.com/resource/xtool/community/attachment/xtool-community/2469d426-fa10-4b9c-8336-4dd4b40b40de.jpeg?x-oss-process=image/resize,w_200,h_150,limit_0/interlace,1/format,webp/auto-orient,1)
![[Laser cut and engrave] Mickey Mouse Multi Layer Laser Cut Wall Art Decor](https://image-res.atomm.com/resource/xtool/community/attachment/xtool-community/b49d3203-690f-44a6-95ec-e7b22e45d838.jpeg?x-oss-process=image/resize,w_200,h_150,limit_0/interlace,1/format,webp/auto-orient,1)
![[Laser cut and engrave] Mickey Mouse Multi Layer Laser Cut Wall Art Decor](https://image-res.atomm.com/resource/xtool/community/attachment/xtool-community/f611357d-dcde-474c-98f7-da575205a561.jpeg?x-oss-process=image/resize,w_200,h_150,limit_0/interlace,1/format,webp/auto-orient,1)
Mickey Mouse Multi Layer Laser Cut Wall Art Decor
 Instruction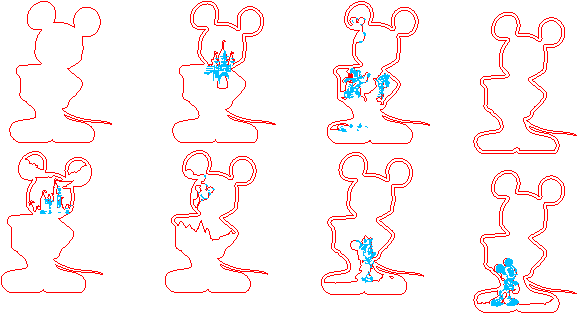
mickeymultilayer
.xcs
Application scenario
Laser processing (30min)
Machine & module

xTool P2S
55W
xTool F1 Ultra
20WMaterial used

1/8"(3mm) Basswood Plywood

Woodglue

420
4320
Information
We just felt like making something easy and sharing it with the whole community
Instruction
1
Step1: Cut al the layers

Preview
- Cut out all the pieces from the file.
- Check that you have all the pieces. You can check it on the photo.
2
Step2: Put the layers together.

Preview

Preview

Preview
We'll assemble it step by step.
The first photo give you an overview of which layer goes on which.
- Start with the base Mickey Mouse.
- Now take the next layer and apply wood glue to the back.
- Be sure to apply the glue sparingly and distribute it evenly.
- Place the second layer on top of the base layer,
- Work carefully and ensure all layers are perfectly aligned
- Remove excess adhesive immediately.
- Do the same workaround for all the layers. On the photo overlay you can see which layer should go on the next layer.
Thats it. Your multylayer Mickey and Frends is ready.
Thanks for downloading❤️this project and have more fun with our (other) models.😍
It is always fun to make it, and also nice to 🎁 it away afterwards.
Happy with this project? Give me a 👍up. THKS.
Comments
Remixes



You may also like

$9.99
$9.99
Credits999
Dragon Mushu Laser Cut Mirror Mosaic Wall Art Decor

1

Laser Cut Deadpool Wall Art Decor

19
116

Engraved Ceramic Predator Wall Art Decor in Dark Wood Frame

9
44

3D FOREST LAYERED WALL ART

98
466

Pikachu Wall Art SVG – Cute Electric Mouse Laser Cut Decor (Digital Download)

3
25

Laser Cut Beetlejuice Themed Decorative Wall Art with Quote

20
86

Laser Cut Frozen Characters (Elsa and Ana) Name Board / Name Plate
4
28

Laser Cut Wooden Zoomania Wall Art Decor with City Skyline

0
4

Laser Cut Super Mario Character Wall Art in Black Acrylic

8
107

Multi-layer Flashlight

31
83

$5.99
$5.99
Credits599
Laser Cut Multilayer Cross #6 Wall Art – 6 Layered Cross Design | 3D Wall Decor | 3D Tabletop Decor | XCS SVG DXF DWG AI Files
.jpg?x-oss-process=image/resize,m_fill,w_240,h_240,limit_0/interlace,1/format,webp/auto-orient,1)
5

Laser Cut Wall Art Featuring The Simpsons Characters
21
127

Laser Cut Wooden Fantasy Castle Wall Art with Birds and Hot Air Balloon

7
10

Laser Cut Wooden Rose Wall Art Decoration

9
115

Deadpool Wall Art SVG | Superhero Mask Decor | Comic Style Laser Cut Wall Art
5
104

Colorful 6 Layered Laser Cut Mandala Wall Art Decoration

11
67

Laser Cut Wooden Real Madrid Football Club Wall Art Decor

4
54

Laser Cut Chinese Dragon and Fu Wall Art Plaque with Red Accents

8
10