


![[Laser cut and engrave] Scooby-Doo Themed Laser Engraved Decorative Wood Wall Art](https://storage-us.atomm.com/resource/xtool/community/attachment/xtool-community/f8fffa10-a384-4930-ac86-9a4705411187.jpg?x-oss-process=image/resize,w_1200,h_900,limit_0/interlace,1/format,webp/auto-orient,1)
![[Laser cut and engrave] Scooby-Doo Themed Laser Engraved Decorative Wood Wall Art](https://storage-us.atomm.com/resource/xtool/community/attachment/xtool-community/f8fffa10-a384-4930-ac86-9a4705411187.jpg?x-oss-process=image/resize,w_200,h_150,limit_0/interlace,1/format,webp/auto-orient,1)
![[Laser cut and engrave] Scooby-Doo Themed Laser Engraved Decorative Wood Wall Art](https://storage-us.atomm.com/resource/xtool/community/attachment/xtool-community/215aab80-bf8e-46af-9ef1-50fbf5efc600.jpg?x-oss-process=image/resize,w_200,h_150,limit_0/interlace,1/format,webp/auto-orient,1)
![[Laser cut and engrave] Scooby-Doo Themed Laser Engraved Decorative Wood Wall Art](https://storage-us.atomm.com/resource/xtool/community/attachment/xtool-community/0087b638-8ebf-43fa-8cc4-967bef97eba4.jpg?x-oss-process=image/resize,w_200,h_150,limit_0/interlace,1/format,webp/auto-orient,1)
Scooby-Doo Themed Laser Engraved Decorative Wood Wall Art
 Instruction
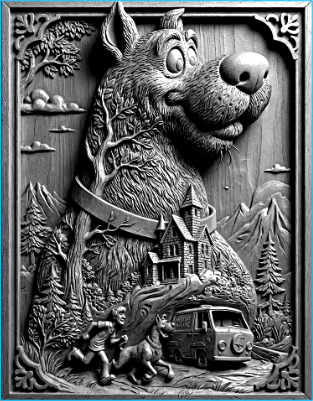

Information
I used Ai make with a design i made in photoshop. Basswood/birch mix. In the instructions I go in depth on how to achieve this dark effect. No it's not borax!
Instruction
Step1: Engraving & Staining Instructions


Above I uploaded pictures of before and after this method I teach you.
White Base + Black RIT Stain Method (Basswood/Birch)
This process creates high-contrast engraved designs with crisp detail and rich black staining.
Materials Used
Basswood/Birch plywood
White paint (spray or brush)
Clear coat (spray recommended)
Laser engraver
Shop vacuum
RIT Black Dye
Water (for dye mix)
Soft brush or rag
Gloves and drop cloth
Step-by-Step Process
Prepare the Design
The artwork was created in Photoshop and finalized using AI assistance, then exported in a laser-ready format.
Paint the Wood
Apply an even coat of white paint to the basswood/birch surface.
Allow the paint to dry completely.
Seal the Surface
Apply a clear coat over the painted surface.
This step is critical. It seals the paint so the stain only absorbs into the engraved areas.
Let the clear coat fully cure before engraving.
Laser Engrave the Design
Engrave directly through the sealed, painted surface.
Ensure proper focus and settings for clean engraving without excessive charring.
Clean the Engraving
Use a shop vacuum to remove all engraving dust from the recessed areas.
Make sure grooves are clean so the stain absorbs evenly.
Apply RIT Black Stain
Mix RIT Black Dye with water or use straight like i did/
Apply stain generously over the engraved areas using a brush or rag.
Allow the dye to penetrate the engraved wood.
Let it sit for rufffly 30 second and whipe exess off the raied parts.
Wipe and Finish
Wipe excess stain from the surface, leaving black dye only in the engraved areas.
Let dry completely before handling or adding an optional final clear coat.
Result
Bright white sealed surface
Deep black engraved lines
High contrast with clean edges
Durable, professional finish suitable for display or sale


