
![[Laser cut and engrave] Wedding Frame](https://storage-us.atomm.com/resource/xtool/community/attachment/xtool-community/0647eb0f-2cbc-49dd-8476-0ca0c876e367.jpeg?x-oss-process=image/resize,w_1200,h_900,limit_0/interlace,1/format,webp/auto-orient,1)
![[Laser cut and engrave] Wedding Frame](data:image/png;base64,iVBORw0KGgoAAAANSUhEUgAAAAoAAAAKCAYAAACNMs+9AAAAAXNSR0IArs4c6QAAABdJREFUKFNjZCASMBKpjmFUId6QIjp4AAppAAuXjCs4AAAAAElFTkSuQmCC)
![[Laser cut and engrave] Wedding Frame](https://storage-us.atomm.com/resource/xtool/community/attachment/xtool-community/0647eb0f-2cbc-49dd-8476-0ca0c876e367.jpeg?x-oss-process=image/resize,w_200,h_150,limit_0/interlace,1/format,webp/auto-orient,1)
![[Laser cut and engrave] Wedding Frame](https://i.ytimg.com/vi/JY822-laomo/hq2.jpg)
![[Laser cut and engrave] Wedding Frame](/_nuxt/video_icon.B5w3Xr8w.png)
![[Laser cut and engrave] Wedding Frame](https://storage-us.atomm.com/resource/xtool/community/attachment/xtool-community/387e3541-f39e-4a34-aadc-a19501e63cb4.jpeg?x-oss-process=image/resize,w_200,h_150,limit_0/interlace,1/format,webp/auto-orient,1)
Wedding Frame
 Instruction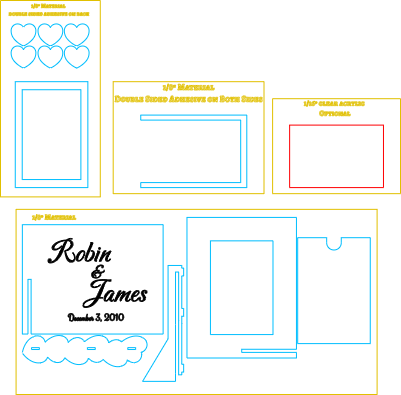


Information
A frame to announce the couple at a wedding or for a keepsake photo after the wedding. Easy to make, This project is a two part frame with the photo on one side and the names and date on the opposite side. It is held together with a slide clip fronted by hearts.
Instruction
Step1: Before you Begin
My post on Facebook for this project: https://www.facebook.com/woodlord.crafts/posts/pfbid021kgMTQ7tuMh2imWZnJm2NM76VGyRzg7XRQpWCZe8Z9XtsGCtrX4jQDT25eSz1ifHl
A many know that follow my plans, or have downloaded my plans in the past, I like unique items. So you may wonder why I have a “frame” in my plans, especially for a contest. Well, if you look at my other frames, you will see that I tried to do something unique with each one. My Mothers Day frame from 2025 lit up and included an engraving of a mother holding a baby. My Rainbow Bridge frame included the poem and a colored rainbow on it.
This one is unique in that it is a slide together frame where the two halves slide together but in such a way as not to be 45 degree angled frame. You actually spread the two sides so that it is more of a 60 to 70 degree angle thereby showing both sides easily. To cover the unsightly area where the two halves slide together is a clip that slides over and holds the two pieces better and this piece creates a center full of hearts to represent the love the couple in the picture has.
It is not a hard piece to create and takes just 25-40 minutes from starting to cut to fully assembled.
There is an optional step to include a piece of clear acrylic as the “glass” front of the photo, but it is not required to have a great photo frame.
I used double sided adhesive to put this together, but you can use superglue if you would like.
There are several colors in the plans. First is the yellow color which is set to ignore. This is just informational and border items. Next is light blue, which is all the wood pieces followed by black which are engraved parts, and finally red, which is the acrylic piece.
Step2: Cut /engrave your pieces
There are a total of 13 pieces (14 if you want the optional acrylic piece)
You have 6 hearts done in 1/8" (3mm) MDF pink but you can use any color/s you like or you can paint bare wood in your desired shade. There is double sided adhesive on the back of each heart.
The birch plywood pieces are also 1/8" (3mm) and they are the cutout picture side, the side with the names and date engraved, the long clip, the outline of the hearts that go on the clip, the spacer (which has adhesive on both sides), and the backer.
The walnut piece is also 1/8" (3mm) and is just for the frame border. It also has double sided adhesive on the back (Note: only put the double sided adhesive on if using the acrylic piece. If you are not using the acrylic piece, you will want to glue the frame on. More on that in the next step)
The optional piece is the acrylic which will be used as the “glass” of the frame. You can use 1/8" OR 1/16". I had 1/16" so that is what I used.
Using the settings above, cut out your pieces. Be sure to replace the names and date with your own.
Once your pieces are cut, sand and clean up any parts that need it.
Step3: Assemble the Frame


VERY IMPORTANT!! Look at the first photo. Your photo side should be facing with the slit facing the opposite of the name side as shown in the photo. Make sure you have the orientation correct before proceeding.
On the front of the photo side, you want to put on the walnut frame. It has an edge that will fall into the center of the picture opening creating an interior lip all the way around. If not using double sided adhesive, you will want to superglue the piece on and then put a strip of superglue along the lip of walnut on the backside.
NOTE: If you using the optional acrylic “glass”, you will want to put it in after you have attached your frame to the front of the photo side. Do this by inserting it from the back so that it rests on the lip of the walnut showing. This is why double sided adhesive is great here as it will help hold the acrylic piece on (See photo two)
Once you have the frame on, flip the photo side so that it is resting on its front. Take the spacer piece (if using double sided adhesive, it should have it on both sides). Line it up where it falls along the edges of the cutout for the photo. See photo 3.
ANOTHER IMPORTANT NOTE: the opening of the space needs to be facing the opposite of the slit. See photo 4.
Finally take the backer piece and attach it to the spacer piece. Make sure it lines up with the spacer on all three sides. The rounded cutout of the backer piece needs to face the same direction as the opening of the spacer.
You now have the photo side complete.
Step4: Assemble the two halves

Very simply, slide your two halves together. After they are together, put your thumb at the joint in front and use your fingers to press the two sides wide, angling them away so that they present a wider look.
Step5: The clip


First you want to take the outline of the hearts which has 3 tab openings in it. Slip the tabs from the clip into these tab openings. It will be a tight fit but that is as designed. Be careful here as you can break the clip if you press too hard. Hold right behind the top tab and work it into the opening of the top cutout. Once it has started, move to the second tab and hold right behind it and do the same thing. Finally, do the same with the last tab. If you hold directly behind each tab while working them into the tab openings, there is less of a chance of the clip breaking.
Once you have the heart outline attached to the clip, slide the clip over where two halves of the frame join. It make take some wiggling to get it on but it should not be difficult. Gently slide it down until it is fully set. You could apply glue here if you like along the backside where the clip joins.
Next, attach the hearts. You will have a slight lip around each heart you attach. Center each heart within the outlines shown. I found it easiest to work my way from the top to the bottom.
Finally insert the photo. You now have a fully made wedding frame.
Step6: Final thoughts.
I really love designing items and sharing my plans with everyone. I hope you liked this one. Be on the lookout for a few other wedding items over the next few weeks. You can find them (as well as other designs I have posted) at the following link. Most of my plans are free, but there are a few premium ones I offer.
If you like this project, I would really appreciate a thumbs up and a download.
As always, happy crafting!
Remixes



You may also like

Love Photo Frame with Heart Accents

'/%3e%3cdefs%3e%3clinearGradient%20id='paint0_linear_1433_15675'%20x1='12'%20y1='3.25'%20x2='16.6891'%20y2='20.75'%20gradientUnits='userSpaceOnUse'%3e%3cstop%20stop-color='%23FF5D80'/%3e%3cstop%20offset='1'%20stop-color='%23FF0035'/%3e%3c/linearGradient%3e%3c/defs%3e%3c/svg%3e)
Gothic window Wedding photo frame with see through colored windows


Laser Engraved Glass Photo Frame with "Love Laughter and Happily Ever After" quote.


Wedding Frame Heart Lasercut SVG


'/%3e%3cdefs%3e%3clinearGradient%20id='paint0_linear_1433_15752'%20x1='12.5'%20y1='5'%20x2='12.5'%20y2='19.2596'%20gradientUnits='userSpaceOnUse'%3e%3cstop%20stop-color='%232F7FFF'/%3e%3cstop%20offset='1'%20stop-color='%232661F1'/%3e%3c/linearGradient%3e%3c/defs%3e%3c/svg%3e)
 Template
Wedding Frame


White Wedding

 Template
Our wedding photo frame


Personalized Wedding Laser Engraved Wooden Photo Frame Stand
Puzzle Piece Photo Frame – “LOVE” Design (9×13 cm)
Wedding Decor Bundle Laser Cut, MR&MRS Photo Frame, Invitations, Wedding Guest Book SVG, Table Numbers, Wedding Ring Box


Jamaica Map Themed Wooden Photo Frame with Tropical Motifs


Laser Cut Wooden Photo Frame with Heart Decoration


Wooden LOVE Letter Photo Frame Tabletop Display


Forever & Always Wedding Wooden Picture Frame
 Template
Wedding Frame

Frame Heart Photo


Wooden frame with heart-shaped love decoration


Laser Cut Wooden Photo Frames with Cute Animal Love Designs
