Report
![[Laser cut and engrave] Oval Wooden Pendant Featuring an Alpaca in a Desert Landscape](https://image-res.atomm.com/resource/xtool/community/attachment/xtool-community/fd6f9c34-999b-45b1-97c6-11023302d011.png?x-oss-process=image/resize,m_fill,w_1280,h_960,limit_0/interlace,1/format,webp/auto-orient,1)
![[Laser cut and engrave] Oval Wooden Pendant Featuring an Alpaca in a Desert Landscape](data:image/png;base64,iVBORw0KGgoAAAANSUhEUgAAAAoAAAAKCAYAAACNMs+9AAAAAXNSR0IArs4c6QAAABdJREFUKFNjZCASMBKpjmFUId6QIjp4AAppAAuXjCs4AAAAAElFTkSuQmCC)
![[Laser cut and engrave] Oval Wooden Pendant Featuring an Alpaca in a Desert Landscape](https://image-res.atomm.com/resource/xtool/community/attachment/xtool-community/fd6f9c34-999b-45b1-97c6-11023302d011.png?x-oss-process=image/resize,m_fill,w_160,h_120,limit_0/interlace,1/format,webp/auto-orient,1)
![[Laser cut and engrave] Oval Wooden Pendant Featuring an Alpaca in a Desert Landscape](https://image-res.atomm.com/resource/xtool/community/attachment/xtool-community/b2b60ff7-5ed0-4559-a376-c468316bae70.png?x-oss-process=image/resize,m_fill,w_160,h_120,limit_0/interlace,1/format,webp/auto-orient,1)
![[Laser cut and engrave] Oval Wooden Pendant Featuring an Alpaca in a Desert Landscape](https://image-res.atomm.com/resource/xtool/community/attachment/xtool-community/79438c12-e9a8-42ff-aa21-07e4d3bb5371.jpg?x-oss-process=image/resize,m_fill,w_160,h_120,limit_0/interlace,1/format,webp/auto-orient,1)
![[Laser cut and engrave] Oval Wooden Pendant Featuring an Alpaca in a Desert Landscape](https://image-res.atomm.com/resource/xtool/community/attachment/xtool-community/4442f29e-597c-4a7f-aed8-3a5fe5b89687.png?x-oss-process=image/resize,m_fill,w_160,h_120,limit_0/interlace,1/format,webp/auto-orient,1)
Ultra Cute Llama Desert Relief | Deep 3D Wood Engraving with xTool F2 Portable
 Instruction
Cute Lama Embossing
.xcs
Application scenario
Laser processing (16min)
Machine & module

xTool F2
15WCompatible xTool Machine
M2
10W, 20WF2 Ultra UV
5WF1 Ultra
20WM1
5W, 10WD1
5W, 10W, 20WD1 Pro
5W, 10W, 20W, 40WP2
55WF1
10WS1
10W, 20W, 40WM1 Ultra
10W, 20WP2S
55WAccessories

xTool F1 Pedal & Button Switch
Material used

1/8"(3mm) Poplar Plywood

100
1931
Information
      Bring your laser engraving to life with this adorable high-relief llama design, crafted specifically for deep 3D engraving on wood using xTool F2 Portable.

This project demonstrates how to create a clean, high-contrast depth map that produces a beautiful embossed (bas-relief) effect with smooth gradients and rich texture.

Featuring a cute llama in a desert landscape with cactus and rock formations, this design is perfect for:

Jewelry tags
Keychains
Wall décor
Personalized gifts

The soft transitions and controlled depth make this project ideal for both beginners and advanced makers exploring 3D relief engraving.

👉 Designed for maximum depth clarity without overburning, ensuring crisp results even on small formats.

⚙️ Machine & Module
- xTool F2 Portable
Blue Diode Laser (for wood engraving)

- 🪵 Material Used
3mm Basswood (Recommended)
Optional: Birch plywood

- 🧠 Design Concept

This project uses a grayscale depth map image, where:

White = highest surface
Black = deepest cut

The llama is intentionally kept brighter than the background to create a strong foreground pop, while the desert adds layered depth.

👉 This follows the same 2.5D relief engraving principle used in XCS projects

🛠️ Step-by-Step Instructions
Instruction
1
Step1: Prepare the Depth Map
- Use the provided llama image (grayscale)
- Ensure:
- No harsh blacks
- Smooth gradients
- Slight blur (optional)
💡 Tip: Use keywords like “bas relief” or “mezzo-rilievo” when generating images to get better emboss-style outputs
2
Step2
- Open xTool Creative Space
- Import image
- Set processing mode:
- ✅ Grayscale
- DPI:
- 600–700
3
Step3: Set Engraving Parameters
Recommended starting settings:
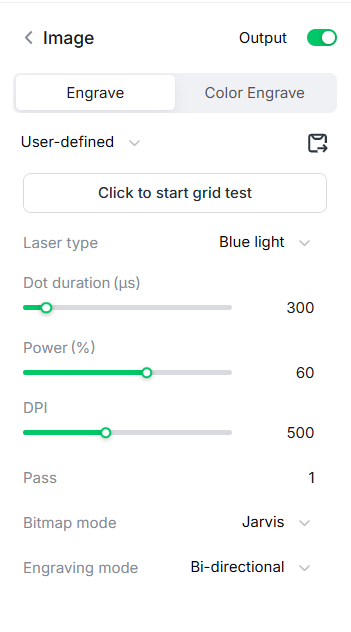
OR
Use the Already given settings
4
Step4: Enhance Depth (Pro Technique)
Duplicate the image layer:
Layer 1:
- Full grayscale (normal)
Layer 2:
- Reduce brightness / grayscale range (~30%)
👉 This creates extra depth in dark areas (pro trick used in relief workflows)
5
Step5: Engrave
- Focus correctly
- Frame twice
- Start engraving
⚠️ Avoid moving the material mid-process
6
Step6: Post Processing
- Light sanding (very gentle)
- Apply:
- Mineral oil OR beeswax
👉 This enhances contrast and gives a premium carved look
Comments
Remixes



You may also like

Elijah's Chariot of Fire Biblical Relief Keychain Keyring

0
2

GIF
Hand-Drawn Father's Day Engraved Wood Slice Ornament (xTool F2 Portable)

21
66

3D (2.5D) Relief engraving varied depth 1 pass!

279
836

Heart-Shaped Tag with Cute Rabbit Illustration

0
1

Wooden heart-shaped sculpture of a married couple

2
10

Layered Wooden Llama / Alpaca Figurine

2
7

Acrylic Low Relief

18
28

3D Bear Portrait on Natural Wood Slice

2
3

3D Printed Black Superhero Coin with Detailed Relief Design

0
19

$1.92
$1.92
$9.60
Credits192
Minimalist Saguaro Cactus Tabletop Figurine

0

Biker MDF fridge magnet f2 ultra
0
6

Round Wooden Ornament Featuring a Puppy Portrait
11
12

2.5D Relief engraving in xTool Creative Space
52
261

Forged in Light: The Eagle Relief

16
180

3D Illusion for this Plywood Wedding Invitation
29
152

'/%3e%3cdefs%3e%3clinearGradient%20id='paint0_linear_1433_15675'%20x1='12'%20y1='3.25'%20x2='16.6891'%20y2='20.75'%20gradientUnits='userSpaceOnUse'%3e%3cstop%20stop-color='%23FF5D80'/%3e%3cstop%20offset='1'%20stop-color='%23FF0035'/%3e%3c/linearGradient%3e%3c/defs%3e%3c/svg%3e)
Aztec Gold Deep Relief Coin

80
896

Pair of Angel Reliefs

15
97

Commemorative medal Ariane 5 1996-2023 in embossing engraving

1
4