
![[Laser cut and engrave] Our Journey Customizable Map](https://image-res.atomm.com/resource/xtool/community/attachment/xtool-community/e2fa5547-0ac9-4c05-8eeb-ca4fb1f0fb23.jpg?x-oss-process=image/resize,w_1200,h_900,limit_0/interlace,1/format,webp/auto-orient,1)
![[Laser cut and engrave] Our Journey Customizable Map](data:image/png;base64,iVBORw0KGgoAAAANSUhEUgAAAAoAAAAKCAYAAACNMs+9AAAAAXNSR0IArs4c6QAAABdJREFUKFNjZCASMBKpjmFUId6QIjp4AAppAAuXjCs4AAAAAElFTkSuQmCC)
![[Laser cut and engrave] Our Journey Customizable Map](https://image-res.atomm.com/resource/xtool/community/attachment/xtool-community/e2fa5547-0ac9-4c05-8eeb-ca4fb1f0fb23.jpg?x-oss-process=image/resize,w_200,h_150,limit_0/interlace,1/format,webp/auto-orient,1)
![[Laser cut and engrave] Our Journey Customizable Map](https://image-res.atomm.com/resource/xtool/community/attachment/xtool-community/32c34fa9-4c1a-4349-8677-87187b29f573.jpg?x-oss-process=image/resize,w_200,h_150,limit_0/interlace,1/format,webp/auto-orient,1)
![[Laser cut and engrave] Our Journey Customizable Map](https://image-res.atomm.com/resource/xtool/community/attachment/xtool-community/21f8b70f-9e19-4323-9f23-32b740738be5.jpg?x-oss-process=image/resize,w_200,h_150,limit_0/interlace,1/format,webp/auto-orient,1)
![[Laser cut and engrave] Our Journey Customizable Map](https://image-res.atomm.com/resource/xtool/community/attachment/xtool-community/25519a53-ba5d-47fe-b573-7924f91ce484.jpg?x-oss-process=image/resize,w_200,h_150,limit_0/interlace,1/format,webp/auto-orient,1)
แผนที่ที่ปรับแต่งได้ของการเดินทางของเรา
 คำแนะนำ
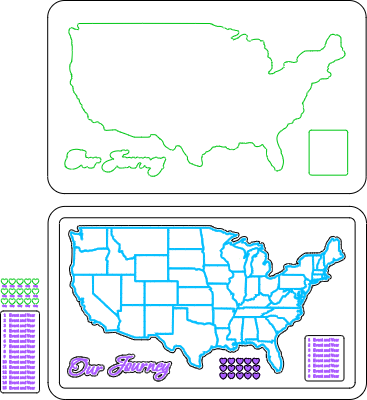


ข้อมูล
แผนที่ส่วนบุคคลนี้บอกเล่าเรื่องราวการเดินทางของเราด้วยกัน โดยเน้นช่วงเวลาสําคัญในชีวิตที่สามีของฉันและฉันได้แบ่งปันตั้งแต่เราพบกันครั้งแรก หัวใจแต่ละดวงทําเครื่องหมายเหตุการณ์ที่มีความหมาย โดยเรียงลําดับเหตุการณ์ที่เกิดขึ้น โดยมีชื่อเมืองแสดงอยู่ข้างๆ คีย์แผนที่ที่ตรงกันจะอธิบายเหตุการณ์สําคัญแต่ละรายการ โดยสร้างไทม์ไลน์ภาพที่สวยงามของความสัมพันธ์ของเรา ชิ้นนี้สามารถปรับแต่งเพื่อแสดงเรื่องราวความรักของคุณเองและสถานที่ที่หล่อหลอมมัน
คำแนะนำ
ขั้นตอน1: ปรับแต่งไฟล์


ปรับแต่งตําแหน่งและรายละเอียดกิจกรรมในไฟล์ได้ เมื่อคุณเปิดไฟล์แล้ว ให้ย้ายหัวใจสีเขียวไปยังตําแหน่งที่คุณต้องการบนแผนที่ เลือกป้ายกํากับเมืองแล้วดับเบิลคลิก ตอนนี้คุณสามารถพิมพ์ชื่อเมืองที่คุณต้องการเพิ่มได้แล้ว ทําเช่นนี้กับแต่ละเมืองและย้ายไปยังหัวใจ ที่เหมาะสม คุณจะต้องปรับปุ่มแผนที่ เลือกกล่องและยกเลิกการจัดกลุ่ม ตอนนี้คุณสามารถเลือกแต่ละบรรทัดและเปลี่ยนข้อความได้แล้ว มีหัวใจเพิ่มเติมและปุ่มที่ใหญ่กว่าอาจคีย์หากคุณต้องการเพิ่ม คุณสามารถปรับเปลี่ยนได้ตามต้องการ หากคุณปรับขนาดของปุ่มแผนที่ ให้แน่ใจว่าได้ปรับหรือลบเส้นคะแนนที่เกี่ยวข้อง
ขั้นตอน2: วัสดุกระบวนการ

โครงการนี้ใช้ไม้อัดไม้เบสวูดขนาด 3 มม. ตัดสีดํา สีเขียวเป็นคะแนน แกะสลัก สีม่วงและสีน้ําเงิน ชั้นสีน้ําเงินต้องแกะสลักที่ค่อนข้างเบาและต้องแน่ใจว่าจะแกะสลักก่อน ประมวลผลวัสดุ ของคุณ
ขั้นตอน3: ประกอบ


เบา ๆ หากจําเป็น ใช้คราบสีเข้มบนฐาน โปรเจ็กต์นี้ใช้คราบ วอลนัทสีเข้ม กาวกรอบให้เข้าที่ ใช้เส้นคะแนนเพื่อติดแผนที่ คีย์แผนที่ และ 'การเดินทางของเรา' ให้เข้าที่ ตอนนี้ กาวหัวใจแต่ละดวงในจุดที่ถูกต้องโดยใช้เส้นคะแนนเป็นแนวทาง ปิดท้ายด้วยโค้ทใสหรือโพลียูรีเทนที่เลือก
ดัดแปลง


'/%3e%3cdefs%3e%3clinearGradient%20id='paint0_linear_1433_15726'%20x1='12'%20y1='5.25'%20x2='12'%20y2='18.75'%20gradientUnits='userSpaceOnUse'%3e%3cstop%20stop-color='%23FFC654'/%3e%3cstop%20offset='1'%20stop-color='%23FF8D12'/%3e%3c/linearGradient%3e%3c/defs%3e%3c/svg%3e)


คุณอาจชอบสิ่งนี้ด้วย

แผนที่ตัดด้วยเลเซอร์


แผนที่เมืองคลอว์สัน


แผนที่โลก


แผนที่โลก


แผนที่นิวยอร์กแมนฮัตตัน


แผนที่การกระจายปราสาทยุคกลางในแผนที่รูปร่าง 3 มิติ

แผนที่ภูมิประเทศโลก

ปริศนาแผนที่โลก


แผนที่เท็กซัสสําหรับการแกะสลักบนหนังหรือหนังเทียม


แผนที่ของ ดับลิน, ไอร์แลนด์ - เลเซอร์คัท


แผนที่ตัดด้วยเลเซอร์ของ Baltimore Irl


แผนที่โลก


แผนที่ไม้ตัดด้วยเลเซอร์ของอิตาลีพร้อมสถานที่สําคัญและภูมิภาค


แผนที่ญี่ปุ่น


แผนที่ผจญภัยสหรัฐอเมริกา


แผนที่ภูมิประเทศ 3 มิติ แม่น้ําแดง


แผนที่สร้างสรรค์


นี่คือแผนที่โลกที่ฉันทํา