
![[Laser cut and engrave] Wooden Christmas Ornaments](https://image-res.atomm.com/resource/xtool/community/attachment/xtool-community/2c8bf270-1e66-486c-b19f-502bde87a390.png?x-oss-process=image/resize,w_1200,h_900,limit_0/interlace,1/format,webp/auto-orient,1)
![[Laser cut and engrave] Wooden Christmas Ornaments](data:image/png;base64,iVBORw0KGgoAAAANSUhEUgAAAAoAAAAKCAYAAACNMs+9AAAAAXNSR0IArs4c6QAAABdJREFUKFNjZCASMBKpjmFUId6QIjp4AAppAAuXjCs4AAAAAElFTkSuQmCC)
![[Laser cut and engrave] Wooden Christmas Ornaments](https://image-res.atomm.com/resource/xtool/community/attachment/xtool-community/2c8bf270-1e66-486c-b19f-502bde87a390.png?x-oss-process=image/resize,w_200,h_150,limit_0/interlace,1/format,webp/auto-orient,1)
![[Laser cut and engrave] Wooden Christmas Ornaments](https://image-res.atomm.com/resource/xtool/community/attachment/xtool-community/2782d040-5e29-404a-aa70-8ccfd2123660.png?x-oss-process=image/resize,w_200,h_150,limit_0/interlace,1/format,webp/auto-orient,1)
![[Laser cut and engrave] Wooden Christmas Ornaments](https://image-res.atomm.com/resource/xtool/community/attachment/xtool-community/8f1141d9-6e7b-4104-b4cd-f8022cb8d043.png?x-oss-process=image/resize,w_200,h_150,limit_0/interlace,1/format,webp/auto-orient,1)
![[Laser cut and engrave] Wooden Christmas Ornaments](https://image-res.atomm.com/resource/xtool/community/attachment/xtool-community/88e8e06b-e6a9-45b6-bcd9-47ba8191bd72.png?x-oss-process=image/resize,w_200,h_150,limit_0/interlace,1/format,webp/auto-orient,1)
![[Laser cut and engrave] Wooden Christmas Ornaments](https://image-res.atomm.com/resource/xtool/community/attachment/xtool-community/47007a03-fe53-4514-bb0b-d7e1c907ed6c.png?x-oss-process=image/resize,w_200,h_150,limit_0/interlace,1/format,webp/auto-orient,1)
![[Laser cut and engrave] Wooden Christmas Ornaments](https://image-res.atomm.com/resource/xtool/community/attachment/xtool-community/41eb4d09-d097-4e2d-9c0a-57a63f877fa3.png?x-oss-process=image/resize,w_200,h_150,limit_0/interlace,1/format,webp/auto-orient,1)
Wooden Christmas Ornaments
 Instruction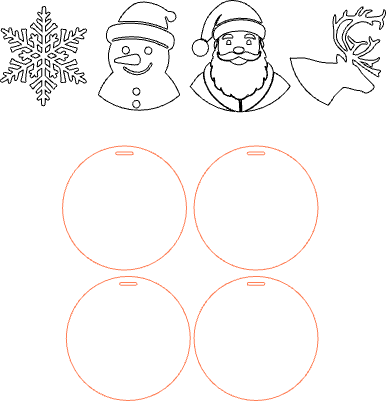


Information
      If you enjoyed this design, consider giving it a thumbs up—I really appreciate it!

Create a set of charming, layered Christmas ornaments with this simple laser-cutting project. By combining dark walnut bases with intricate basswood designs, you'll craft beautiful, high-contrast decorations perfect for your tree or as handcrafted gifts.
Instruction
Step1: Prepare xTool Studio

Start by opening your project file in xTool Creative Space. First, resize the entire design to your desired dimensions. This project consists of two distinct layers to create a contrasted look: a dark walnut base and a lighter basswood top piece. To ensure a clean cut, you'll process each layer separately. Simply drag the top layer pieces off the main canvas, leaving only the circular bases to be cut from your walnut sheet. Once finished, move the bases off and place the top layer icons onto the canvas to cut them from basswood.
Step2: Send Design to the Laser Cutter


A quick heads-up on settings: These instructions are tailored for an xTool D1 Pro 10W laser. If you are using a different model, you may need to adjust the power and speed settings to get the best results.
The cutting process for both layers will take roughly 15-25 minutes. Once the cutting is complete, be sure to carefully gather all the small, delicate pieces from the basswood layer before clearing your machine.
Step3: Assemble and Glue the Layers

Now it's time to bring your ornament to life! Carefully apply a small amount of super glue to attach the top wooden piece to its base. For any tiny, detailed parts, using tweezers can help with perfect placement.
Pro-Tip: A sheet of scrap paper underneath your project will keep your table clean from any stray glue.
Once the glue has dried, you can add a finishing touch. Simply thread a piece of your favorite ribbon or string through the hole at the top, and your beautiful, layered ornament is ready to hang
Step4: Enjoy!

Congratulations, your beautiful ornaments are complete! Whether you hang them on your tree or share them as handcrafted presents, you can now enjoy the detailed, layered ornaments you brought to life. Well done.
Remixes
License



You may also like

Laser Cut Wooden Christmas Ornaments Set with Holiday Designs


Christmas Ornament with Festive Characters Engraving


Laser Cut Santa Claus Christmas Decoration with Gift Bag


Santa clause


Laser Engraved Wooden Christmas Ornament with Santa and Reindeer


Color Laser Cut Festive Wooden Christmas Ornaments


PALLE DI NATALE SIMPATICHE


Edgy Skull Santa Christmas Coin: Intricate Snowflake-Accented Holiday Collectible

Laser Engraved Wooden Santa Claus Coaster with Snowflake Design

Laser Cut Heart-Shaped Christmas Ornaments with Santa and Reindeer


Laser Cut Christmas Ornaments with Santa and Reindeer Designs

Weihnachtliche Deko-Anhänger

Christmas Ornament


Strampunk Santa Clause Christmas Tree Bauble Ornament


Personalized Laser Cut Snowman Ornament with Name


Cute Family Holiday Ornament

Wooden Christmas Ornaments with Animal and Snowflake


Santa and reindeer ornament
