
举报
![[Laser cut and engrave] Craft Supply Stand](https://image-res.atomm.com/resource/xtool/community/attachment/xtool-community/806c5bb1-81ae-4d30-8a77-cf6f2e5d63d1.png?x-oss-process=image/resize,w_1200,h_900,limit_0/interlace,1/format,webp/auto-orient,1)
![[Laser cut and engrave] Craft Supply Stand](data:image/png;base64,iVBORw0KGgoAAAANSUhEUgAAAAoAAAAKCAYAAACNMs+9AAAAAXNSR0IArs4c6QAAABdJREFUKFNjZCASMBKpjmFUId6QIjp4AAppAAuXjCs4AAAAAElFTkSuQmCC)
![[Laser cut and engrave] Craft Supply Stand](https://image-res.atomm.com/resource/xtool/community/attachment/xtool-community/806c5bb1-81ae-4d30-8a77-cf6f2e5d63d1.png?x-oss-process=image/resize,w_200,h_150,limit_0/interlace,1/format,webp/auto-orient,1)
![[Laser cut and engrave] Craft Supply Stand](https://image-res.atomm.com/resource/xtool/community/attachment/xtool-community/20e7233b-2b50-49ec-a7e7-321352514ab7.png?x-oss-process=image/resize,w_200,h_150,limit_0/interlace,1/format,webp/auto-orient,1)
![[Laser cut and engrave] Craft Supply Stand](https://image-res.atomm.com/resource/xtool/community/attachment/xtool-community/b8d3da1f-e575-4ec6-93e7-f6c779785865.png?x-oss-process=image/resize,w_200,h_150,limit_0/interlace,1/format,webp/auto-orient,1)
工艺品供应站
 教程
教程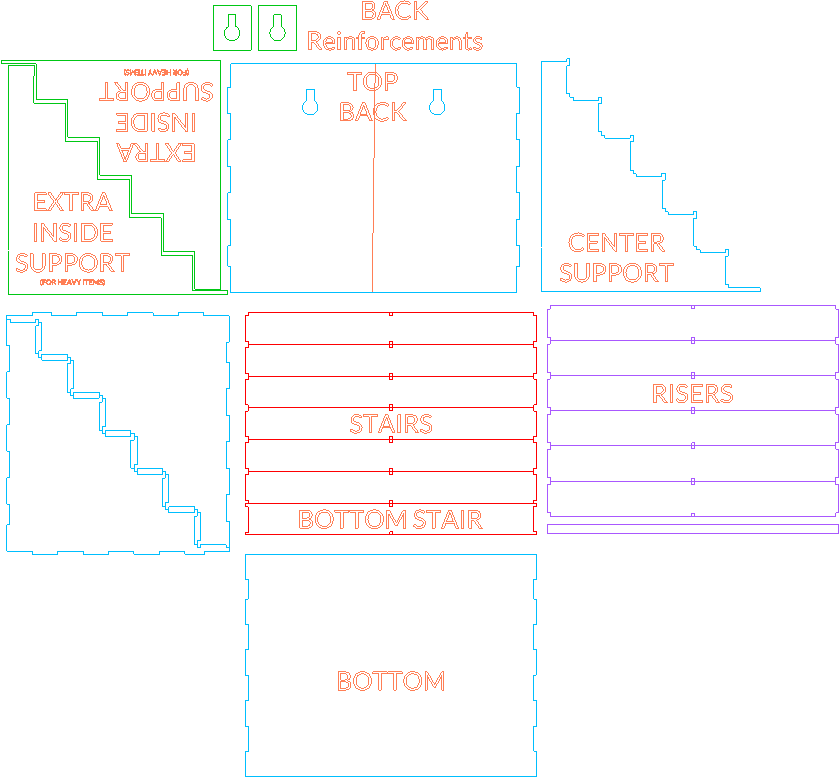
bottlerack
.xcs
应用场景
激光加工
机器与模块

xTool D1 Pro
5W材料兼容的 xTool 机器
上新
M2
10W, 20WF2 Ultra UV
5WF2
15WP3
80WF2 Ultra
40WF1 Ultra
20WM1
5W, 10WD1
5W, 10W, 20WD1 Pro
10W, 20W, 40WP2
55WF1
10WS1
10W, 20W, 40WM1 Ultra
10W, 20WP2S
55W使用的材料

3mm椴木胶合板

179
2354
教程
1
步骤1: 工艺品供应站

预览

预览
这个支架组装起来非常简单。 大多数部件上都标有橙色标记,可以在切割前刻上作为参考,但其实不是必须的。 把两侧板粘在背面和底部,加上中间支撑,然后按照下面的步骤添加:
看文件夹时,蓝色层块是搁板的主要部分。 先用木工胶在所有接缝处组装。背部中间的线条作为中心支撑件的引导。
如果你觉得支架会承受很重的物品,可以选择额外的内部支撑(绿色层),以防止台阶弯曲。还有可选的孔/加固件可以加装或拆除,用于悬挂在这一层里。
主框架组装好后,先加步骤(红色层),再加立座(紫色层),边做边粘。台阶的最后一级有不同的切口(标注),必须专门放在底部。
紫色层的最后一块细板可以加到前底边缘,以遮盖缝隙以美观,但对支撑建筑来说不是必需的。
不需要长层架子吗? 第二块画布有更窄的8英寸版本,适合小空间。
评论
二创



您可能也喜欢

YUI 耳环展示架和收纳系统

279
809

用于展示物品的木制架子

209
1567

iPad支架

79
385

四层展示台

201
1065

定制木制电话/石板支架,带有首字母

7
77

木制电脑台

167
553

布斯
28
174

盘架/框架支架

27
239

$1.99
$1.99
$3.98
Credits199
组合
蛋糕架 - 2件套

70

展示台

26
207

代表小玩意儿

32
117

木制电话亭,播放音乐

250
1226

父亲节木制茶点时间表展示架
10
56

油漆摊
36
105

藤架架

39
237

钥匙扣展示
140
448

石板架

26
253

布斯
79
1109