![[Laser cut and engrave] A Toothless Dragon](https://image-res.atomm.com/resource/xtool/community/attachment/xtool-community/02f53644-c73a-4695-8ab1-d12bccd208e2.jpg?x-oss-process=image/resize,w_1200,h_900,limit_0/interlace,1/format,webp/auto-orient,1)
![[Laser cut and engrave] A Toothless Dragon](data:image/png;base64,iVBORw0KGgoAAAANSUhEUgAAAAoAAAAKCAYAAACNMs+9AAAAAXNSR0IArs4c6QAAABdJREFUKFNjZCASMBKpjmFUId6QIjp4AAppAAuXjCs4AAAAAElFTkSuQmCC)
![[Laser cut and engrave] A Toothless Dragon](https://image-res.atomm.com/resource/xtool/community/attachment/xtool-community/02f53644-c73a-4695-8ab1-d12bccd208e2.jpg?x-oss-process=image/resize,w_200,h_150,limit_0/interlace,1/format,webp/auto-orient,1)
![[Laser cut and engrave] A Toothless Dragon](https://image-res.atomm.com/resource/xtool/community/attachment/xtool-community/d553ec1c-f3dc-4c83-aa61-b83ccf199994.jpg?x-oss-process=image/resize,w_200,h_150,limit_0/interlace,1/format,webp/auto-orient,1)
![[Laser cut and engrave] A Toothless Dragon](https://image-res.atomm.com/resource/xtool/community/attachment/xtool-community/b7931587-17df-436b-916f-54e5445f6e5e.jpg?x-oss-process=image/resize,w_200,h_150,limit_0/interlace,1/format,webp/auto-orient,1)
![[Laser cut and engrave] A Toothless Dragon](https://image-res.atomm.com/resource/xtool/community/attachment/xtool-community/bca2da94-4780-4ae2-9476-c998634aa291.jpg?x-oss-process=image/resize,w_200,h_150,limit_0/interlace,1/format,webp/auto-orient,1)
A Toothless Dragon
 Instruction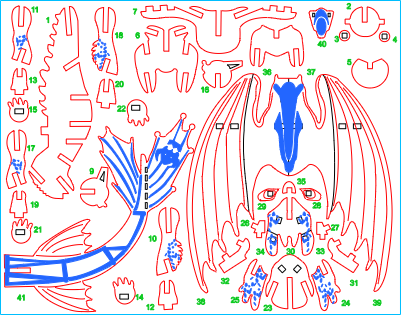


Instruction
Step1: Cut out pattern

Cut out all pieces
Step2: Assemble body pieces


The first piece goes in the throat. It has the two square tabs that stick out from the sides. Glue in place, then glue the two small round pieces to the sides.
The next piece is the disk with the V shaped cut in it.
Next is the leg piece with the V shape on top (the wings will go into the slots in a later step).
Now glue the wing holder in the next slot.
The final piece is the back legs holder.
Step3: Assemble Legacy


There are two leg sections for the front and two for the rear.
The front legs have a feathering, the back legs do not.
The engraving goes outward. Keep all leg groups separated.
Glue the legs on, then the foot holder, and finally the foot.
Step4: Head assembly


Glue the cheek pieces onto the lower jaw/face piece.
Slide this into the main bode piece.
There are two small eye holders that glue into the jaw piece.
Glue the eyes onto these pieces. Add the nose to the front.
Take the top of the head piece and glue the ear holders on the bottom.
Glue the ears on to the tabs that stick out at an angle.
Slide this piece into the slot in the back of the head.
Step5: Add Wings and tail


Slide the inner wings in so they go flush against the main body piece.
Glue the two outer wing pieces on.
Glue the tail piece in the remaining slot on the back of the body.
Step6: Finished


You are done!
I hope you enjoy it!
Remixes



You may also like

Laser Cut Wooden Volkswagen Beetle Model Car Kit


3D Wooden Bear Laser Cut, Animal Puzzle. Bear Model SVG. Family Puzzle. Shelf Sitter Laser Cut


'/%3e%3cdefs%3e%3clinearGradient%20id='paint0_linear_1433_15675'%20x1='12'%20y1='3.25'%20x2='16.6891'%20y2='20.75'%20gradientUnits='userSpaceOnUse'%3e%3cstop%20stop-color='%23FF5D80'/%3e%3cstop%20offset='1'%20stop-color='%23FF0035'/%3e%3c/linearGradient%3e%3c/defs%3e%3c/svg%3e)
Model airplane puzzle kit with engraved details


Laser Cut Wooden Ford Model Car Puzzle Kit


Lamborghini car


Laser Cut Apache Helicopter SVG File


Modèle de puzzle d'oxolot en bois découpé au laser sur le bureau


CASTILLO


Laser Cut Wooden Groot Figurine


Laser Cut Wooden Airplane Model Kit


Laser Cut Wooden Krille Model Puzzle - Krille Stecktier - 3D Puzzle

Knight Fighting Dragon Figure for Role Play


Tiny Tavern Heroes – Dragon's Hoard


Laser Cut Wooden Vintage Car Model Kit on Workbench

Revolver


3D Puzzle Airplane Toy Model Kit – SVG Only (3mm Plywood)


Classic Car

Wooden toy Bi-Plane
