
![[Laser cut and engrave] Detailed Laser Engraved Dragon Rider Wall Art in Clouds](https://image-res.atomm.com/resource/xtool/community/attachment/xtool-community/ef66ff43-5aff-43b9-8fc4-59c160acd6f4.jpg?x-oss-process=image/resize,w_1200,h_900,limit_0/interlace,1/format,webp/auto-orient,1)
![[Laser cut and engrave] Detailed Laser Engraved Dragon Rider Wall Art in Clouds](data:image/png;base64,iVBORw0KGgoAAAANSUhEUgAAAAoAAAAKCAYAAACNMs+9AAAAAXNSR0IArs4c6QAAABdJREFUKFNjZCASMBKpjmFUId6QIjp4AAppAAuXjCs4AAAAAElFTkSuQmCC)
![[Laser cut and engrave] Detailed Laser Engraved Dragon Rider Wall Art in Clouds](https://image-res.atomm.com/resource/xtool/community/attachment/xtool-community/ef66ff43-5aff-43b9-8fc4-59c160acd6f4.jpg?x-oss-process=image/resize,w_200,h_150,limit_0/interlace,1/format,webp/auto-orient,1)
![[Laser cut and engrave] Detailed Laser Engraved Dragon Rider Wall Art in Clouds](https://image-res.atomm.com/resource/xtool/community/attachment/xtool-community/d799f699-28f2-495e-89c9-c81d3e899365.jpg?x-oss-process=image/resize,w_200,h_150,limit_0/interlace,1/format,webp/auto-orient,1)
![[Laser cut and engrave] Detailed Laser Engraved Dragon Rider Wall Art in Clouds](https://image-res.atomm.com/resource/xtool/community/attachment/xtool-community/0c4ec8c3-a5e5-4941-8007-9a6b136c8948.jpg?x-oss-process=image/resize,w_200,h_150,limit_0/interlace,1/format,webp/auto-orient,1)
Santa's Dragon
 Instruction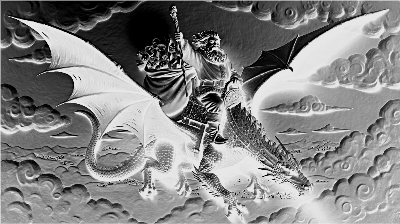


Information
      Did you know that Santa had a dragon. Yep! Sure did. And Santa used to ride the dragon on Christmas Eve to deliver toys long before he started to use the sleigh and reindeer. Dragons were known to be protective of all things precious and valuable, and Santa sure is that.
Created with AImake and engraved on Black Acrylic, this picture captures Santa enjoying a thrilling ride on the back of his dragon high over the villages below.
This was engraved on the P2 or the F1. Both files are included in addition to the original image made from AIMake
Instruction
Step1: Before you begin
This image was created using AIMake. I remember years ago seeing an image of Santa on a Dragon in a magazine and thought that was a wild idea, very original. I decided to create one of more detail and went into AIMake to do so. It took some tweaking and adjusting but finally was able to create an image almost exactly like what I envisioned.
I first engraved this on the F1 using the slide extension since it was longer than what would engrave on the base plate of the F1 by itself. I loved how it turned out using the IR function. I then used the P2 for the next version. While both turned out great, I loved the F1 more. It was brighter, more vivid and sharper in detail.
I imagine this can be done with the IR on the S1 as well, but I don't have one so I hope someone out there does it on theirs and let me know how it turns out.
Step2: Prepping the image

I took the image from AIMake and edited it by first adjusting the brightness a bit and then sharpening it by about 30 points. Once that was done, I inverted the image so that it would engrave on a dark surface like the black acrylic.
Step3: F1 Version

Using the Slide extension on the F1 and a piece of black acrylic 7"x4", use the settings above to get a very crisp looking version of this image.
Step4: P2 Version

I put a whole sheet of 12x19 black acrylic in my P2 and used the settings above in. This gave me the best version of the image with some pretty crisp lines and great gradiants. However, I still prefered the vividness of the F1 version.
Remixes
License



You may also like
Dragon Wall Art Silhouette


Embossed image of a Unicorn


Drinking dragon with mirror reflection


Dragon


Colorful Dragon Wall Art with Moon Illustration


Leather Box with Detailed Laser Engraved Metal Dragon Scene


Digital Fantasy Art of Two Ethereal Dragons in Misty Mountains


Dragon and Castle AI Design


Fantasy Dragon Wall Art Print with Castle Landscape


Proof I am a Dragon

Laser Cut Geometric Pegasus Wall Art Decoration


Laser Engraved Dragon with D20 Dice Wood Wall Art Dungeons and Dragons inspired

Dragon Guardian Library | Multilayer Fantasy Wall Decor


Demon In Darkness Acrylic Engraving


Black and White Laser Engraved Castle Wall Art in Frame


Laser Engraved Dragon Design


Dragon Ball wooden card


Laser Cut Wooden Wizard Wall Art with Mountain and Moon Design
