
Report
![[Laser cut and engrave] Fall Tray](https://image-res.atomm.com/resource/xtool/community/attachment/xtool-community/23a07b5c-f5eb-48ab-a231-4fc282487381?x-oss-process=image/resize,w_1200,h_900,limit_0/interlace,1/format,webp/auto-orient,1)
![[Laser cut and engrave] Fall Tray](data:image/png;base64,iVBORw0KGgoAAAANSUhEUgAAAAoAAAAKCAYAAACNMs+9AAAAAXNSR0IArs4c6QAAABdJREFUKFNjZCASMBKpjmFUId6QIjp4AAppAAuXjCs4AAAAAElFTkSuQmCC)
![[Laser cut and engrave] Fall Tray](https://image-res.atomm.com/resource/xtool/community/attachment/xtool-community/23a07b5c-f5eb-48ab-a231-4fc282487381?x-oss-process=image/resize,w_200,h_150,limit_0/interlace,1/format,webp/auto-orient,1)
![[Laser cut and engrave] Fall Tray](https://image-res.atomm.com/resource/xtool/community/attachment/xtool-community/75c09a3f-1a2d-4f8e-af2d-6d2a78de2241?x-oss-process=image/resize,w_200,h_150,limit_0/interlace,1/format,webp/auto-orient,1)
![[Laser cut and engrave] Fall Tray](https://image-res.atomm.com/resource/xtool/community/attachment/xtool-community/0787674e-f46d-4730-8540-de85e334d148?x-oss-process=image/resize,w_200,h_150,limit_0/interlace,1/format,webp/auto-orient,1)
![[Laser cut and engrave] Fall Tray](https://image-res.atomm.com/resource/xtool/community/attachment/xtool-community/a6b3b830-0f0e-4ddc-80a2-ad95a79c82a3?x-oss-process=image/resize,w_200,h_150,limit_0/interlace,1/format,webp/auto-orient,1)
![[Laser cut and engrave] Fall Tray](https://image-res.atomm.com/resource/xtool/community/attachment/xtool-community/02c9426b-ffd4-48f0-b5e9-1c93ad8095c7?x-oss-process=image/resize,w_200,h_150,limit_0/interlace,1/format,webp/auto-orient,1)
Fall Tray
 Instruction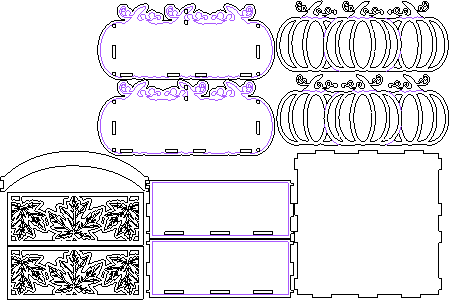
FallTray
.xcs
Application scenario
Laser processing
Machine & module

xTool S1
40WCompatible xTool Machine
New
M2
10W, 20WF2 Ultra UV
5WF2
15WP3
80WF2 Ultra
40WF1 Ultra
20WM1
5W, 10WD1
5W, 10W, 20WD1 Pro
5W, 10W, 20W, 40WP2
55WF1
10WS1
10W, 20WM1 Ultra
10W, 20WP2S
55WMaterial used

1/8"(3mm) Basswood Plywood

108
2172
Information
This charming tray makes a delightful addition to your fall decor. Perfect for holding candy, small essentials, or seasonal decorations, it adds both style and function to any space. It also makes a thoughtful and festive gift. The inside of the tray is 5.5 x 5.5 inches.
Instruction
1
Step1

Preview

Preview
This file uses 3mm basswood. The black lines are cut, and the purple lines are score. Be sure to adjust the settings if using a different material. Process your material. Clean or sand if needed. Paint the overlay pieces as desired.
2
Step2

Preview

Preview
Glue the overlay pieces onto the corresponding side pieces. Use the score lines as a guide. This will allow you to put glue into the holes on the opposite side allowing for easier assembly.
3
Step3

Preview

Preview

Preview
Glue the leaf sides on first. Attach one pumpkin side completely. Attach the last one but don't completely put it on as shown in the image. Now, you can add the handle and push the remaining side on completely. Once dry, finish with sealer or polyurethane of choice.
Comments
Remixes



You may also like

$2.20
$2.20
Credits220
3D Christmas trays bundle. Xmas Santa plate laser cut. Serving tray. Christmas kitchen decor. Treats for Santa svg. Dear Santa tray

1

Laser Engraved Wooden Dear Santa Cookie and Milk Tray with Metal Handles

2
15

Laser Engraved Wooden Disney Christmas Snack Tray with Holiday Coasters

1
18

Heart Puzzle Serving Tray SVG Coffee & Cookie Tray Wooden Snack Tray SVG Laser Cut Heart Tray File

5
22

Baseball Engraved Charcuterie Tray

4
12

bandeja reyes magos

11
39

Laser Engraved Harry Potter Wooden Serving Tray with Magical Symbols

8
49

Laser Cut Wooden Coffee Quote Tray with Decorative Frame
.png?x-oss-process=image/resize,m_fill,w_240,h_240,limit_0/interlace,1/format,webp/auto-orient,1)
2
15

Mystical Wooden Tray Laser Cut. Celestial Dice Tray. Mystical Symbol. Serving Tray Design. Home Décor. Laser Engraving. Organizer

13
75

Serving Trays with Handles Laser Cut Set. Kitchen Decor. Home Organization. Wooden Trays Kit

26
228

$3.99
$3.99
Credits399
Square Santa Tray Laser Cut

0

Laser Engraved Wooden Serving Tray with Floral Initial K Design

9
32

Wooden tray with mountain and forest engraving decoration
19
136

Heart Tray SVG Laser Cut | Wooden Serving Tray File | Decorative Tray
11
77

10 inch leather tray

1
20

Laser Engraved Wooden Santa Drink and Treat Serving Tray
1
6

Espresso Tray - World Coffee Map

151
740

My OutIn Tray template With Quote

1
0