
举报
![[Laser cut and engrave] Laser Engraved Wooden Photo Frame with Team Papa Design](data:image/png;base64,iVBORw0KGgoAAAANSUhEUgAAAAoAAAAKCAYAAACNMs+9AAAAAXNSR0IArs4c6QAAABdJREFUKFNjZCASMBKpjmFUId6QIjp4AAppAAuXjCs4AAAAAElFTkSuQmCC)
![[Laser cut and engrave] Laser Engraved Wooden Photo Frame with Team Papa Design](https://storage-us.atomm.com/resource/xtool/community/attachment/xtool-community/8cd38ee8-12fe-4a86-88e6-d7c2abfb9c0c.jpg?x-oss-process=image/resize,w_200,h_150,limit_0/interlace,1/format,webp/auto-orient,1)
![[Laser cut and engrave] Laser Engraved Wooden Photo Frame with Team Papa Design](https://storage-us.atomm.com/resource/xtool/community/attachment/xtool-community/5a786eb8-22f2-4606-b369-010e6367e6bc.jpg?x-oss-process=image/resize,w_200,h_150,limit_0/interlace,1/format,webp/auto-orient,1)
![[Laser cut and engrave] Laser Engraved Wooden Photo Frame with Team Papa Design](https://storage-us.atomm.com/resource/xtool/community/attachment/xtool-community/533f99aa-8e07-4f15-8543-bfbeea476b89.jpg?x-oss-process=image/resize,w_200,h_150,limit_0/interlace,1/format,webp/auto-orient,1)
![[Laser cut and engrave] Laser Engraved Wooden Photo Frame with Team Papa Design](https://storage-us.atomm.com/resource/xtool/community/attachment/xtool-community/e11d789d-adad-4ae8-85f5-2a78fbcdaad5.jpg?x-oss-process=image/resize,w_200,h_150,limit_0/interlace,1/format,webp/auto-orient,1)
![[Laser cut and engrave] Laser Engraved Wooden Photo Frame with Team Papa Design](https://storage-us.atomm.com/resource/xtool/community/attachment/xtool-community/49460d01-d6e7-4c81-aaf6-e9122659b945.png?x-oss-process=image/resize,w_200,h_150,limit_0/interlace,1/format,webp/auto-orient,1)
![[Laser cut and engrave] Laser Engraved Wooden Photo Frame with Team Papa Design](https://storage-us.atomm.com/resource/xtool/community/attachment/xtool-community/24cf9763-6dd4-418d-a28b-3e33973ebafc.png?x-oss-process=image/resize,w_200,h_150,limit_0/interlace,1/format,webp/auto-orient,1)
爸爸相框队
 教程
教程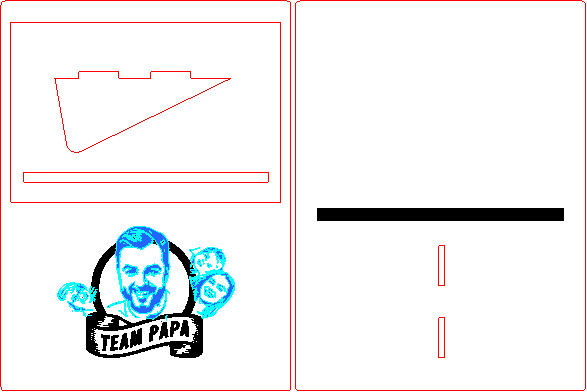
papa_photostand
.xcs
显示剩余(1项)
应用场景
激光加工
机器与模块

xTool S1
40W材料兼容的 xTool 机器
上新
M2
10W, 20WF2 Ultra UV
5WF2
15WP3
80WF2 Ultra
40WF1 Ultra
20WM1
5W, 10WD1
5W, 10W, 20WD1 Pro
5W, 10W, 20W, 40WP2
55WF1
10WS1
10W, 20WM1 Ultra
10W, 20WP2S
55W使用的材料

3mm椴木胶合板

32
1149
教程
1
步骤1: 用 AImake 制作家庭的面部绘画

预览

预览

预览

预览
借助Xtool创意空间的AI功能,你可以轻松制作家人的面部绘画!
- 将家庭照片插入Xtool创意空间
- 要制作绘图,> Filter AI Filter >线稿写实
- 要去除背景,剪掉> AI 剪裁 >确认 将
- 照片拍到每个成员的脸上
2
步骤2: 将面部图像替换为数据中的示例图像(蓝色部分)

预览
3
步骤3: 激光切割和雕刻!

预览
使用上面的设置。
用Xtool S1 40W处理大约10分钟。
4
步骤4: 上色、组装、粘合!

预览
- Paint them if you like.
- Glue the long and narrow rectangle on the engraved part.
- Glue the front plate on the top of the back plate
(It's like putting the rectangle between two plates) - Insert the stand part on the back (Glue it if you like)
5
步骤5: 完成!

预览
从侧面插入照片。
为了在A4木板中容纳所有设计,画框尺寸比普通照片尺寸稍小(100×150mm)。
你可能需要稍微裁剪照片的外层部分。
评论
二创


您可能也喜欢

丛林相框

33
161

多心合一——五代定制相框

8
18

带有可变底座和图案的相框

15
111

相框 姐妹之爱

22
24

天使之翼相框

12
19

微型相框

19
85

龙设计相框

14
45

曾孙辈相框

14
92

我们的家庭相框

41
135
$2.10
$2.10
Credits210
3D花卉相框捆绑激光切割。木制装饰画框。挂着相框。10 设计

8

宝丽来相框

43
124

'/%3e%3cdefs%3e%3clinearGradient%20id='paint0_linear_1433_15726'%20x1='12'%20y1='5.25'%20x2='12'%20y2='18.75'%20gradientUnits='userSpaceOnUse'%3e%3cstop%20stop-color='%23FFC654'/%3e%3cstop%20offset='1'%20stop-color='%23FF8D12'/%3e%3c/linearGradient%3e%3c/defs%3e%3c/svg%3e)
我把你藏在我皮肤下 相框

74
285

激光雕刻木质家庭照片框,附励志名言

0
1

激光切割木质家谱相框,带心形设计

15
58

带班级照片槽的木质相框

11
106

带有恐龙装饰和名字的个性化相框

4
20

热气球相框
21
61

极简简洁的木质照片架,适合你的办公桌
20
72