
“Expand picture size” means two completely different things, and the fix for one is useless for the other. Either you want more canvas — a wider image with new area added — or you want more pixels in the picture you already have.
This guide separates the two in the first section, then covers four ways to get more canvas, including one that involves no AI at all.
Expand an image nowDrag the canvas outward and let AI fill the new area, free in the browser.Open AI ExpandKey Takeaways
- Expanding adds new area, and the new area is generated. Upscaling adds resolution and invents nothing.
- For a factual image — a product, a property, a news photo — upscale, do not expand.
- Canvas can also be extended without AI, using a solid, mirrored or blurred fill.
Expand or Upscale? They Fix Different Problems
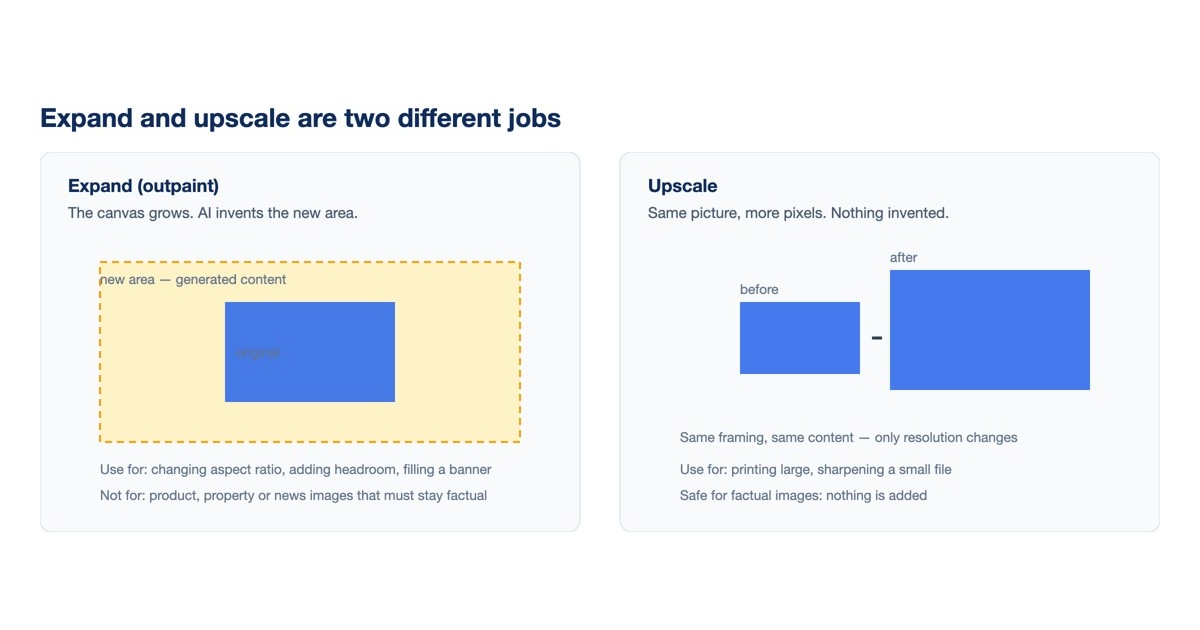
Getting this right saves you from the wrong tool entirely.
You want more canvas
The picture is the wrong shape. It is portrait and you need landscape, or there is not enough space above someone's head for a banner. The frame has to grow, and something has to fill the new space.
You want more pixels
The picture is the right shape but too small — blurry when printed, or rejected for being under some minimum size. Nothing about the framing needs to change.
That second case is upscaling, and it is a different job with different tools. We have a separate guide to the best image upscalers.
“Without losing quality” usually means upscaling
If you searched for expanding an image without losing quality, you almost certainly want an upscaler. Expanding does not degrade your original at all — it leaves it untouched and adds new area around it. Quality loss is an upscaling problem, not an expanding one.
Method 1: Expand the Picture With AI Fill
The fastest way to change an image's shape while keeping it looking like one photograph.

Step 1: Upload the image
Open AI Expand and upload your file. It accepts JPG, JPEG, PNG and WEBP up to 10 MB, and asks that the main subject is centred and fully visible.
Step 2: Drag the canvas outward
Select the Expand tool and pull the handles in whichever directions you need. You are defining empty space; nothing has been generated yet.
Step 3: Generate, and cycle the variations
Click Generate and the empty area fills with content matched to the edges of your photo. You can cycle through the variations it produces and keep the one that works.
Step 4: Or describe what should be there
If the automatic fill guesses wrong, type a short description into the prompt box — the tool's own example is “blue sky” — and generate again to steer it.
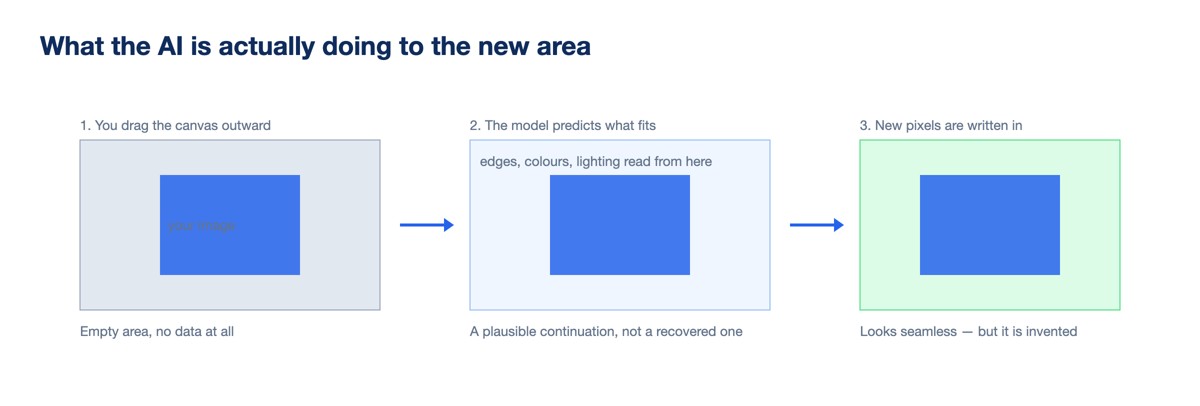
What this is good for:
changing aspect ratio for a banner or social format, adding headroom above a subject, and rescuing a photo that was cropped too tightly.
What it is not:
a recovery of what was outside the original frame. The new area is invented, which the next section deals with properly.
The full AI workflow, including how to write the prompt, is in how to expand an image with AI, and the tools are compared in the best image expanding tools.
Method 2: Expand the Canvas Without AI
Tool used: Photopea — free, runs in the browser, no account. Any editor with a canvas-size command works the same way.
Here the new space is filled with something predictable rather than generated. Less impressive, and sometimes exactly right: nobody mistakes a white band for part of the scene.
Three fills cover almost every case. Solid colour is how most product listings get square images. Mirroring the edge outward suits texture, foliage and fabric. A blurred stretch of the image behind itself is the treatment video platforms use.
Step 1: Open the image and the canvas dialog
Drop the file into Photopea, then choose Image ▸ Canvas Size. The dialog reports the current pixel dimensions.
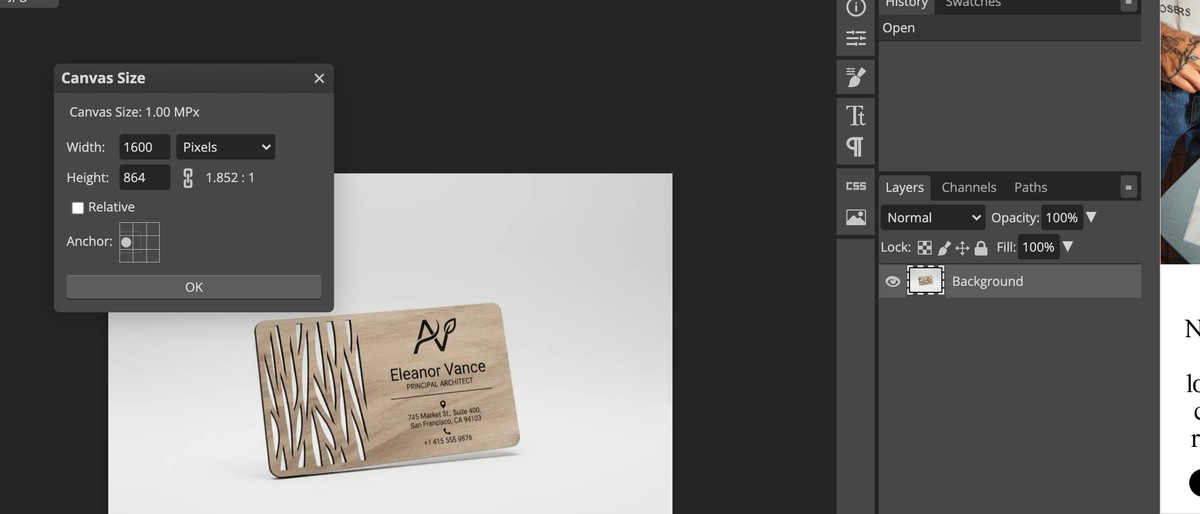
Step 2: Break the ratio link, then set one dimension
Click the chain icon between width and height so the ratio is not preserved. Type the width you need and leave the height as it is, or the canvas grows in both directions.
Step 3: Choose which way it grows
The anchor grid decides where the original sits in the new canvas. Left-middle keeps the photo on the left and adds all the space to the right; centre splits it evenly.
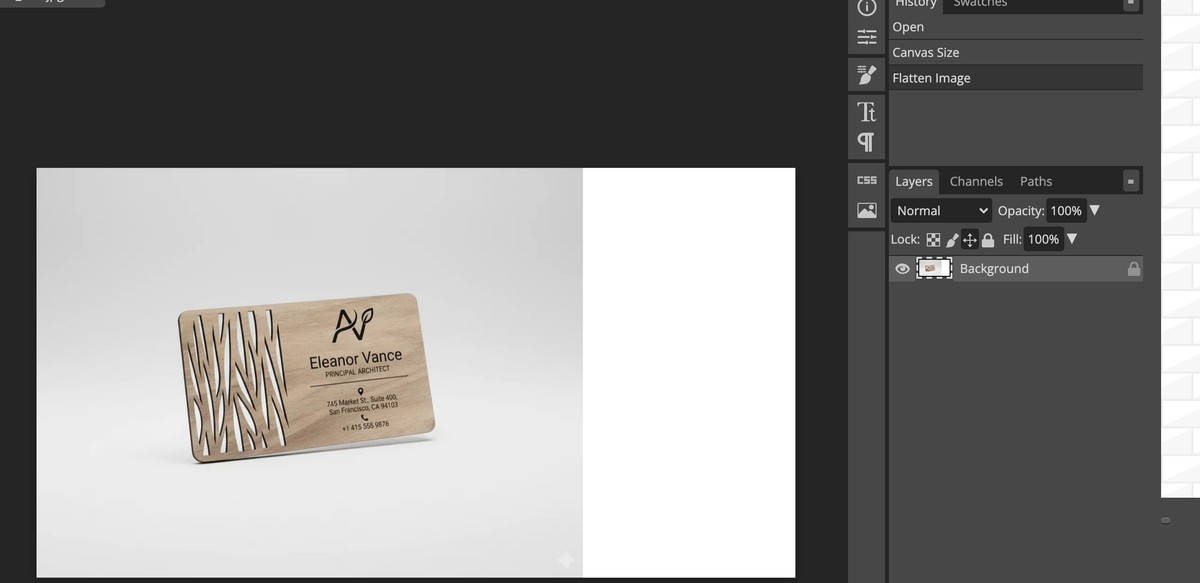
Step 4: Fill the new area
The new area arrives transparent, not white — the checkerboard in the screenshot below. Layer ▸ Flatten Image drops it onto white, or add a solid colour layer underneath for a brand colour.
Method 3: Change Print Size Instead of Picture Size
Tool used: Photopea again, Image ▸ Image Size with Resample switched off. Any print dialogue exposes the same setting.
Worth knowing because it solves a surprising number of “my image is too small” problems without touching the file at all.
Print size is pixels divided by DPI. We measured it on the 1600 by 864 file from Method 2: at 72 DPI it prints 22.22 inches wide, at 300 DPI it prints 5.33 inches wide.
The pixel count never moved — both dialogs still read 1.38 MPx. Only the instruction about how big to print it changed.

Step 1: Turn Resample off first
This is the whole trick. With Resample on, changing DPI rewrites the pixels. With it off, the pixel count is locked and only the print size responds.
Step 2: Switch the units to inches or centimetres
In pixels you cannot see the effect. In inches the width figure moves as soon as you change DPI, which is the number the printer cares about.
Step 3: Set the DPI your printer wants
300 DPI is the usual answer for photographic prints, 150 is acceptable for posters seen from a distance. Quality drops as DPI falls, and no software creates detail that was never captured.
Method 4: Upscale the Picture If Pixels Are the Problem
Tool used: Bigjpg — free for 2x and 4x, with 8x and 16x behind a paid plan. Any modern upscaler follows the same sequence.
If the framing is fine and the file is simply too small, upscaling is the correct operation. Modern upscalers reconstruct detail rather than just interpolating, so results beat stretching in an editor.
Crucially, an upscaler does not change what is in the picture. That makes it the safe choice whenever the image has to stay factually accurate.
Step 1: Upload and pick the image type
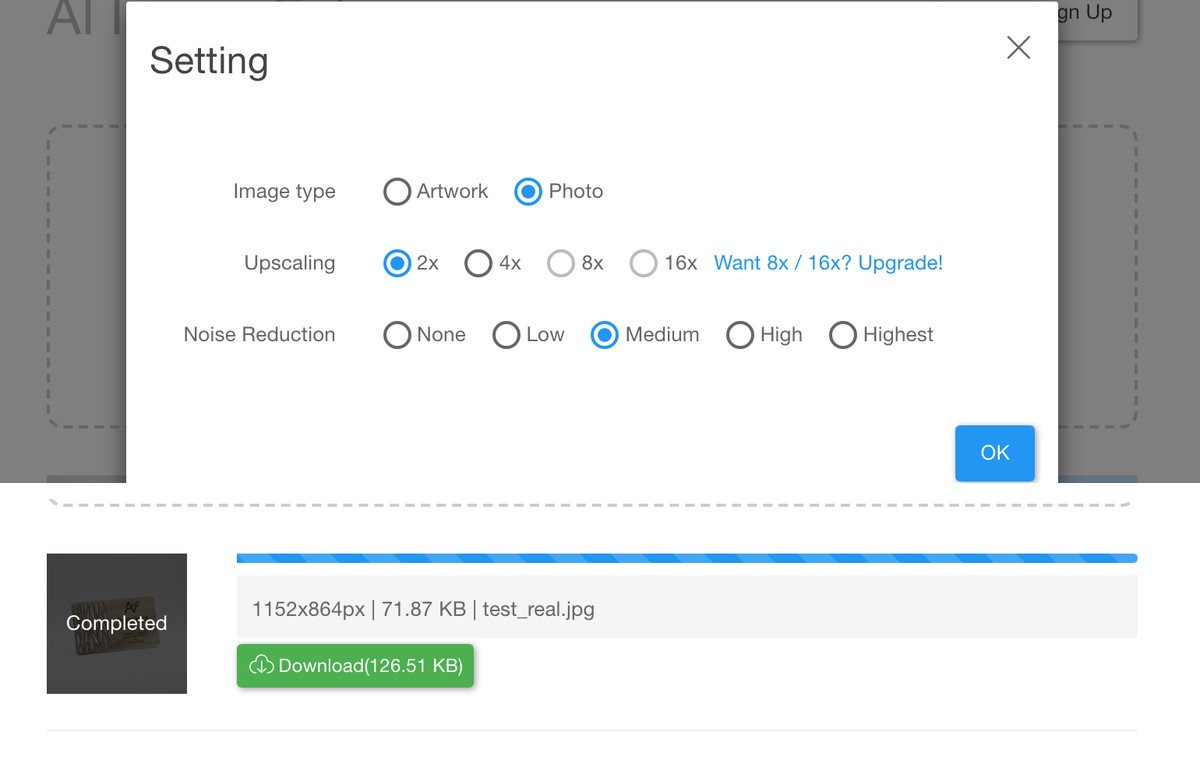
Drop the file into Bigjpg and choose Artwork or Photo. The setting changes how aggressively edges are smoothed, and picking the wrong one is the most common mistake.
Step 2: Choose the multiplier
2x and 4x are free. Ask for the smallest jump that solves the problem — every extra step invents more of what it cannot see.
Step 3: Set noise reduction, then start
Medium is a reasonable default for photographs; None suits clean line art. Our 1152 by 864 test photo came back at 2x as a 126.51 KB file.
Step 4: Check the result at full size
Upscalers smooth skin, flatten fine text and occasionally hallucinate texture. Open the output at 100% before using it anywhere that matters.
More on the operation itself in how to upscale an image, with tools compared in the best 4K image upscalers.
The Four Ways to Expand a Picture, Compared
| Method | Tool used here | Adds canvas | Invents content | Best for |
|---|---|---|---|---|
| AI expand | Atomm AI Expand | Yes | Yes | Aspect ratio changes, banners, headroom |
| Solid colour fill | Photopea | Yes | No | Product listings, square crops |
| Mirror or blur fill | Photopea | Yes | No, but it repeats | Textures, backgrounds, video-style framing |
| Change print DPI | Photopea, Resample off | No | No | Physically larger prints from the same file |
| Upscale | Bigjpg | No | No | Small files that need more resolution |
When Not to Expand a Picture With AI
This is the part that most guides leave out, and it matters more than any technique in them.
The area an AI adds is generated. It is a plausible guess based on the edges of your photo, not a record of anything that was there. For decorative and marketing work that is fine. In three cases it is not.
Product photography
Expanding an image can invent packaging, extra items or surroundings that misrepresent what a buyer receives.
Property and listing photos
Adding room, garden or view that does not exist is a misrepresentation, regardless of intent.
News, documentary and evidence
Any image whose value is that it records something real should never have generated area added.
In all three, extend with a solid colour or upscale instead. Both change presentation without changing the facts.
What Is the Best Way to Expand a Picture?
You need a different aspect ratio for a banner or post
AI expand. This is exactly the case it was built for, and the result looks like one photograph rather than a padded one.
You are preparing product images
Solid colour fill to square. Fast, free, consistent across a catalogue, and it never misrepresents the product.
You need a bigger print from the same photo
Change the print size first, and upscale only if the result is visibly soft at the size you need.
The file is just too small
Upscale. Expanding will not help, because the problem is resolution rather than framing.
If the method is settled and the question is which tool, the best AI image expanders compares five of them on what expanding actually costs.
Conclusion
Decide first whether you need canvas or pixels. Almost every frustrating hour spent on this problem comes from using an expander when an upscaler was needed, or the reverse.
For canvas, AI expansion is quick and convincing, and a plain colour fill is quicker still when the image has to stay literal. For pixels, an upscaler is the only correct tool.
And keep the distinction in mind when the image has a job beyond decoration: expanding adds content that was never photographed, and some images should never have that done to them.
Frequently Asked Questions about Expanding Picture Size
How do I expand a picture without losing quality?
Expanding does not degrade the original at all — it leaves your pixels untouched and adds new area around them. If your picture looks soft when enlarged, the operation you actually want is upscaling, which adds resolution.
What is the difference between expanding and resizing an image?
Expanding grows the canvas and fills the new area with something. Resizing changes the pixel dimensions of the existing picture. Expanding changes the shape; resizing changes the size of what is already there.
Can I expand an image for free?
Yes. Atomm’s AI Expand runs in the browser and accepts JPG, JPEG, PNG and WEBP up to 10 MB. Extending a canvas with a solid colour fill is also free in any image editor.
Is the area AI adds real?
No. It is generated from the edges of your photo — a plausible continuation rather than a recovery of what was outside the frame. Avoid it on product, property, news or evidence images.
How do I make an image bigger for printing?
Try changing the print DPI first, since the same file prints larger at lower DPI. If the result is too soft at the size you need, upscale the file rather than expanding it.
Why does my expanded area look wrong?
The automatic fill guesses from the edges, so complex or structured surroundings confuse it. Type a short description into the prompt box, such as “blue sky”, and generate again to steer the result.
Expand an image in your browser
Free AI Expand from Atomm, or explore the wider set of image tools.
