


신고
![[Laser cut and engrave] Laser Cut Wooden Dragon Model Puzzle Toy](https://storage-us.atomm.com/resource/xtool/community/attachment/xtool-community/02f53644-c73a-4695-8ab1-d12bccd208e2.jpg?x-oss-process=image/resize,w_1200,h_900,limit_0/interlace,1/format,webp/auto-orient,1)
![[Laser cut and engrave] Laser Cut Wooden Dragon Model Puzzle Toy](data:image/png;base64,iVBORw0KGgoAAAANSUhEUgAAAAoAAAAKCAYAAACNMs+9AAAAAXNSR0IArs4c6QAAABdJREFUKFNjZCASMBKpjmFUId6QIjp4AAppAAuXjCs4AAAAAElFTkSuQmCC)
![[Laser cut and engrave] Laser Cut Wooden Dragon Model Puzzle Toy](https://storage-us.atomm.com/resource/xtool/community/attachment/xtool-community/02f53644-c73a-4695-8ab1-d12bccd208e2.jpg?x-oss-process=image/resize,w_200,h_150,limit_0/interlace,1/format,webp/auto-orient,1)
![[Laser cut and engrave] Laser Cut Wooden Dragon Model Puzzle Toy](https://storage-us.atomm.com/resource/xtool/community/attachment/xtool-community/d553ec1c-f3dc-4c83-aa61-b83ccf199994.jpg?x-oss-process=image/resize,w_200,h_150,limit_0/interlace,1/format,webp/auto-orient,1)
![[Laser cut and engrave] Laser Cut Wooden Dragon Model Puzzle Toy](https://storage-us.atomm.com/resource/xtool/community/attachment/xtool-community/b7931587-17df-436b-916f-54e5445f6e5e.jpg?x-oss-process=image/resize,w_200,h_150,limit_0/interlace,1/format,webp/auto-orient,1)
![[Laser cut and engrave] Laser Cut Wooden Dragon Model Puzzle Toy](https://storage-us.atomm.com/resource/xtool/community/attachment/xtool-community/bca2da94-4780-4ae2-9476-c998634aa291.jpg?x-oss-process=image/resize,w_200,h_150,limit_0/interlace,1/format,webp/auto-orient,1)
이빨 없는 용
 지침
지침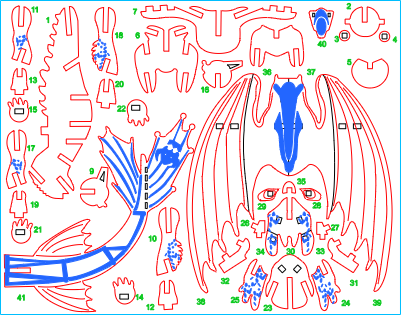
Toothless
.xcs
4개 더 보기
응용 시나리오
레이저 가공 (60min)
기계 및 모듈
xTool S1
40W호환되는 · 13
사용된 재료

3mm 포플러 합판
5
30
지침
1
단계1: 컷아웃 패턴

미리보기
모든 조각을 잘라내세요
2
단계2: 차체 부품 조립

미리보기

미리보기

미리보기
8 More images
첫 번째 조각은 목구멍에 넣습니다. 옆면에서 튀어나온 두 개의 사각형 탭이 있습니다. 접착제를 붙인 후 두 개의 작은 둥근 조각을 옆에 붙입니다.
다음 조각은 V자 모양으로 잘린 원반입니다.
다음은 위에 V자 모양이 있는 다리 부분입니다(날개는 나중에 슬롯에 넣을 예정입니다).
이제 다음 슬롯에 윙 홀더를 붙이세요.
마지막 부품은 뒷다리 홀더입니다.
3
단계3: 어셈블 레거시

미리보기

미리보기

미리보기
앞쪽은 다리 부분이 두 개, 뒷부분이 두 개로 나뉘어 있습니다.
앞다리에는 깃털이 있고, 뒷다리에는 없습니다.
새김이 바깥쪽으로 뻗어 있습니다. 모든 다리 그룹을 분리하세요.
다리를 붙이고, 그다음 발걸이, 마지막으로 발을 붙입니다.
4
단계4: 헤드 어셈블리

미리보기

미리보기

미리보기
6 More images
볼을 아래턱/얼굴 부분에 접착하세요.
이걸 메인 보드 조각에 끼워 넣으세요.
턱 부분에 접착되는 작은 아이홀드 두 개가 있습니다.
눈을 이 조각들에 붙여 놓으세요. 앞쪽에 코를 추가하세요.
헤드피스 상단을 가져와 아래쪽 귀걸이를 접착하세요.
귀를 비스듬히 튀어나온 탭에 붙
이세요.이 부품을 머리 뒤쪽 슬롯에 끼워 넣으세요.
5
단계5: 날개와 꼬리 추가하세요

미리보기

미리보기

미리보기

미리보기
내부 날개를 본체와 밀접
하게 밀어넣으세요.바깥쪽 두 개의 날개 조각을 접착하세요.
테일 피스는 몸체 뒤쪽의 남은 슬롯에 접착하세요.
6
단계6: 끝났어

미리보기

미리보기

미리보기
2 More images
끝났어!
즐겁게 읽으시길 바랍니다!
댓글


