![[Laser cut and engrave] 3d Printer Toolbox](https://image-res.atomm.com/resource/xtool/community/attachment/xtool-community/9690ada7-9b0b-41cc-a31c-b708901e08b7?x-oss-process=image/resize,m_fill,w_1280,h_960,limit_0/interlace,1/format,webp/auto-orient,1)
![[Laser cut and engrave] 3d Printer Toolbox](data:image/png;base64,iVBORw0KGgoAAAANSUhEUgAAAAoAAAAKCAYAAACNMs+9AAAAAXNSR0IArs4c6QAAABdJREFUKFNjZCASMBKpjmFUId6QIjp4AAppAAuXjCs4AAAAAElFTkSuQmCC)
![[Laser cut and engrave] 3d Printer Toolbox](https://image-res.atomm.com/resource/xtool/community/attachment/xtool-community/9690ada7-9b0b-41cc-a31c-b708901e08b7?x-oss-process=image/resize,m_fill,w_160,h_120,limit_0/interlace,1/format,webp/auto-orient,1)
![[Laser cut and engrave] 3d Printer Toolbox](https://image-res.atomm.com/resource/xtool/community/attachment/xtool-community/edd041a1-08f8-44ee-90fa-98ec05640fa1/20240502_181440.jpg?x-oss-process=image/resize,m_fill,w_160,h_120,limit_0/interlace,1/format,webp/auto-orient,1)
![[Laser cut and engrave] 3d Printer Toolbox](https://image-res.atomm.com/resource/xtool/community/attachment/xtool-community/f2bacf03-a5da-4333-b5c8-576c9ef7dbe4/20240502_181650.jpg?x-oss-process=image/resize,m_fill,w_160,h_120,limit_0/interlace,1/format,webp/auto-orient,1)
![[Laser cut and engrave] 3d Printer Toolbox](https://image-res.atomm.com/resource/xtool/community/attachment/xtool-community/cd7ef67a-5d16-4bcc-9891-daa8d06a7a63/20240502_181436.jpg?x-oss-process=image/resize,m_fill,w_160,h_120,limit_0/interlace,1/format,webp/auto-orient,1)
3d Printer Toolbox
 Instruction


Information
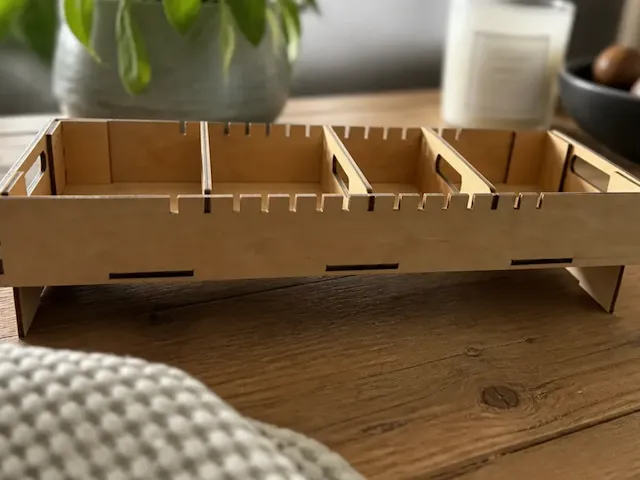
Typical makers have a variety of machines to work with, but with the various machines comes an assortment of tools. This project will walk you through creating a wooden tray that can be used as a drawer to store all the tools for your 3d printer. The toolbox has dividers to help keep things organized. Of course you can organize and label your version of this project by adding in labels or any modifications.
Instruction
Step1: Create the Divider Tray

The first step is to go over to boxes.py to create the tray. We will use the divider tray module. There are many options here, so don't worry if you are not customizing or changing the dimensions of the design I provided. I simply want to mention where i got the design from, so you can go make your own variation if you want.
Reading the documentation is very helpful to learn the correct syntax for entering the dimensions of each divider and the overall length and height of the box. I just did a little bit of trial and error and looked at the SVG until I understood what was going on.
Step2: Adjust the SVG if needed.

Boxes.py adds in some extra parts to divide the tray up. I removed those and I moved some of the parts to a different tab. I am using 12x12 inch sheets of basswood plywood, so I need to make sure the parts fit
Tip: Do not resize the boxes design as this will make the joints not fit. If you need to change the dimensions, you need to do this from the boxes.py site.
Step3: Settings
For settings, this project only uses the Cut process. All settings are for the D1 with a 5W laser. You may need to adjust settings for your own configurations. Be sure to follow all safety guidelines that go with your laser. Always wear personal protective equipment.
Remixes



You may also like

Box with divider


Bamboo pen engraving template


Pen Holder


Storage Box for xTool F1 Centering Jigs


'/%3e%3cdefs%3e%3clinearGradient%20id='paint0_linear_1433_15752'%20x1='12.5'%20y1='5'%20x2='12.5'%20y2='19.2596'%20gradientUnits='userSpaceOnUse'%3e%3cstop%20stop-color='%232F7FFF'/%3e%3cstop%20offset='1'%20stop-color='%232661F1'/%3e%3c/linearGradient%3e%3c/defs%3e%3c/svg%3e)
Wooden desk organizer with floral decorations


Wooden box with oak tree cutout design


Magnetic School Locker Storage Bin / Box


casier de rangement , colle et autres , casier de 53 x 53 mm


Tiered Wooden Desk Organizer with Nine Compartments


Simple Desk Storage Box


Laser Cut Wooden Soap Holder Organizer Tray for Bathroom

Rounded basket - no glue required

Matchbox 70x42x20 mm


~33 x 9 Box Joint fire pit cover


Storage Box


4-Compartment Desk Organizer Tray 1/8" Plywood


HOLDER FOR BUSINESS CARDS AND 4 PENCILS


Laser Cut Wooden Sticky Note and Pen Holder
