
![[Laser cut and engrave] Mobile Phone Stand/Amplifier](https://image-res.atomm.com/ali-res/community/making/f8a6200b-9261-4d12-9f6f-45e990765d5d/IMG_20230715_064905.jpg?x-oss-process=image/resize,w_1200,h_900,limit_0/interlace,1/format,webp/auto-orient,1)
![[Laser cut and engrave] Mobile Phone Stand/Amplifier](data:image/png;base64,iVBORw0KGgoAAAANSUhEUgAAAAoAAAAKCAYAAACNMs+9AAAAAXNSR0IArs4c6QAAABdJREFUKFNjZCASMBKpjmFUId6QIjp4AAppAAuXjCs4AAAAAElFTkSuQmCC)
![[Laser cut and engrave] Mobile Phone Stand/Amplifier](https://image-res.atomm.com/ali-res/community/making/f8a6200b-9261-4d12-9f6f-45e990765d5d/IMG_20230715_064905.jpg?x-oss-process=image/resize,w_200,h_150,limit_0/interlace,1/format,webp/auto-orient,1)
![[Laser cut and engrave] Mobile Phone Stand/Amplifier](https://image-res.atomm.com/ali-res/community/making/e017fc21-7b42-4aca-8716-548313671acf/IMG_20230715_064905.jpg?x-oss-process=image/resize,w_200,h_150,limit_0/interlace,1/format,webp/auto-orient,1)
![[Laser cut and engrave] Mobile Phone Stand/Amplifier](https://image-res.atomm.com/ali-res/community/making/11a17ee9-1924-4d63-a592-72b5fda8de98/IMG_20230715_064956.jpg?x-oss-process=image/resize,w_200,h_150,limit_0/interlace,1/format,webp/auto-orient,1)
![[Laser cut and engrave] Mobile Phone Stand/Amplifier](https://image-res.atomm.com/ali-res/community/making/49badd72-dfb6-4bb9-bc92-3f5610393767/IMG_20230715_065301.jpg?x-oss-process=image/resize,w_200,h_150,limit_0/interlace,1/format,webp/auto-orient,1)
![[Laser cut and engrave] Mobile Phone Stand/Amplifier](https://image-res.atomm.com/ali-res/community/making/86a562a8-75a3-42b4-a3a6-fcd9b114c50d/IMG_20230715_065016.jpg?x-oss-process=image/resize,w_200,h_150,limit_0/interlace,1/format,webp/auto-orient,1)
![[Laser cut and engrave] Mobile Phone Stand/Amplifier](https://image-res.atomm.com/ali-res/community/making/35a90dad-d595-4d7a-81ce-39bcfaf8008b/IMG_20230715_065037.jpg?x-oss-process=image/resize,w_200,h_150,limit_0/interlace,1/format,webp/auto-orient,1)
![[Laser cut and engrave] Mobile Phone Stand/Amplifier](https://image-res.atomm.com/ali-res/community/making/ee624d20-2c53-41a3-b48d-cf234f022f91/IMG_20230715_065024.jpg?x-oss-process=image/resize,w_200,h_150,limit_0/interlace,1/format,webp/auto-orient,1)
![[Laser cut and engrave] Mobile Phone Stand/Amplifier](https://image-res.atomm.com/ali-res/community/making/5740cda8-f5af-4d38-a7af-e0f1ff237767/IMG_20230715_065031.jpg?x-oss-process=image/resize,w_200,h_150,limit_0/interlace,1/format,webp/auto-orient,1)
![[Laser cut and engrave] Mobile Phone Stand/Amplifier](https://image-res.atomm.com/ali-res/community/making/b8732734-9214-4aeb-9074-fdf8916e35a3/IMG_20230715_065419.jpg?x-oss-process=image/resize,w_200,h_150,limit_0/interlace,1/format,webp/auto-orient,1)
![[Laser cut and engrave] Mobile Phone Stand/Amplifier](https://image-res.atomm.com/ali-res/community/making/c0597eb0-30e7-4157-8ac7-4ef215a1b5cb/IMG_20230715_065410.jpg?x-oss-process=image/resize,w_200,h_150,limit_0/interlace,1/format,webp/auto-orient,1)
![[Laser cut and engrave] Mobile Phone Stand/Amplifier](https://image-res.atomm.com/ali-res/community/making/98bf2bc9-6dcf-44d7-90b7-87806d1d3c1f/IMG_20230715_065427.jpg?x-oss-process=image/resize,w_200,h_150,limit_0/interlace,1/format,webp/auto-orient,1)
Підставка/підсилювач для мобільного телефону
 Інструкція
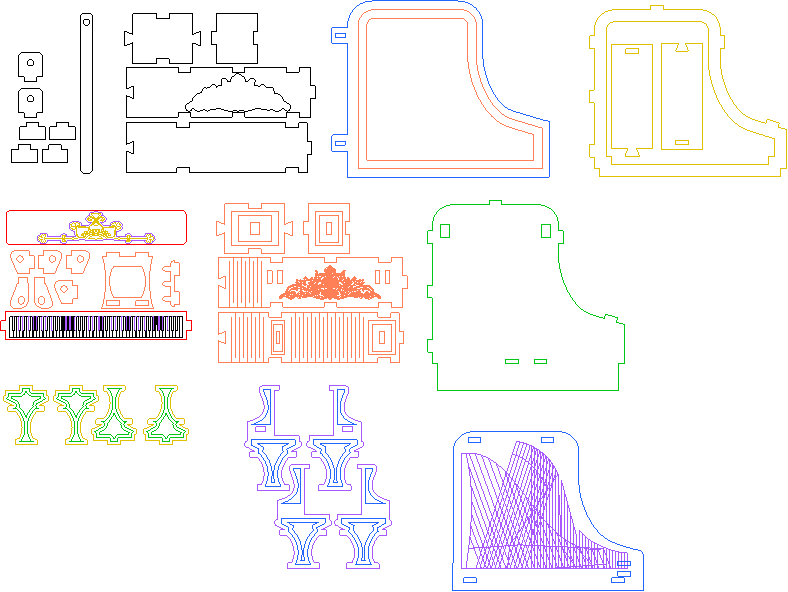


Інформація
Ця підставка для мобільного телефону спроектована так, щоб виглядати як рояль. Переважаючі кольори — сріблястий і золотий. Окрім того, що це підставка для телефону, це також підсилювач, призначений для того, щоб звук з динаміка телефону проходив вниз через піаніно, а потім перенаправлявся вперед за допомогою звукової панелі. Більшість компонентів виготовлені з липи товщиною 2,2 мм. Підтримка телефону та верхня частина — це фанера Lauan 3.0mm.
Інструкція
Крок1: Гравіювання та вирізання компонентів


Дерев'яні панелі фарбують перед лазерними операціями. Для цього проєкту я обрала золоті та срібні металеві фарби. Гравіювання чіткі і добре контрастують. Також дуже мало змін кольору від лазера на гравіюваннях і лініях різання.
Для 2,2 мм Basswood усі CUT виконуються на 375 мм/хв, 100% потужності, 1 проход
.3,0 мм Lauan має CUT на 900 мм/хв, 100% потужність, 5 проходів. Цей матеріал має дуже м'яку серцевину, і якщо різати занадто повільно, розріз горить дуже широко і виглядає непривабливо. Збільшення швидкості та кілька проходів мінімізують це.
Лінійні гравіювання зазвичай виготовляються зі швидкістю 1200 мм/хв, 35% потужності, 1 проход
.Велика гравіювання на боці піаніно встановлена на 800 мм/хв, 18% потужності, один прохід. Повільніша швидкість і потужність створюють чітке гравіювання без надмірної зміни кольору для дуже завантаженого вектора.
Клавіатура трохи складніша. Контур клавіатури викарбуваний як LINE зі швидкістю 1500 мм/хв, 40% потужності, одним проходом. Темні клавіші використовують функцію MULTI у LB. Перша операція MULTI — ЗАПОВНИТИ клавіші на 2500 мм/хв, 45% потужності, 150 dpi. Друга операція MULTI — це ЛІНІЯ навколо патерну FILL зі швидкістю 1200 мм/хв, 35% потужності, один прохід
.Крок2: Зберіть звукову коробку на основі

Sound Box дозволяє звуку з динаміка телефону проходити крізь корпус піаніно. Верхній сріблястий компонент із різьбленими овалами — це місце, де телефон зрештою буде лежати. Чотири срібні частини Звукової Коробки збирають на основі і фіксують суперклеєм.
Крок3: Зберіть обгорнуту сторону та передню задню панелі


Три частини для сторони з обгорткою притискаються разом, а потім крапля суперклею на зворотній стороні їх фіксує. Дві частини Backplate збираються однаково.
Один кінець бічного вузла прикріплений до Backplate. Потім Backplate притискається до язичок на звуковій коробці.
Крок4: Закріпіть обхідну збірку на основі


Сторона Wrap-Around розташована на основі, а вкладки на основі вирівнюються з вирізами на бокових частинах. Наразі клей не наноситься. Верхня частина кільця на периметрі потім розташовується. Елемент Кільця має ті ж язики, що й Основа, і фіксує верхню частину Сторони у своєму положенні.
Суперклей наноситься на всі виступи/вирізи з обох боків збоку. Всередині нижній край Side закріплений до основи краплою білого клею.
Деревний клей наноситься на з'єднання між боковими компонентами поруч із Sound Box і затискається, поки клей затвердів
.Крок5: Зібрати та встановити задні ніжки до основи

Кожна задня нога складається з двох частин, кожна з яких гравірується з одного боку. Язички на ніжках вставляються у прорізи на основі, після чого кожен вузол Ніг затискується. Суперклей наноситься на вузли ніг, а також на вкладки.
Крок6: Зберіть саундбар і педалі


панелі становить близько 55 градусів і перенаправляє звук з динаміка телефону вперед, підсилюючи його. Кріплення кріплення приклеєні до задньої частини звукової плати.
Складка педалей складається з двох частин: педалей і підтримуючого кронштейна. Язички педалей вставляють у кронштейн і фіксують суперклеєм.
Крок7: Зберіть передні ніжки та клавіатуру


Кожна половина передніх ніг скріплена разом і нанесена суперклей. Потім язички на кінцях клавіатури вставляються у передні ніжки і склеюють деревним клеєм.
Крок8: Прикріпіть клавіатуру/ніжку до піаніно

Деревний клей наноситься на передні ніжки та нижню частину клавіатури. Потім збірку розміщують на піаніно, і клей дає затвердіти.
Крок9: Встановіть передню панель, звукову плату та педалі


кріплення передньої панелі до задньої панелі використовується деревний клей, який затискають до висихання клею
.Для саундборду та педалей дерев'яний клей наноситься на язички обох вузлів, після чого вузли вставляють у відповідні слоти в основі.
Крок10: Збери підтримку телефону і прикріпи її до верхньої частини


Примітка: спочатку я планував використати морильоване дерево для підтримки та верхньої частини телефону. Однак виглядало це не дуже добре (чесно кажучи, виглядало дуже погано).
Я ВИРІЗАВ нові компоненти і потім їх пофарбував. Для верхньої частини виріб був ВИРІЗАНИЙ, а потім пофарбований у сріблястий колір. Коли фарба висохла, її повертали на лазерну платформу, і дві профільні LINE гравірували.
Требловий кліф складається з двох частин. Передня частина пофарбована в золото, а задня частина — у сріблястий колір. Зверніть увагу на використання функції TABS на требловому кліфі, щоб зберегти символ недоторканим.
Крок11: Закріпіть верхівку до піаніно


Краплі клею Gorilla використовуються для кріплення верхньої частини до корпусу піаніно. Через кілька годин затискачі зняли, і піаніно ГОТОВЕ!
Ремікси


Вам також може сподобатися

3D-підставка для телефону, лазерний виріз. Дерев'яна підставка для телефону з візерунком. Підставка з квітковим візерунком лазерною вирізкою. Тримач мобільного телефону svg


Вертикальні стійки підсилювача


Тримач мобільного телефону


Складений тримач і підсилювач для гудка


Ісламський мобільний стенд


Лазерно вирізана дерев'яна міні-рояльна підставка для телефону та підсилювач з кабелем


Тримач для мобільного телефону жирафа


Підставка для телефону, дизайн лазерного різання. Малювання лазерного розрізу, лазерний візерунок, мобільний тримач. Декор столу, офісний аксесуар, святковий подарунок.


Металевий тримач для мобільного телефону


Стійка для сонцезахисних окулярів


Ювелірний кіоск


Стенд із кавовими капсулами

Мобільна трибуна


Підставка для мобільного телефону


Чотириярусна виставка


Простий кіоск з кавовими зернами


Підставка для телефону та динамік


3D-підставки для телефонів, лазерно вирізані в пучку, лазерний виріз. Дерев'яна підставка для телефону з візерунком. Геометричний візерунок. Квітковий тримач для мобільного телефону svg. 10 Дизайни